How to open boot menu on lenovo laptop. Login to BootMenu on computers and laptops
Microsoft engineers have implemented a boot store, also known as Boot Configuration Data (BCD), and a boot menu in Windows. The first contains the bootloader identifiers of all operating systems available on the PC, and the second reads them and displays them as a list of OSes available for launch. This greatly simplifies the life of a user who has several systems on his computer. He does not need to be smart about something to switch between them. It is enough to restart the computer and select the one you need from the list presented. Like other parts of the Windows OS, the boot menu is customizable. This guide lists available ways editing this section.
Note: almost all the actions described in this manual must be performed from under account with administrator rights. V otherwise you must know the password for it.
Editing the Windows 10 boot menu in the bootloader window
Menu Windows boot 10 has a small settings section. It provides a minimal set of options - changing the value of the timer auto start the main system, changing the OS loaded by default, as well as an additional section with system startup modes and a computer shutdown function.
Editing the Windows 10 Boot Menu in System Options
In the additional system settings, which can be accessed through the OS properties, there is a section. It stores a small list of functions for editing the boot menu, which is suitable for undemanding users. So with its help you can choose which operating system will be loaded by default, set the display time of the list installed systems or turn off the timeout altogether, as well as activate the output of recovery options.

To get to the specified section, you need to do the following:

Editing the Windows 10 Boot Menu in System Configuration
If you need a little more customization, you can try the utility system configuration. In addition to the mentioned settings, it offers the function of deleting boot entries of operating systems, an option to display information about the OS, the ability to start Windows without a graphical shell, select boot options safe mode and a few other minor features.
You can edit the boot menu using System Configuration as follows:

How to Edit Windows 10 Boot Menu Using EasyBCD
EasyBCD- free utility, which provides a wide range of options for editing the boot menu. In comparison with it, all standard system tools (except the Command Line) look very primitive.
This compact program allows you to:
- Remove OS from the list of available to run.
- Add new Windows entries(including obsolete), Linux / BSD, Mac.
- Add entries to install systems using ISO images or individual hard disk partitions.
- Rename operating system entries.
- Set system as default.
- Change the position of entries in the list.
- Set boot menu language.
- Select bootloader interface shell (Metro or earlier from Windows Vista / 7).
- Set the timeout duration.
- Back up and restore boot storage (BCD) settings.
- View BCD content and boot menu.
The program interface is completely localized into Russian, and the program itself is quite easy to use and does not require any supernatural abilities from the user.


How to rename the system entry in the boot menu

How to move the system entry to the boot menu

How to choose a default boot system

How to change the boot menu display time

How to change boot menu language

How to Edit Windows 10 Boot Menu Using Command Prompt
If you don't trust third party programs and try to use exclusively system tools, then you should try out ways to edit the Windows 10 boot menu using the command line.
Create or restore a Windows Boot Store backup
Before doing all the steps, back up your download storage so that you can restore it if necessary. You can create a BCD backup in the following way:

How to add a system entry to the boot menu

How to remove the system entry from the boot menu

How to change the order in which systems are displayed in the boot menu
To edit the position of entries in the loader, use the command bcdedit /displayorder (ID2) (ID1) (ID3). Instead of all ID specify the actual entry codes in the order in which you want to see them during computer startup. 
Good day to all.
When installing Windows (for example), it is very often necessary to select bootable media other than hard drive. You can do this in two ways:
1) Enter the BIOS and change the boot queue (i.e. put the flash drive in front of the HDD in the boot queue - this way the PC will first check the flash drive for boot records, and only then the hard drive);
2) Call boot menu and in it select a specific media to boot into this moment. In my opinion, this option is even better than the first one: it's faster and you don't need to go back and forth in the BIOS to change the boot queue.
To enter the BIOS (call the Boot Menu) in most cases, the keys are used: F2, Del, Esc, F12 (depending on the device manufacturer). The button must be pressed immediately after turning on the computer (you can several times so as not to miss the right moment.
By the way, if you look closely at the first screen, which is visible immediately after turning on the computer, then a button is often written on it to enter desired settings(calling the menu). Screenshot example below.
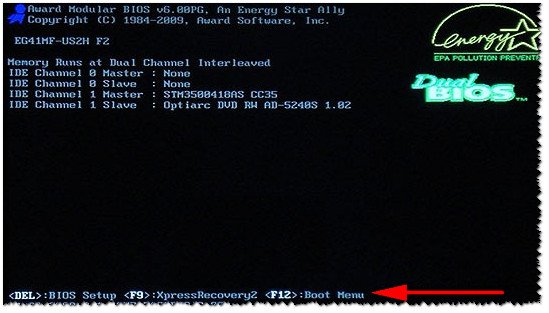
Rice. 1. Dual Bios. DEL button - entrance to BIOS settings, F12 button - Call Boot Menu.
Table number 1: keyboard shortcuts for computers
To use the table - you need to know what motherboard you have, BIOS version. There are several ways to find out, here are the fastest:
![]()
Simple free program, which will tell you quite a lot about your hardware. For example, you can find out information about: the processor (CPU), random access memory(Ram), motherboard (Motherboard), video card (Graphics), HDD drives, SSD (Storage), etc. In addition, you can learn and control in the mode online temperature main components: hard disk, video card, processor.
A screenshot of this utility is shown in Fig. 2.

Rice. 2. Speccy - getting information about the motherboard
Table #1
| Motherboard | BIOS version | hot key | Which menu will be open |
|---|---|---|---|
| Acer | Del | Enter Setup | |
| F12 | boot menu | ||
| ASRock | AMI | F2 or DEL | run Setup |
| F6 | Instant Flash | ||
| F11 | boot menu | ||
| TAB | switch screen | ||
| Asus | Phoenix Award | DEL | BIOS Setup |
| TAB | Display BIOS POST Message | ||
| F8 | boot menu | ||
| Alt+F2 | Asus EZ Flash 2 | ||
| F4 | Asus Core Unlocker | ||
| BioStar | Phoenix Award | F8 | Enable System Configuration |
| F9 | Select Booting Device after POST | ||
| DEL | Enter SETUP | ||
| Chaintech | Award | DEL | Enter SETUP |
| ALT+F2 | Enter AWDFLASH | ||
| ECS (Elite Grour) | AMI | DEL | Enter SETUP |
| F11 | BBS POPUP | ||
| FoxConn (WinFast) | TAB | POST Screen | |
| DEL | SETUP | ||
| ESC | boot menu | ||
| gigabyte | Award | ESC | Skip memory test |
| DEL | Enter SETUP/Q-Flash | ||
| F9 | Xpress Recovery Xpress Recovery 2 | ||
| F12 | boot menu | ||
| Intel | AMI | F2 | Enter SETUP |
Table number 2: hot keys (Bios / Boot Menu, etc.) for laptops
Note: on modern laptops, the key combination in Windows also works: hold down the SHIFT button + select the restart button with the mouse.
The Boot Menu is a small window in which, using the mouse (arrows on the keyboard), you can select the device from which to boot. An example of such a menu is shown in Fig. 3.
Depending on the manufacturer of your device, the menu may be slightly different, but the principle of operation is the same everywhere.

Table number 2
| Notebook manufacturer | BIOS version | hot key | Function / menu call |
|---|---|---|---|
| Acer | Phoenix | F2 | Enter Setup |
| F12 | Boot Menu (Change Boot Device,Multi Boot Selection Menu) | ||
| Alt+F10 | D2D Recovery (disk-to-disk system recovery) | ||
| Asus | AMI | F2 | Enter Setup |
| ESC | popup menu | ||
| F4 | Easy Flash | ||
| Phoenix Award | DEL | BIOS Setup | |
| F8 | boot menu | ||
| Benq | Phoenix | F2 | BIOS Setup |
| Dell | Phoenix,Aptio | F2 | Setup |
| F12 | boot menu | ||
| eMachines (Acer) | Phoenix | F12 | boot menu |
| Fujitsu-Siemens | AMI | F2 | BIOS Setup |
| F12 | boot menu | ||
| Gateway (Acer) | Phoenix | Click mouse or Enter | Menu |
| F2 | BIOS Settings | ||
| F10 | boot menu | ||
| F12 | PXE Boot | ||
| HP (Hewlett-Packard)/ Compaq | Insyde | ESC | Startup Menu |
| F1 | System Information | ||
| F2 | System Diagnostics | ||
| F9 | Boot Device Options | ||
| F10 | BIOS Setup | ||
| F11 | System Recovery | ||
| Enter | Continue Startup | ||
| Next | F1 | Call Boot Menu | |
| F2 | BIOS setup | ||
| Lenovo (IBM) | Phoenix SecureCore Tiano | F2 | Setup |
| F12 | Multi Boot Menu | ||
| MSI (MicroStar) | *** | DEL | Setup |
| F11 | boot menu | ||
| TAB | Show POST screen | ||
| F3 | Recovery | ||
| Packard Bell (Acer) | Phoenix | F2 | Setup |
| F12 | boot menu | ||
| Toshiba | Phoenix | Esc,F1,F2 | Enter Setup |
| Toshiba Satellite A300 | F12 | bios |
Table number 3: recovery from a hidden partition (for laptops)
Most modern laptops have a dedicated hidden section with the ability to restore Windows using a "pair" of keys (no need to prepare a bootable USB flash drive, download ISO images with Windows, etc.).
As a rule, to start the recovery function, after turning on the laptop, just press one key (F9, for example, on Asus laptops). Next, a window will appear in which you need to follow the instructions of the recovery wizard.
Note: when restoring information, system disk"C:\" is often formatted and all information is removed from it. Make a copy of important data from it in advance.

Rice. 4. ACER laptop - service recovery utility
Table #3
| Notebook manufacturer | Button combination | Note |
|---|---|---|
| Acer | Alt+F10 | First you need to log in laptop bios, and enable D2D Recovery. In the recovery system, by default, the password is set: 000000 or AIM1R8. |
| Asus | F9 | |
| Dell Inspiron | Ctrl+F11 | |
| Fujitsu-Siemens | F8 | |
| HP | F10, F11 | |
| LG | F11 | |
| Lenovo ThinkPad | F11 | |
| MSI | F3 | |
| Packard Bell | F10 | |
| RoverBook | alt | |
| Samsung | F4 | |
| Sony VAIO | F10 | |
| Toshiba | F8, F11 |
PS
The tables will be updated (over time). For additions on the topic of the article - a big merci in advance. Good luck to all!
Boot Menu (boot menu) can be called when turned on on most laptops and computers, this menu is a BIOS or UEFI option and allows you to quickly choose which drive to boot your computer from this time. In this manual, I will show you how to enter the Boot Menu on popular laptop models and PC motherboards.
The described feature can be useful if you need to boot from a Live CD or bootable flash drive to install Windows and not only - it is not necessary to change the boot order in BIOS, as a rule, it is enough to select the desired boot device in the Boot Menu once. On some laptops, the same menu gives access to the laptop's recovery partition.
I'll write first general information by entering the Boot Menu, nuances for laptops with Windows 10 and 8.1 preinstalled. And then - specifically for each brand: for Asus, Lenovo, Samsung and other laptops, Gigabyte, MSI, Intel motherboards, etc.
General information on entering the BIOS boot menu
Just as to enter the BIOS (or configure the UEFI software) when you turn on the computer, you must press a certain key, usually Del or F2, so there is a similar key to call the Boot Menu. In most cases, these are F12, F11, Esc, but there are other options, which I will write about below (sometimes information about what you need to press to call the Boot Menu appears immediately on the screen when you turn on the computer, but not always).
Moreover, if all you need is to change the boot order and you need to do this for some one-time action ( Windows installation, virus check), then it is better to use the Boot Menu, and not to put, for example, .
In the Boot Menu, you will see a list of all devices connected to the computer that are currently potentially bootable ( hard drives, flash drives, DVD discs and CD), as well as, possibly, the option of network booting the computer and starting the recovery of a laptop or computer from a backup partition.
Features of entering the Boot Menu in Windows 10 and Windows 8.1 (8)

For laptops and computers that originally shipped with Windows 8 or 8.1, and soon with Windows 10, you may not be able to enter the Boot Menu using these keys. This is due to the fact that shutdown for these operating systems is not in the full sense of the word a shutdown. This is more like hibernation, and therefore the boot menu may not open when you press F12, Esc, F11, and other keys.
In this case, you can do one of the following:

One of specified ways should definitely help with entering the boot menu, provided everything else is done correctly.
Entering the Boot Menu on Asus (for laptops and motherboards)
For almost all desktop computers with motherboards Asus, the boot menu is entered by pressing the F8 key after turning on the computer (the same time we press Del or F9 to enter BIOS or UEFI).

But with laptops there is some confusion. To enter the Boot Menu on ASUS laptops, depending on the model, when you turn it on, press:
- Esc - for most (but not all) modern and not so models.
- F8 - for those Asus laptop models whose name starts with x or k, for example x502c or k601 (but not always, there are x models where the Boot Menu is entered by pressing the Esc key).
In any case, there are not many options, so you can try each of them if necessary.
How to enter the Boot Menu on Lenovo laptops
For almost all Lenovo laptops and all-in-ones, you can use the F12 key to enter the Boot Menu when turned on.

Also additional options downloads for Lenovo laptops can be selected by pressing the small arrow button next to the power button.
Acer
The next most popular model of laptops and monoblocks with us is Acer. Entering the Boot Menu on them for different BIOS versions done by pressing the F12 key at power on.
However, on Acer laptops there is one feature - often, entering the Boot Menu by F12 does not work on them by default, and in order for the key to work, you must first enter the BIOS by pressing the F2 key, and then switch the "F12 Boot Menu" parameter to the Enabled state, after then save the settings and exit the BIOS.

Other models of laptops and motherboards
For other laptop models, as well as PCs with different motherboards, the features are smaller, and therefore I will simply list the Boot Menu entry keys for them in the form of a list:
- HP All-in-Ones and Notebooks - F9 or Esc, then F9
- Dell laptops - F12
- Samsung Notebooks - Esc
- Notebooks Toshiba - F12
- Motherboards Gigabyte - F12
- maternal Intel boards- Esc
- Asus motherboards - F8
- Motherboards MSI - F11
- AsRock-F11
It seems that he took into account all the most common options, and also described the possible nuances. If suddenly you still can’t enter the Boot Menu on any device, leave a comment indicating its model, I will try to find a solution (and do not forget about the moments related to fast loading in latest versions Windows, as I wrote above).
After installing several operating systems on a computer, for example, Vista and Windows 7, the initial boot menu settings are lost, leading to the fact that every time you start the PC you have to choose which OS to boot from and which parameters to apply. The process, let's say, is unpleasant, since it takes a lot of time. In this case, restoring the original appearance of the boot menu by editing the system startup order in the Windows bootloader will help return the situation to its course. However, it can be done in more than one way.
Option #1: Debugging via the "System" Control Panel
In order to start the process of restoring the settings and remove additional boot options from Windows bootloader using this method, first you need to enter the "System" section. You can do this in different ways:

In any case, the "System" window will be displayed on the screen. In it we find and select the "Advanced system settings" section, and then click in the system window that appears opposite the "Startup and recovery" tab, the "Settings" button:

As a result, users are given the opportunity to:
- change the order of startup of operating systems by selecting the OS that is loaded by default;
- determine the waiting time (timeout) before starting the system;
- remove the list of available OSes in the boot menu:

Perhaps it is easy to see that the advantage of this method is the simplicity and speed of solving the problem with editing the boot menu. However, it would hardly be logical to deny that only the most basic parameters can be determined with its help. Windows startup.
Option #2: Configuring with the System Configuration Utility
It is also possible to remove unnecessary variants of operating systems installed on the computer from the Windows bootloader by editing the settings in the System Configuration utility. You can open it in different ways:
One way or another, after the system window "System Configuration" appears on the monitor screen, to restore standard method Starting Windows, you will need to enter the "Download" section. Here, in particular, you can make settings such as:
- remove an extra entry from the Windows bootloader;
- assign one OS to run by default;
- set a timeout at system startup;
- set maximum memory, number of executable processes, PCI lock:

Thanks to the simple and clear interface utilities, the process of performing each of these actions is not difficult. For example, in order to remove an unnecessary OS from the start menu, just click on it with the mouse and click the "Delete" button. Accordingly, in the “Timeout” section, the system start delay time is set, and so on.
Option #3: Restoring default settings via the bcdedit.exe command
The process of restoring the standard boot on the OS computer can also be started by working in the bcdedit.exe utility. It is located in the Windows\System32 folder, but you can only run it with administrator rights through command line.
The easiest way to do this is, of course, to use search string available in the start menu. In this case, the procedure will be as follows:
- enter the "Start" and set the search word cmd;
- click right click mouse on the displayed result in the list of programs and define for it "Run as administrator":

After the “Command Prompt” opens, first of all, you should take care of saving backup bootloader for later access to quick recovery data. To do this, create the BCDREZ folder on drive C, and then type bcdedit /export C:\BCDREZ\bcd into the command line and press Enter. In the future, to undo all changes and restore basic settings it will be enough to use the bcdedit /import C:\BCDREZ\bcd command.
Each computer / laptop has its own firmware (BIOS) and its appearance and functionality depends on the manufacturer, model and software version of the device (year of manufacture). The boot menu is part of the BIOS and may look different. The method of calling the boot menu also depends on the device model, but usually it is a constant (so as not to miss) pressing a certain button immediately after turning on the computer.
Consider the most common boot menu keys for various manufacturers of laptops and motherboards:
| Motherboard | Key |
| AsRock | F11 |
| Asus | F8 |
| Intel | Esc |
| gigabyte | F12 |
| MSI | F11 |
| Notebook | |
| Acer | F12 |
| Asus | Esc |
| Dell | F12 |
| HP | Esc > F9 |
| Lenovo | F12 |
| Packard Bell | F12 |
| Samsung | Esc |
| Sony Vaio | F11 |
| Sony Vaio | Assist |
| Toshiba | F12 |
As I said earlier, the boot menu looks different for everyone, but the logic is always simple:
 Usually, the choice from which to boot is made with the "up" and "down" keys, and the final choice is "Enter".
 On new computers and laptops, the new Windows 8 OS is installed, and with it, hardware manufacturers have found a BIOS replacement - UEFI. A more sophisticated firmware that has an interface that can rightfully be called graphical, and sometimes even pretty. By default, these computers have " fast loading", which in most cases does not allow you to get into the boot menu in the usual way, and indeed into the BIOS settings themselves.
The simplest option is to solve the problem from operating system: you need to hold down the "Shift" button and send the machine to reboot. Service should appear. windows menu 8.
 By the way: sometimes the function of calling the boot menu is disabled by default in the BIOS. great example there will be Sony Vaio laptops: to boot from a USB flash drive, you must enable special option in BIOS - "External device boot". Also, when booting from a regular flash drive, sometimes it is defined as HDD- is the norm


