The system drive is loaded on 100 windows 10. The hard drive is fully loaded: causes and solutions
Very often a problem arises when, due to the fact that the hard drive is 100 percent loaded in Windows 8, the system starts to slow down. In some cases, this can lead to freezes and data loss. This phenomenon can also be observed in earlier Windows versions, however, in the "eight" this problem is much more common.
Before moving on to solving the issue, you should understand why this happens, which programs can cause heavy loading of the HDD (hard drive), and also in what cases this is normal. This knowledge will help you in solving the problem associated with the heavy loading of the hard drive. We note right away that it is guaranteed to help you -.
Why does Windows 8 load the hard drive at 100 percent
Different programs can load the hard drive, in particular, boot loaders. Such utilities include:
- Service windows updates 8.
- Various downloaders like torrent client, DC++, browsers and so on.
- Games and installation assistant programs.
In addition, to download hard drives can be affected by various malicious programs (so-called viruses). Another reason for the high load may be hiding in the heavy fragmentation of the HDD. This means that you have been using the operating system for a long time, regularly installing and removing programs and various files. In this case, it is recommended.
In addition to all of the above, heavy loading and braking of the system can occur as a result of wear and tear. hard drive. It should be understood that each part of the computer has a certain resource. Moreover, the service life may vary depending on how you use it.
As a rule, if an operating system is installed on the hard drive, and you constantly install and remove various programs, games, and so on, then the life of the HDD can be significantly reduced and be about 5-7 years. If you use it as an additional memory storage for storing files, then the life will be much longer.
Checking the performance of the hard drive is quite simple. There are various utilities for this, for example, Victoria or HDD Regenerator. However, it is worth remembering that it is not recommended to perform such checks unless necessary, as they also reduce the life of the device. It is recommended to use them only in cases where you have any problems with the drive.
How to install an SSD hard drive in a computer: Video
Solving the problem with a strong loading of the hard drive
It goes without saying that, depending on the source of the problem, the solution will be different. In order to see which process in Windows 8 loads the hard drive at 100 percent, you should open the "Resource Monitor". This is done in the following way. Sign in to your desktop. Click right click mouse on the taskbar and select "Task Manager" in the menu that appears.

In the window that opens, click the "Details" button, it is located at the bottom of the menu. Here, open the "Disk" tab and see which processes are loading the hard drive. In this program, you can not only watch processes, but also complete them.


If it is system update services or some kind of bootloader, then to solve the problem, just wait for the data to load. If you do not want to wait, then just close the corresponding program. Downloaders such as UTorrent or DC++, in addition to downloading, can distribute information, so they scan the hard drive and share files. At these moments, there is a high load on the disk.
If this does not help, then check the system with some antivirus. It is possible that the computer was infiltrated malware. Another reason for the heavy loading of the hard drive is that the Windows 8 operating system has a temporary SWAP file. It does not have a certain amount and is necessary in cases where the system does not have enough RAM. In such cases, this file occupies a certain place on the HDD, using it as virtual RAM. The solution to this problem is to expand the RAM.
If you checked the hard drive with Victoria or HDD Regenerator and you have bad sectors(Bad sector), this means that it is time to purchase a new HDD, since the old one is already on the verge of failure. Of course, it can still be used for a long time, but only as an additional drive, since if you use it as the main one, then at any time you can lose important data.
Windows 8 does not see external hard drive: Video
The Windows 10 operating system has received a huge number of updates over the past few years, which, of course, is great from Microsoft, but here's the problem - disk usage is 100%. To put it more precisely, when the system installs updates for itself, it often loads your disk at 100 percent. As soon as the installation completes, the disk usage should also disappear, but sometimes this does not happen and the user's disk can get stuck in this endless cycle of loading.
Some users, in fact, sometimes do not even suspect that their disk is working at full capacity, but simply experience slow work systems. Checking disk usage is incredibly easy using the Task Manager. Don't know where to look? Let's explain.
You can check the usage of your disk in the Task Manager in the tab with running processes. You have probably already used this system program, but simply did not pay attention to the disk load column (meaning newbies with Windows).
- Click ALT+CTRL+Delete on your keyboard.
- Select "Task Manager" from the list of actions.
- Select the Processes tab.
- In this tab, you can see a column named "Disk". It is in it that the total load on your disk will be indicated.
Method #1 Disable Windows Search
Disabling Windows Search has proven to be the most helpful action for most users in dealing with this issue. In more detail, Windows Search scans your files and folders, and then enters the information recorded from them into an index file. It is for this reason that this service is also known as SearchIndexer.
The benefit of Windows Search is that it speeds up the process of finding your files. But, shutdown Windows Search will not give any noticeable effect. The only negative will be a slight increase in time to search for files and folders. Although, if you do not perform frequent search terms through tons of different files and folders, then you have nothing to worry about.
Follow the steps below to disable Windows Service Search:
- Click Win once.
- Right-click on the result that appears and select "Run as Administrator".
- Once Command Prompt opens, type exe stop “windows search”(with brackets) and press Enter.
- Wait while the system stops the Windows Search service. You should see an appropriate message that the service terminated successfully.
Keep in mind that disabling Windows Search is not permanent, but only temporary. Open Task Manager and look at disk usage. If it has decreased, then you can start the service you just disabled with these steps:
- Click Win+R.
- Write down services.msc and press Enter.
- You will see a huge list with the services that operate on your operating system. Find in the list Windows Search.
- Double click on Windows Search.
- Click the Startup Type drop-down menu and select Disabled.
- Also click on the "Stop" button if the service has not been stopped yet.
- And finally,
In fact, disabling this service is not the recommended action. But, if you want to try to cope with the problem of disk utilization at 100%, then everything is in your hands. One way or another, if nothing happens, then use the above steps and enable the service.
Method # 2 Disabling Message Signaled Interrupt Mode (firmware bug)
Disabling Message Signaled Interrupt can also help with this issue, according to online user claims. StorAHCI.sys is a driver with which a firmware bug can occur causing high disk usage.
- Click Win+R.
- Enter devmgmt.msc and press Enter.
- Double click on IDE ATA/ATAPI controllers.
- Double click on Standard SATA AHCI Controller.
- Go to the "Driver" tab.
- Click on "Details".
- If the driver name matches StorAHCI.sys, then the so-called “driver out of the box” works for you and you need to make a couple of three changes in the Registry Key.
- Go to the "Details" tab of the "Standard SATA AHCI Controller" properties window.
- Click on the "Property" drop-down menu and select "Device Instance Path". Write down the shown knowledge somewhere or just leave the window open.
- Click Win+R.
- Enter regedit.exe and press Enter.
- As soon as the Editor window opens in front of you Windows Registry, go to HKEY_LOCAL_MACHINE→System→CurrentControlSet→Enum→PCI→“Device Instance Path”→Device Parameters→Interrupt Management→MessageSignaledInterruptProperties .
- Click twice LMB on the key MSISUpported on the right side of the window.
- Change the value of this key from 1 to 0.
- Click OK.
Restart your computer and your problem should now be resolved. If you see several controllers in the Task Manager, then repeat all the above steps for each of them.
Method #3 "Use Suggestions to Speed Up Page Loading" feature in Google Chrome
Sometimes, the problem with 100% disk utilization can occur due to the browser Google Chrome and its "Use hints to speed up page loading" feature. Users have complained that given function quite "gluttonous" on system resources. So disabling this feature in Google Chrome can help de-stress your drive.
Follow the steps below to disable the "Use hints to speed up page loading" feature in Google Chrome:
- Open Google Chrome.
- Click on the “ ” icon in the upper right corner of the browser window.
- Select "Settings".
- Go down to the bottom of the settings and click on the "Advanced" button.
- Find the option "Use hints to speed up page loading" in advanced settings and uncheck it. The function will be in the "Privacy and Security" column.
Now close Google Chrome and check your disk usage percentage in Task Manager. It is possible that this function was at the head of the problem.
Method #4 Disable Skype
A huge number of users have been able to fix their high disk usage by simply disabling Skype. There are some programs, such as Google Chrome or Skype, that can use up all your disk resources at times (especially Chrome). So disabling some features or the entire program can help solve the problem. If not, you can enable them again.
- Click Win+R.
- Enter in line C:\Program Files (x86)\Skype\Phone\ and press Enter.
- Right-click on the Skype executable and go to "Properties".
- Go to the "Security" tab, and then click on the "Edit ..." button.
- Select "ALL APP PACKAGES" in the "Groups or Users" section.
- Check the box next to the “Write” option in the “Permissions for the “ALL APP PACKAGES” group” section.
- Click on "Apply" and "OK".
Go to Task Manager again to check for a problem with a 100% loaded disk. You can also try to turn off Skype altogether and see if the voltage comes off the disk.
Method #5 Remove Flash Updates
next possible cause a huge load on the disk could be updates for Flash. This is solved simple removal these Flash updates from the Windows Update History.
The thing is that loaded and installed update could contain a bug, due to which there is an excessive load on the disk. Also keep in mind that Internet Explorer, Microsoft Edge and Google Chrome also come with Flash plugin. So, even if you didn't install Flash yourself, it might already be installed via Windows Update.
Use the following steps to uninstall updates Adobe Flash:
- Press Win on your keyboard.
- Select "Settings" from the Start menu.
- Select Update & Security.
- Select Update History.
- Click on "Uninstall Updates".
- Find Adobe Flash Player and click Remove.
- Follow the additional instructions on the screen.
Restart your computer once the updates have been removed. Check if the problem with 100% disk usage has been fixed.
Note: Do not try to completely remove Flash using the uninstallers available on the official website of the manufacturer. Complete removal Flash may well cause serious problems in the system.
Method #6 Detach OneDrive
It looks like the problem can also come from OneDrive, according to the statements of users on the network. A huge number of Windows users complain that when working with OneDrive, high disk usage can occur. Detaching from OneDrive may resolve this issue.
To disconnect from OneDrive, follow the steps below:
- Right click on the OneDrive tray (lower right corner).
- Select Options".
- Go to the "Account" tab.
- Click on the "Unlink OneDrive" link.
- Click on the "Unlink Account" button.
Now restart your computer and check for the problem.
You can also completely uninstall Microsoft OneDrive using the Programs and Features located in the Control Panel.
Method #7 Disable Windows Notifications
Shutdown Windows notifications was able to solve the problem with 100% disk utilization for many users on the network (as, indeed, all the methods in this article). To turn off Windows notifications, use this instruction:
- Click the button Win on keyboard.
- Select "Settings".
- Click on "System".
- Go to the Notifications & Actions tab.
- Turn off all notifications under the "Notifications" section.
Wait a few seconds, and then head to the Task Manager for another disk usage check. Well, is the disk still in 100% loaded state? Ok, let's move on.
Method No. 8 Reviews and diagnostics
Setting the Feedback and Diagnostics options is a pretty good way to reduce the load on your disk. Typically, your Feedback and Diagnostics is set to either Basic or Full. Changing the setting to Basic settings can reduce disk usage. To do this, do the following:
- Click Win+I.
- Click "Privacy".
- Go to the "Reviews and diagnostics" tab. Click on the "Submit device data to Microsoft" drop-down menu and select the "Basic information" option.
Check the load on your disk. The actions taken should have reduced the load at least a little.
Method #9 Cancel Windows Performance Recorder(WPR)
Windows Performance Recorder Windows performance), as its name suggests, is a tool that is used to record and send a report of your performance directly to Microsoft. It is located in the %SystemRoot%\System32 directory and is preinstalled software. Unlogging Windows performance logging can help you knock 100% disk load off. To do this, do the following:
- Click Win.
- Enter in search string"Command line".
- Right-click on the search result and select "Run as Administrator".
- Enter WPR-cancel and press Enter.
Well, this should have helped. However, be aware that this action will have to be repeated every time the system is rebooted.
Method #10 Disable Connected User Experiences and Telemetry Service
Disabling a service Connected User Experiences and Telemetry can also help you solve this problem.
- Click ALT+CTRL+Delete and select Task Manager.
- Go to the "Services" tab.
- Find the "DiagTrack" service.
- Right-click on it and select Stop.
- Then right-click on it again and select "Open Services".
- Find "Diagnostic Policy Service" in the list of services and double-click on it.
- Click the Startup Type drop-down menu and select Disabled.
- Go to the "Recovery" tab.
- Click on the First failure drop-down menu and select Take no action.
- Repeat the same for the Second and Subsequent failures.
- Click on "Apply" and "OK".
This action is permanent, so you don't have to repeat it every time you restart your computer.
Found a typo? Select the text and press Ctrl + Enter
I have long wanted to write an article about what to do if disk is 100% loaded. I could not solve this problem for a long time, but then I was able to do everything like that. How I did it now I will describe in this article.
So, this phenomenon occurred to me on my laptop, on which I constantly work. By the way, many other users also suffer from this problem, therefore, it needs to be solved, which is what we will do now.
What was in the beginning?
Let's say you bought a nice, powerful laptop with operating system Windows 8. For some, it seems powerful, unlike Windows 7, for some it's the other way around. In any case, they say that it works quickly.
The first time is really true. You will work as usual, use programs, play games, and do other things. Everything will work quickly.
After a few months of use, working on a laptop turns into hard labor. It starts to turn on for a very long time, you can’t wait for the launch of programs either.
Such signs may indicate that the disk is 100% busy. To verify this, open the task manager, go to the tab "Performance" and see if the disk is loaded. If yes, then we will try to do something.
You can order subscribers to a Telegram channel on the DoctorSmm website. Here you will find not only some of the most low prices Runet, but also advantageous offers that will suit specifically your community on the network. Hurry up, while pleasant wholesale discounts are on the site, and the choice of the speed mode of resource receipt is also available.
If the problem is not the disk
If you're not sure if your slow computer problem is disk related, try the following:
- Check if it's clogged system disk. The main thing is that the strip is not red.
- Use CCleaner to clean up junk.
- We clean programs from startup.
- With the help of an antivirus.
- Try to remove suspicious programs that can load the system.
We solve the problem with loading 100%
When we went into the task manager, we may have seen that the disk was 100% loaded, but actually, where and what does it write to?
One of the problems is an innovation implemented in Windows by Microsoft. It is needed in order to.
This technology is called and designed to quickly log in after sleep. This is done by writing information from RAM to .
Now it is clear why our system slows down so much and the disk is heavily loaded. But as it turned out this service can be disabled.
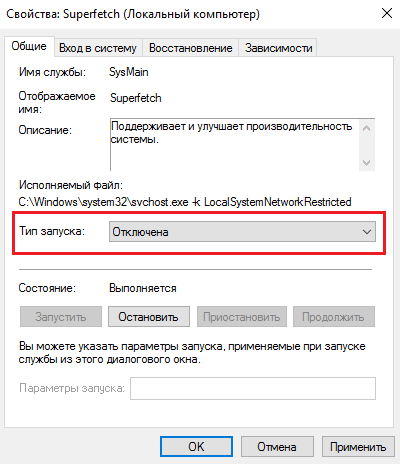
For this we go to Control Panel and looking for Administration».
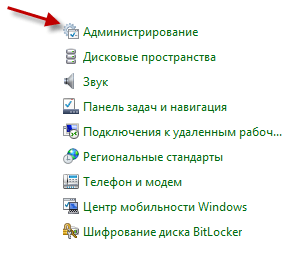
Now open the item Services". Scrolling and looking for a service Superfetch.
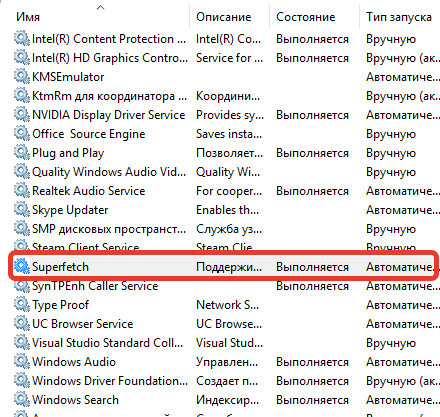
Right click on it and click " Stop».

For greater efficiency, click on this RMB service again and go to " Properties". Choose the launch type Disabled” so that the next time the system is started, the service will not turn on again.
Personally, when I switched to the task manager, the load on the disk dropped sharply and was 0-20%. You can try to enable the Superfetch service again and make sure that the disk will boot to full again.
Addition
I found that some users contacted Microsoft support with this problem, but they just shrugged and said that nothing could be wrong. Allegedly, the system is in perfect order. Also, they say that the problem is in the hard drive itself.
Thus, we still found the reason for loading the disk at 100%, I think that this is not the only reason, but there are others that will be sorted out and you can find out about them on our website.
If the PC is running Windows 10(sometimes Windows 8) began to work very slowly with a minimum amount of running applications, there may be a problem with the HDD. If the hard disk is used at 100%, it has no reserves for other tasks, so the speed of the computer drops sharply. To check if there is a problem, you need to run Task Manager and see the corresponding value in the table (" Disk"). There are several ways to solve the problem, the application of each of which depends on the cause of its occurrence. It is recommended to start with the first method and work your way down the list.
Method 1: Disable Search in Windows
This service is designed to quickly search for data within the system. You can turn it off, especially if you use Total Commander or its equivalent. " Windows search” can be disabled temporarily to make sure that the cause is in this particular service. The next time you start the system, the service will be available again.
You need to do the following:
- In the console window that opens, enter the command net.exe stop "Windows search";
- Click Enter to confirm your entry.

Test your PC. If the problem with booting the hard drive is solved, you can disable " Windows search" forever:
- Click Windows+R;
- Enter the command services.msc in the text field;
- Find a service Windows search«;

- Right click, open window " Properties»;
- Opposite the entry " Launch type» select list item « Disabled»;
- Click " Apply" and " OK».
Method 2: Disable SuperFetch
This technology allows you to speed up the boot time of the OS and frequently used applications. But Windows users 8 and later have noticed that it can cause 100% hard disk usage.
To stop the service, you must:
- Run command line on behalf of the administrator;
- In the console window that opens, enter the command net.exe stop superfetch ;
- Click Enter to confirm your entry.

Method 3: Run a disk check
To check the volume, do the following:
- Run command prompt as administrator;
- Enter the command chkdsk.exe c: / f (if a message appears that it is impossible to check now, click " Y" and " Enter" to start the process after a system reboot);
- Click " Enter” and wait for the test to finish.


Method 4: Disable virtual memory
This type of memory allows you to expand the amount of RAM on your PC. If RAM full, the OS allocates a portion of the computer's main memory to write application data. Disabling this function may solve the problem with 100% HDD loading.
You need to do the following:
- Right click on " This computer» and open « Properties»;
- Find in the left part of the window the item " Additional system settings»;
- Select tab " Additionally” and press the button “ Parameters" in the area of " Performance»;

- Select tab " Additionally", find the area with the name " Virtual Memory ” and press the button “ Change»;

- Uncheck the box next to " Automatically choose swap file size»;

- Select value " No swap file” to prevent the system from using the HDD memory area.
If the amount of RAM is small, you should specify the size of the paging file, the value of which should be 1.5 times the size of the RAM.
Method 5: Temporarily disable antivirus applications
If additional anti-virus software (Norton, Kaspersky, AVG or others) has recently been installed on the PC, it is necessary to disable them for a while to find out if they are causing 100% hard disk usage.
Windows 10 has its own antivirus application that can provide adequate protection against malicious applications. You can safely disable third-party software for a while without a significant risk of infecting your PC with viruses.

Method 6: Change Chrome and Skype settings
In some cases, the combination of these two applications can cause a problem HDD loading by 100%.
To make settings, follow these steps:
- Open a browser Chrome and go to its settings;

- Scroll down the page and click on the link Additional»;

- Turn off the " Use hints to speed up page loading»;

- Disable Skype if the application is running;
- Go to Windows Explorer to the folder " C:\Program Files (x86)\Skype\Phone\»;
- Right-click on the Skype.exe application icon and select "Properties";
- Select the "Security" tab and click "Edit";
- Select "ALL APP PACKAGES" and set the permission for recording;
- Press the buttons Apply" and " OK».
If the above methods did not solve the problem, the computer may be infected with viruses or the hard drive may be physically damaged. In the first case, you need to completely scan the system for viruses. In the second - replace the HDD.

Windows 10 often has issues with disk utilization at 100%. The computer starts to work slowly and when we go to the task manager, we notice that the disk is 100% loaded. What could be the reasons for this and what to do in this case?
We reinstalled the system, the disk is in full order, only basic set programs, everything seems to be fine, but not quite. But in simple terms, the hard drive is frozen, and in the task manager we can see that the disk usage has increased to a maximum of 100%.
Let's take a look at why the disk is so heavily loaded and check whether this is a short-term situation caused by the action of running programs or the problem is of a long-term nature and how to solve it. An increase in disk utilization can be caused by many factors, so there is no single universal method to solve it.
Windows search engine and file indexing
In Windows 8, 8.1, or 10, the cause may be when the search engine is drawn into a looping process, resulting in increased disk load when searching for files. Fortunately, it can be disabled manually by stopping the search.
To do this, right-click on the Start button and select "Command Prompt (Admin)". Or, in the search bar of the Start menu, type the command "cmd", and then click on it and select "Run as administrator".
To temporarily stop the search Windows systems type in the command line window:
NET STOP "Windows Search"

The Windows Search service will be stopped and the looped process will be closed. Now we go to the task manager and check if the load has decreased and how busy it is. If this method worked and the problem does not appear on the next search, then nothing else needs to be done.
However, the problem may recur after a while, especially if the computer has old disk or the system has problems indexing files. Then you can completely disable indexing, despite the fact that this will slow down the process of searching for files in the system to some extent.
To disable indexing, press Win + R to bring up the Run window. Then enter the command:
services.msc
The services window will open, where you need to find "Windows Search" in the list. 
Double click on it to change its launch options. If the service is running, stop it by clicking the Stop button and then change the startup type from Auto to Disabled. 
Disabling this service will bring some benefit, especially for older computers, where indexing slows down the system a lot.
SuperFetch Service
The disk may be heavily loaded by the SuperFetch service. Her influence on Windows work is of a twofold nature. In most cases, SuperFetch has a positive effect on system performance, as in latest versions Windows 8.1 and 10, and in earlier Vista and "seven". But on some computers it causes problems, including excessive disk usage.
SuperFetch can be completely disabled in the same way as file indexing, in the system services section, which is invoked using the services.msc command. 
In the list we find the service "SuperFetch". Then we open it with a double mouse click, stop it with the "Stop" button and set the "Startup type" to "Disabled".
Antivirus check
Often the hard drive is 100% loaded due to malware infection on the computer. In Windows 8.1 or 10 Task Manager, you can sort loaded processes in the disk usage column. To do this, just click on "Disk" to sort the various processes.
If the disk is loaded at 100 by some unknown process, then you can try to turn it off. If you know which program is responsible for this process, you can remove it. However, if it is unknown EXE file and, especially, its process cannot be terminated due to "Access Denied", you should check your computer with an antivirus.
The reason may be itself antivirus program, which we install after Windows installation 10 - perhaps at this moment it is scanning the disk in background. In this case, wait until it finishes checking and see how busy it is. If the antivirus constantly loads heavily hard drive, then it should be replaced with another one.
Check disk chkdsk
Corrupted files can cause heavy loading. If there are errors reading files and folders, then this will most likely lead to the aforementioned looping process during the search. What to do if there are corrupted files?
You should scan the disk with the chkdsk command with additional options to not only identify problems, but also try to fix them. To do this, launch a command prompt in administrator mode and enter the following command:
chkdsk.exe /f /r

After scanning, we restart the computer and check how much the drive is loaded.
The drive itself may be the source of the problem. If you are using an old hard drive that may have been damaged, it may boot Windows system and cause your computer to slow down. It should be checked for bad sectors, for example, Victoria program or MHDD, and then see how loaded it is. In case of multiple damage, you should consider buying a new one. Sometimes the problem occurs due to a malfunction SATA cable, so it should also be checked.