Word hides the main panel. Pinning a toolbar in Word
In this article
Permanent display of the tape
You can set your Office programs to show all tabs and ribbon commands at all times.
Showing only a row of tabs
IN Office programs you can display only ribbon tabs to, on the one hand, free up space for the document, and on the other hand, to preserve the ability to quickly switch between tabs.

If you click a tab, the commands will be displayed and you can perform the necessary actions. When you return to the document, all commands will be hidden again.
Collapse or expand the ribbon
If necessary, you can collapse the ribbon to make room for the document you are creating. To hide the ribbon, double-click any tab on the ribbon, or press CTRL+1.
To show the ribbon again, double-click any tab, or press CTRL+F1.
If the ribbon does not appear at all
If the ribbon is completely hidden and no tabs are showing, it is probably set to auto-hide. click the "More" icon
In the upper right corner of the screen. This will temporarily restore the tape.
When you click on a document sheet, the ribbon will be hidden again. If you want to always display the feed, follow the steps above to pin it.
additional information
Customize the Ribbon in Office
Ribbon roll
If necessary, you can collapse the ribbon to make room for the document you are creating. To do this, click the arrow collapse arrow in the upper right corner.
To show the ribbon again, click the arrow again.
additional information
Customize the Ribbon in Office
Ribbon roll
The ribbon cannot be removed or replaced with toolbars and menus that were available in previous versions office. However, you can minimize it to free up screen space.
Continuous tape roll
Click the button
Select an item from the list Collapse ribbon.
To use the collapsed ribbon, click the desired tab, and then select the desired option or command.
For example, if the ribbon is collapsed, you can select text in Word document, open tab home and then in the group Font select the desired font size. Immediately after that, the tape will curl up again.
Temporary tape folding
To quickly collapse the ribbon, double-click the name of the active tab. To restore the ribbon, double-click the tab again.
Ribbon Recovery
Click the button Panel setup quick access
Select an item from the list Collapse ribbon.
Keyboard shortcut: To collapse or expand the ribbon, press CTRL+F1.
support.office.com
Customize the Quick Access Toolbar - Office Support

Notes:
You can only add commands to the Quick Access Toolbar. You cannot add the contents of most lists, such as indentation and spacing values, or individual styles available on the ribbon, to it. However, you can customize the ribbon however you like. For example, you can create your own tabs and groups for frequently used commands.
Intended action:
How to add commands to the Quick Access Toolbar
Adding a command that is not on the ribbon to the Quick Access Toolbar
Removing a command from the Quick Access Toolbar
Reorder commands on the Quick Access Toolbar
Grouping commands by inserting a separator between them
How to move the Quick Access Toolbar
Customizing the Quick Access Toolbar with Options
Restoring Quick Access Toolbar Defaults
Export Customized Quick Access Toolbar
Importing a Customized Quick Access Toolbar
Reasons for the green ball icon

Note: In issue 2007 Office systems you can press the button Microsoft office, and then click one of the commands right click mice. A context menu will open containing the Add to Quick Access Toolbar command. In Office 2010 after clicking a tab File this option is not available.
Adding a command that is not on the ribbon to the Quick Access Toolbar
Click the button Customizing the Quick Access Toolbar and select the menu item Other commands.

Listed Select commands from select item Commands not on the ribbon.
Find the desired command in the list and click the button Add.
Removing a command from the Quick Access Toolbar
Right-click the command you want to remove from the Quick Access Toolbar and select context menu paragraph Remove from Quick Access Toolbar.
Reorder commands on the Quick Access Toolbar
Customizing the Quick Access Toolbar.
In the window Customizing the Quick Access Toolbar click the command you want to move and click the arrow Move Up or Move down.
Grouping commands by inserting a separator between them
Commands can be grouped using a separator to make the Quick Access Toolbar look like it contains sections.
Right-click the Quick Access Toolbar and choose from the context menu Customizing the Quick Access Toolbar.
Listed Select commands from select item Frequently used commands.
Select <разделитель> and press the button Add.
Use the arrows to place the separator in the right place Move Up And Move down.
If you don't like the current location of the Quick Access Toolbar, you can move it to a different location. If you feel that the place next to the program icon is too far from the work area, you can move the panel closer. When the panel is located below the ribbon, it somewhat limits the size of the work area. So if you want to extend it, it's best to leave the Quick Access Toolbar where it is by default.
Click the button Customizing the Quick Access Toolbar
Select an item from the list Place under the tape or Place above ribbon.
Customizing the Quick Access Toolbar with Options
With the command Parameters You can add commands to the Quick Access Toolbar, remove them, and change their order.
Open a tab File.
On the menu reference select item Parameters.
Click the button Quick Access Toolbar.
Restoring Quick Access Toolbar Defaults
Right-click the Quick Access Toolbar and choose from the context menu Customizing the Quick Access Toolbar.
In the window Customizing the Quick Access Toolbar press the button Restore default settings and select command Restore Quick Access Toolbar Only.
Export Customized Quick Access Toolbar
Ribbon and Quick Access Toolbar settings can be exported to a file that other employees can import and use on their computers.
Open a tab File.
On the menu reference select item Parameters.
Click the button Quick Access Toolbar.
Click an item Import and export and select command Export all settings.
Importing a Customized Quick Access Toolbar
You can import a settings file to change the current appearance of the Ribbon and Quick Access Toolbar. Import settings allows you to ensure the same appearance Microsoft applications Office for all employees or just on different computers.
Important: When you import the Ribbon Customizations file, any previously configured Ribbon and Quick Access Toolbar settings will be lost. If the current settings need to be restored, they should be exported before importing the settings file.
Open a tab File.
On the menu reference select item Parameters.
Click the button Quick Access Toolbar.
Click an item Import and export and select command Import settings file.
For more information about how to customize the ribbon, see Customize the Ribbon.
Reasons for the green ball icon
A green ball icon is displayed if a custom group or command has been added to the Quick Access Toolbar after customizing the ribbon, but has not been assigned an icon.
This icon is used in the following cases:
when adding a custom group to the Quick Access Toolbar;
so that the user-customized ribbon can be distinguished from the default ribbon.
Add an icon representing a custom group or team
Open a tab File.
In a group reference select a team Parameters.
Click the button Ribbon customization.
In the window Ribbon customization on the list Ribbon customization select the added custom group or team.
Click an item Rename and then in the list Symbol click icon.
In the dialog box Renaming press the button OK.
For more information about how to customize the ribbon, see Customize the Ribbon.
In this article:
Moving the Quick Access Toolbar
Adding a Command to the Quick Access Toolbar
Moving the Quick Access Toolbar
There are two options for placing the Quick Access Toolbar.
In the upper left corner next to Microsoft Office button
(default location)
Under the ribbon which is the element user interface Microsoft Office Fluent
If you don't want the Quick Access Toolbar to appear in its current location, you can move it to another location. If you find the default location next to Microsoft Office Button
The distance between the work area is too large to be comfortable, you can move it closer to the work area. The location below the ribbon captures the workspace. Therefore, if you want to enlarge the area of your work, you can save the Quick Access Toolbar to the default location.
Click the button Customizing the Quick Access Toolbar
Select an item from the list Place under the tape or Place above ribbon.
Adding a Command to the Quick Access Toolbar
You can add one of the commands displayed on the Microsoft Office Fluent ribbon to the Quick Access Toolbar.
Buttons that represent commands cannot be increased in size using Microsoft Office options. To do this, you can only reduce the screen resolution.
The Quick Access Toolbar cannot be displayed as multiple lines.
You can only add commands to the Quick Access Toolbar. You cannot add the contents of most lists to it, such as indentation and spacing values, or individual styles available on the ribbon.
To display the command you want to add to the Quick Access Toolbar, select the appropriate tab or group on the ribbon.
Right-click the command, and then select the command from the context menu Add to Quick Access Toolbar.
Notes:
support.office.com
How to pin a toolbar in Word
Writers, copywriters, office workers work in Word text editor takes a lot of time. It is much more convenient to type texts if the bookmarks and their contents are customized for a specific user. Not everyone knows how to pin a toolbar in Word. Setting up command buttons, tools is not a super difficult task.
Pinning a new tab
On a new tab, you can place the necessary tools and shortcuts for your work.
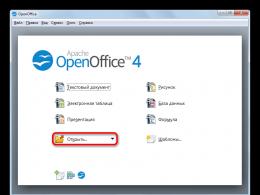
- To pin a new tab to the toolbar, you need to click "File", and select the "Options" item at the bottom left.
- In the opened options text editor Select Ribbon Customization.
- The Customize Ribbon and Keyboard Shortcuts window appears. In it, the "Create Tab" button is pressed at the bottom. This window can be opened faster by right-clicking on the ribbon and selecting "Customize Ribbon..." from the context menu.

In Word 2010, the ribbon appears absolutely empty tab titled "Create Tab". Now it can be filled with the necessary buttons and commands using the ribbon settings.
Adding buttons and commands
The combination of commands in a new tab can be chosen at your discretion, regardless of their location in other tabs.
- Open the ribbon settings, on the left you can see a list of buttons and commands used when working with text.
- The right column - buttons already displayed on the tabs of the ribbon, you can edit and pin new tools in each. To do this, a "New Group" is created in each tab.
- In the left column, the required command is selected, for example, "Create", in the right - the location. In our case, this is "New Group (Custom)". Selected items are highlighted in blue.
- Next, click the "Add" button in the middle of the page.

New commands can be seen on the ribbon tab, the fewer new tools, the larger they are.
You can move the tab to the right in the "Ribbon Settings ..." by clicking on it with the left mouse button and dragging it up or down.
Quick Access Toolbar
You can pin buttons from the toolbar that you use all the time to the Quick Access Toolbar. Moreover, add not only the items proposed by the developers, but also other text editing tools.
- Opening the context menu of the Quick Access Toolbar, select the item "Other commands"
- A window with two columns will open. On the left you can choose essential tool, the buttons on the Quick Bar are displayed on the right.
- Having selected the necessary item on the right, click the "Add" button.


The more tabs and icons, the smaller they become, they become inconvenient to use. Before you pin a toolbar in Word, you need to think about the functionality of the new commands.
windowsfree.ru
How to get the toolbar back in Word
Text editor Microsoft Word very functional. In addition to typing and formatting text, here you can create various shapes, graphs and tables, perform a few simple actions with pictures. And where are all the necessary tools for this? That's right, on the Toolbar.
It is located at the top of the page of an open document, and with Word 2007 on it you see not only tabs, but also the main buttons that are used to work. In this article, we will figure out what to do if the toolbar in the Word has disappeared, and instead of the usual view, only the main names are visible at the top. I'll also tell you about the quick access panel, and how to add all the necessary buttons to it.
If the Word document that you opened looks like the screenshot below, then to restore the toolbar, just click on the small arrow pointing down in the upper right corner of the window.
After that, all the usual groups and commands will be visible again. And if you need to leave only a sheet on the page, then you can hide the top ribbon by clicking on the same arrow, only now it points up. This can be used if you need nothing to distract you while working with a document.
If you have Word 2013 or 2016 installed, then to display the toolbar, you need to click on the "Ribbon Display Options" button, which is located to the right of the file name, next to the minimize, full screen and close buttons.
After clicking, a small menu will open. The first item automatically hides the ribbon - the window expands to full screen and it hides, when you move the cursor to the very top, it appears. When you click on the second item, only the menu items "Home", "Insert", "Design" and others will remain. If you choose the latter option, then it will be possible to fix not only the names of the items, but also the commands - in fact, this is what we need.
Now let's figure out what to do if not the control panel itself disappeared, but some tabs on it. Go to "File" at the top and select "Options" from the list on the left.
A window like this will open. Click the Ribbon Customization tab.
For example, I didn’t have the “Developer” tab on the toolbar. So I put a checkmark next to it. To save your changes, click "OK".
After that, the item we need will appear, and you can use all the commands that are in it.
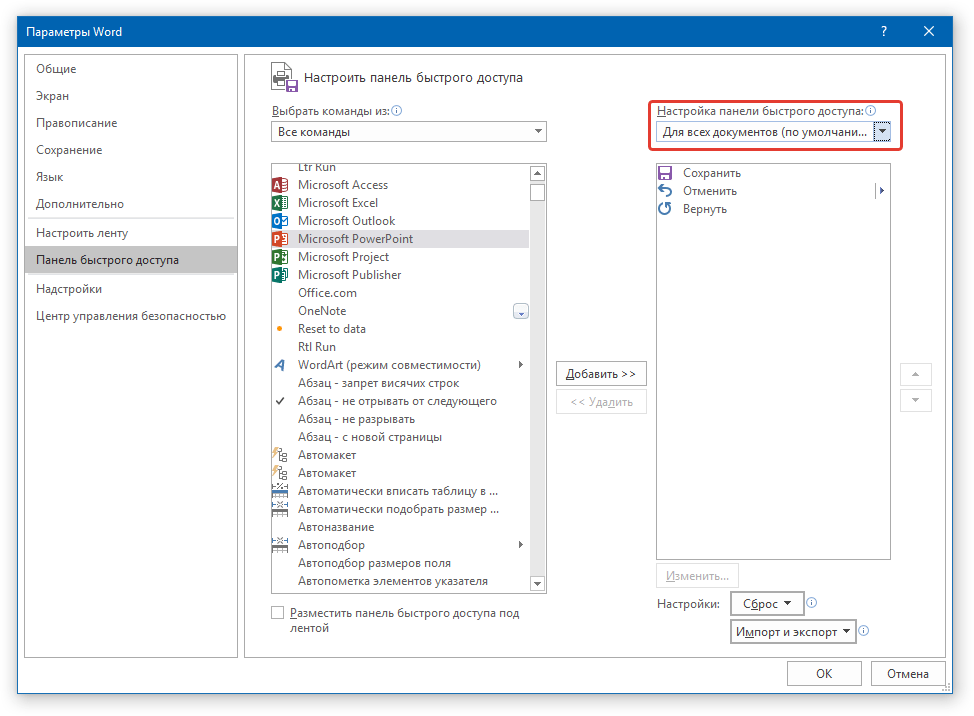
In Word, in addition to the toolbar, there is also a quick access toolbar. You can add icons of those commands that you use most often to it. It is displayed either below or above the ribbon. By default, it has three buttons: save, cancel or redo.
To customize it for yourself, click on the little black arrow pointing down and select "More Commands" from the list.
Look for the desired command in the list, select it with a mouse click, and then click "Add".
Everything that will be in the area on the right will also appear in the quick access toolbar.
If necessary, all items can be arranged in a suitable order for you. To do this, select one and change its position using the up/down arrows on the right. In order for the changes made in Word to be saved for all other files, select "For all documents" in the upper field. When you're done, save by clicking OK.
Removal occurs in a similar way. Open a familiar window, select an unnecessary command and click "Delete". Save by clicking on "OK".
That's all. Now you know not only how to return back hidden panel tools, but also how to customize it and the Quick Access Toolbar in Word.
« Previous post
Next post »
comp-profi.com
Customize the ribbon and toolbars in Office for Mac
In Office 2016 for Mac, you can set Quick Access Toolbar options and customize the Ribbon to your liking. You can change the default tabs or create your own tabs and groups for frequently used commands.
Note: However, it is not possible to rename the standard commands and change the icons assigned to them or their order.
Ribbon customization

Here's how you can customize the ribbon:
Renaming tabs: to rename a tab, for example home, Insert or Constructor, select it in the field Customize Ribbon and select
> Rename.
Adding a new tab or group: To add a new tab or group, click
Under the field Customize Ribbon and select Create tab or To create a group.
Removing tabs: Only custom tabs can be deleted. Select a tab in the field Customize Ribbon and click
Customizing the Quick Access Toolbar
If you just need to quickly access a few commands, use the Quick Access Toolbar. These are the icons that always appear above the ribbon, no matter which tab is selected.

Ribbon customization
Office Application Used:
Word
Reorder tabs
And select the item.
Note: tab home cannot be moved.
Click the button Ready.
Hiding tabs
On the right side of the ribbon, click
And select item Rearrange ribbon tabs.
On the tab, select a command
Click the button Ready.
Show hidden tabs
On the right side of the ribbon, click
And select item Ribbon options.
In section Setting
Showing and hiding groups on tabs
Commands are divided into logical groups, which are located on different tabs. Some groups are hidden by default, but can be made visible.
On the right side of the ribbon, click
And select item Ribbon options.
In a group Setting do one of the following:
On the right side of the ribbon, click
And select item Rearrange ribbon tabs.
Choose a team Reset.
On the right side of the ribbon, click
And select item Ribbon options.
In section General
PowerPoint
Reorder tabs
On the right side of the ribbon, click
And select item Rearrange ribbon tabs.
Drag the tab to the desired location.
Note: tab home cannot be moved.
Click the button Ready.
Hiding tabs
The following steps allow you to hide a tab until the user re-displays it. The tab will remain hidden even if you close and reopen the app.
On the right side of the ribbon, click
And select item Rearrange ribbon tabs.
On the tab, select a command
Click the button Ready.
Show hidden tabs
On the right side of the ribbon, click
And select item Ribbon options.
In section Setting, check the box for the tab you want to display.
Restore the tab order on the ribbon by default
On the right side of the ribbon, click
And select item Rearrange ribbon tabs.
Choose a team Reset.
Hiding and showing group names on the ribbon
By hiding group names, you can free up additional workspace.
On the right side of the ribbon, click
And select item Ribbon options.
In section General do one of the following:
excel
Do one of the following:
Reorder tabs
On the right side of the ribbon, click
And select item Rearrange ribbon tabs.
Drag the tab to the desired location.
Note: tab home cannot be moved.
Click the button Ready.
Hiding tabs
The following steps allow you to hide a tab until the user re-displays it. The tab will remain hidden even if you close and reopen the app.
On the right side of the ribbon, click
And select item Rearrange ribbon tabs.
On the tab, select a command
Click the button Ready.
Show hidden tabs
On the right side of the ribbon, click
And select item Ribbon options.
In section Setting, check the box for the tab you want to display.
Restore the tab order on the ribbon by default
On the right side of the ribbon, click
And select item Rearrange ribbon tabs.
Choose a team Reset.
Hiding and showing group names on the ribbon
By hiding group names, you can free up additional workspace.
On the right side of the ribbon, click
And select item Ribbon options.
In section General do one of the following:
Show or hide the toolbar
Next to the names of the toolbars displayed in this moment, the checkbox is displayed.
When you open an Office application, the same toolbars appear that were displayed the last time you used the application.
If you don't see the buttons on the standard toolbar, click
At the right end of the toolbar. If you are using Office on Mac OS X 10.7 (Lion), this button does not appear on the standard toolbar.
On the menu View hover over element Toolbars, and then select the toolbar you want to show or hide.
Notes:
Docked or floating toolbar
Some toolbars can be docked directly below the standard toolbar. The floating (unpinned) toolbar can be positioned anywhere on the screen.
If the panel does not show a checkbox Pin, it cannot be docked below the standard toolbar. At the same time, any floating panel can be manually dragged and fixed under the menu bar.
If the standard toolbar is displayed, it must be docked.
On the menu View select item Toolbars, and then - Customizing toolbars and menus.
Go to the tab Customizing toolbars and menus.
In column Show indicates the toolbars that are currently displayed.
In section Pin check or uncheck the desired toolbar.
Notes:
Add or remove buttons and commands on a toolbar or menu bar
On the menu View select item Toolbars, and then - Customizing toolbars and menus.
Go to the tab Customizing toolbars and menus.
Check box Show next to the toolbar you want to change.
Go to the tab Teams.
Do one of the following:
Name setting or appearance menu commands or toolbar buttons
On the menu View select item Toolbars, and then - Customizing toolbars and menus.
Go to the tab Customizing toolbars and menus.
In section Show
In section Pin check the box next to the toolbar with the button or command you want to change.
Important: You can change the properties of toolbar buttons or menu commands only if the toolbar is not docked. You cannot change the properties of buttons or menu commands on the standard toolbar.
On the toolbar or menu bar, double-click the button or command you want to change.
Make the necessary changes.
IN Microsoft program Word toolbar disappeared? What to do and how to get access to all those tools without which working with documents is simply impossible? The main thing is not to panic, as it disappeared, it will return, especially since finding this loss is quite simple.
As they say, everything that is not done is for the best, so thanks to the mysterious disappearance of the quick access bar, you can learn not only how to return it, but also how to customize the elements that appear on it. So let's get started.
If you are using Word 2012 and higher, you only need to press one button to return the toolbar. It is located in the upper right part of the program window and looks like an upward arrow located in a rectangle.

Press this button once, the disappeared toolbar returns, press again - it disappears again. By the way, sometimes it really needs to be hidden, for example, when you need to completely and completely concentrate on the content of the document, and so that nothing extra is distracting.

This button has three display modes, you can choose the appropriate one just by clicking on it:
- Automatically hide the ribbon;
- Show only tabs;
- Show tabs and commands.

The name of each of these display modes speaks for itself. Choose the one that is most convenient for you while you work.
If you are using MS Word 2003 - 2010, you must perform the following manipulations to enable the toolbar.
1. Open the tab menu "View" and select the item "Toolbars".
2. Check the boxes next to the items that you need to work.
3. Now all of them will be displayed on the quick access toolbar as individual tabs and/or instrument groups.
Enabling Individual Toolbar Items
It also happens that “disappears” (is hidden, as we have already figured out) not the entire toolbar, but its individual elements. Or, for example, the user simply cannot find any tool, or even an entire tab. In this case, you need to enable (configure) the display of these same tabs on the Quick Access Toolbar. You can do this in the section "Parameters".
1. Open a tab "File" on the Quick Access Toolbar and navigate to "Parameters".

Note: IN early versions Word instead of button "File" there is a button "MS office".
2. In the window that appears, go to the section "Customize Ribbon".

3. In the Main Tabs window, check the boxes next to the tabs you need.

- Advice: By clicking on the plus sign next to the tab name, you will see lists of tool groups that these tabs contain. Expanding the "pluses" of these items, you will see a list of tools presented in groups.
4. Now go to the section "Quick Access Toolbar".

5. Section "Select commands from" select item "All Teams".

6. Go through the list below, finding the necessary tool there, click on it and click the button "Add" between windows.

7. Repeat the same step for all other tools that you want to add to the Quick Access Toolbar.
Note: You can also delete unwanted tools by clicking the button "Delete", and sort their order using the arrows located to the right of the second window.
- Advice: In section "Customizing the Quick Access Toolbar", located above the second window, you can choose whether your changes will be applied to all documents or only to the current one.
8. To close the window "Parameters" and save your changes, click the button "OK".
Now on the quick access panel (toolbar), only the tabs you need, tool groups and, in fact, the tools themselves will be displayed. By properly configuring this panel, you can noticeably optimize work time resulting in increased productivity.
The article is devoted to customizing the interface elements of Word 2010 - the ribbon and the quick access toolbar. After carefully reading the material of the article, you will be able to customize the interface of the program "for yourself". This is very convenient and will help save time when working with Word 2010 further. Moreover, it is possible to save settings for all documents, as well as for a single one.
Quick Style Preview Setting
With the quick style preview setting, you can see in real time what the selected style will look like, as well as the font, line spacing, animation and text color, theme colors and text selection, and more. This is especially true for the most commonly used Home tab (it contains, for the most part, the above commands). To do this, move the mouse cursor over the desired command button.
For example, we want to see how a snippet of text will look in the Strict style with the theme color Blue. To do this, select the fragment of text we need, and then move the mouse cursor to the section of the ribbon where the style group is located and hover over the “Strict” style button. The selected text section will change its appearance in accordance with the selected style. We do the same with the "Text Colors" button, only before that we open the list of theme colors, and select the desired one. If we need to see another style, for example "Heading 2", we do the same and look at the selected section of text - the picture has changed according to the type of style that we hovered over. To apply a style, click on its button. If you suddenly change your mind, but have already applied a style (fill, theme, etc.), don't be discouraged - just press the key combination Ctrl + Z, or click the "Cancel Input" button on the Quick Access Toolbar.
Figure 1. Quick style preview setting.
Enable/Disable Quick Style:
- In the "Word Options" window, on the "General" tab, turn on / off the "Dynamic Preview" item.
Figure 2. Enabling dynamic preview in the Word Options window.
Command tooltips on the ribbon
Most of the command buttons found on ribbon tabs have tooltips that tell you about the keyboard shortcut and what the button does. This is very convenient and allows you to quickly learn a number of the most commonly used key combinations in your work. The benefit is expressed in significant time savings.
To enable hints, do the following:
- Open the File tab and click Options.
- In the Word Options window, on the General tab, in the General Word Options group, in the Tooltip Style column, in the value list, select Show improved tooltips.
- Then go to the "Advanced" tab and in the "Display" group, check the box next to "Include keyboard shortcuts in tooltips."
- Press the "Enter" key (on the keyboard), or close the window by clicking "OK".
If you are new to Word 2010, it is recommended that you use the improved tooltips as they give you the most background information. When you hover over a command (group of commands) button, you will see both the short name of the command and its description (as well as keyboard shortcuts if you have done the above).
Adding Command Buttons to the Ribbon and Quick Access Toolbar
You can add any commands, both to the ribbon and to the Quick Access Toolbar.
Adding more tabs and command buttons to the ribbon
If you are somehow not satisfied with the standard set of commands (groups of commands) present on the ribbon by default, or if you want to arrange them in a convenient order, or add missing commands, you can easily do this
You can create your own tab (one or more), on which, arrange the command buttons as you like. Please note that you cannot change the composition and structure of the default tabs at your discretion. But you can create your own tabs, on which you can set almost any command buttons, divided into groups - you determine their composition yourself. But remember that the more command buttons you add, the smaller the command button images become so that they can all fit in a given section of the ribbon (group).
You can add as many command buttons as you like to arbitrary tabs, to the groups you created, but if too many commands are added, then Word 2010 will automatically divide them into subgroups, and you will have access to them already through the drop-down lists, which will subsequently slow down somewhat you a job. Therefore, it is recommended to choose only the commands you most frequently use and form their groups from the thematically or practically the closest commands. That is, if the command button is related to text formatting, it should be placed in a group with the appropriate purpose. From a practical point of view, nothing prevents you from placing command buttons responsible for text style next to command buttons responsible for document structure. It all depends on what you're working with, so precise recommendations are redundant here.
Create a new tab
Adding a new command button tab:
- Open the File tab and click Options.
- In the Word Options window, select Ribbon Customization.
- At the bottom right of the Word Options window, titled Customize the Ribbon and Keyboard Shortcuts, click the New Tab button. Alternatively, in the right column of the Customize Ribbon group, right-click and select New Tab from the context menu that appears.
Note that the Ribbon Customization list (upper right corner) is set to Main Tabs by default. These are the most commonly used tabs that have been brought into the program by this name by the developers as they are the most used by the vast majority of users. You can also select "All Tabs" and "Tool Tabs" as well.
New tab will appear in the list of main tabs with a default name "New tab". Note that a group is automatically created in this tab, with the same name - "A new group". Change the name of the group and tab. To do this, right-click on the tab (group). In the context menu that appears, select "Rename" and enter a name. Notice that next to its name in brackets there is a note "Custom". This is done to make it easier to distinguish standard tabs from custom ones. Click on the tab you created - as you can see, it is completely empty, ie. has only one group on the tape, which is also empty.
Figure 3. A new tab with an empty group of command buttons.
Create a group
Use the context menu (see point 3 in the procedure above), select "Create a group" » ( or click the button with the same name). Create a group and give it a name. In our example, this "Experimental Group 1" to be tab respectively.
Adding Command Buttons
All commands on the tabs are located in groups, so adding command buttons also occurs in separate groups. To do this, in the "Word Options" window, in the "Customize the Ribbon" item, click the "Select commands from" list. Select the item "Frequently used commands" (there are 9 of these items, short description provided in "Type of instruction set to add"). In the command button column, select the one you want and double-click (or click the "Add" button) - the selected command button will appear in "Experimental group 1" tabs "Experimental Tab 1". Do this a few more times, adding the necessary command buttons.
Note that immediately below the "Add" button is the "Delete" button, that is, you can, by doing the same steps, delete the command buttons you do not need. You can use the context menu in the same way.
Move tabs in the list
To move a tab up or down in the list of tabs (on the tab bar it's left or right), you can select it, hold down the left mouse button, drag it up or down, respectively, and then release it.
Now click on the tab you created and see how it has changed. You can see on it all the command buttons added to the group.
Figure 4. New tab with a group filled with command buttons
Hiding command labels
If you use only one group on the tab with a relatively small number of buttons, you get about the same picture as on figure 4. Firstly, it is not very beautiful, and it takes up a lot of space. Secondly, if you are navigating commands by their icons, then you don't need to see their signatures (or command labels) at all. To disable these signatures, you need to do the following:
- In the right column, under Ribbon Customization, right-click ( "Experimental Tab 1" - "Experimental Group 1"). In the context menu, select the "Hide command labels" checkbox.
Ribbon with an open tab (in our case - "Experimental Tab 1") takes the following form.
Figure 5. Ribbon with the tab open with the "Hide command labels" setting enabled.
Removing a tab
If you no longer need a custom tab, you can simply remove it:
- Click "File" - "Options" - "Customize Ribbon"
- Click Remove.
Click "OK" or press the "Enter" key.
Hiding a tab
Sometimes you want to remove a specific custom tab, but it may be needed in the future. Fortunately, the program is thought out to the smallest detail, and in this case there is an optimal way to solve the problem. You can simply hide the tabs as you wish, until you need them again. To do this, do the following:
- Click "File" - "Options" - "Customize Ribbon"
- Right click on the custom tab you want.
- Uncheck Show Tab.
Click "OK" or press the "Enter" key.
Figure 6. Hiding a custom tab.
As you can see, the tab has disappeared from the ribbon.
Figure 7. Tab bar with "Experimental Tab 1" hidden.
You can enable the tab by doing the same manipulations, only this time check the box "Show tab". You can also check the box corresponding to the tab you have hidden (Figure 6).

Figure 8. An alternative option to enable custom tab display.
Command sets to add
In the "Word Options" window on the tab "Customize Ribbon" in the column "Select commands from" there is nine command set types:
- "Frequently used commands" - these are the most frequently used command buttons for tabs and groups;
- "Commands not on the ribbon" is a list of commands from various windows and menus that are not on the ribbon;
- "All commands" - a list of all commands of the program "Word 2010";
- "Macros" - a set of commands for working with macros;
- "File tab" - a complete list of commands on the "File" tab;
- "All tabs" - a list of commands presented on all tabs;
- "Main tabs" - a list of commands presented on the main tabs of the ribbon;
- "Tools tab" - complete lists commands of the corresponding additional tabs (SmartArt, diagrams, pictures, etc.).
- "Custom tabs and groups" - a list of commands presented on custom tabs and groups.
By knowing the contents of a particular type of command set, you can create new tabs or add command buttons to existing tabs more efficiently.
Adding More Command Buttons to the Quick Access Toolbar
Adding additional command buttons to the Quick Access Toolbar is similar to the steps for the ribbon.
- Open the File tab and click Options.
- In the Word Options window, click on the Quick Access Toolbar.
- Click the "Choose Commands From" list and select the item whose commands you would like to add to the Quick Access Toolbar. Select the command button you need and add it by clicking on the "Add" button, or by double-clicking the left mouse button on the selected command.
Scope of Quick Access Toolbar Settings
In Word 2010, it is possible to save settings related to adding command buttons to the Quick Access Toolbar, both for all documents and individually. This is especially useful for authors working on a single large project, such as a book.
To assign a scope to the Quick Access Toolbar settings, do the following:
- Open the "File" tab and click on "Options".
- Click the Customize Quick Access Toolbar tab.
- In the right column, from the Customize Quick Access Toolbar list, select the item you need. There are only two options: for the entire document and for the document you are working with. If you choose the second option, then the Quick Access Toolbar customization data will only be available when working with this document.
- Click "OK" or press the "Enter" key.
Add command buttons from the ribbon to the Quick Access Toolbar
If you want to add to the Quick Access Toolbar a series of command buttons that you use most often on the ribbon, do the following:
- In an open document window, right-click on the desired command button on any ribbon tab.
- From the context menu, click Add to Quick Access Toolbar.
Figure 10. Adding command buttons from the ribbon to the Quick Access Toolbar.
Reset all settings
You can return the ribbon and Quick Access Toolbar settings to default.
Reset Ribbon Preferences
If you feel like "spring-cleaning" and quickly removing everything you've added in the process of creating custom tabs, command groups, adding command buttons to the Quick Access Toolbar, and so on, you should do the following:
- Open the File tab and click Options.
- In the Word Options window that opens, click Customize the Ribbon.
- In the Customize Ribbon and Keyboard Shortcuts window that opens, select the desired custom tab in the right column.
- Click the "Reset" button. Select one of the two options from the drop-down list. If you only want to remove the selected tab, select Reset Only Selected Ribbon Tab. If you want to remove all your settings, then select the "Reset all settings" option (note that this will also affect the quick access panel).
Click on the selected item and a dialog box will appear. Confirm your intentions by clicking the "Yes" button. Everything, everything now additional settings the tapes have been dropped.
Figure 11. Ribbon Reset.
Reset Quick Access Toolbar
You can do the same for the Quick Access Toolbar:
- Open the File tab and click Options.
- In the Word Options window that opens, click Customize the Quick Access Toolbar.
- In the "Customize Quick Access Toolbar" window that opens, in the right column, select the desired customizable tab.
- Click the "Reset" button. Select one of the two options from the drop-down list. If you want to return standard settings panel, select Reset Quick Access Toolbar Only. If you want to remove all your settings, then select the "Reset all settings" option (note that the ribbon will be affected).
Figure 12. Reset the Quick Access Toolbar.
The Quick Access Toolbar has now returned to its default view.
Conclusion
In my opinion, the advanced customization of the ribbon and quick access toolbar is one of the most successful innovations in Word 2010. Despite the rejection of the ribbon interface by a number of users, we can confidently say that Word 2010 has become better. It has not become more difficult in relation to new users, on the contrary, it has become different. It just became more perfect, more convenient and obviously more attractive.
Unfortunately, absolutely free customization of the ribbon and the quick access panel is not yet available, we can not yet configure everything in “design mode”, simply by dragging the necessary command buttons with the mouse. For example, in a group on the ribbon tab, or on the taskbar - there we still need to use the menu. But, nevertheless, I, for example, have not yet heard of such a deep program with such customization options “for myself”. And in this regard, Word 2010 is a huge step forward for word processor Microsoft. At the moment, he simply has no equal.
Microsoft Word text editor is very functional. In addition to typing and formatting text, here you can create various shapes, graphs and tables, perform a few simple actions with pictures. And where are all the necessary tools for this? That's right, on the Toolbar.
It is located at the top of the page of an open document, and with Word 2007 on it you see not only tabs, but also the main buttons that are used to work. In this article, we will figure out what to do if the toolbar in the Word has disappeared, and instead of the usual view, only the main names are visible at the top. I'll also tell you about the quick access panel, and how to add all the necessary buttons to it.
If the Word document that you opened looks like the screenshot below, then to restore the toolbar, just click on the small arrow pointing down in the upper right corner of the window.
After that, all the usual groups and commands will be visible again. And if you need to leave only a sheet on the page, then you can hide the top ribbon by clicking on the same arrow, only now it points up. This can be used if you need nothing to distract you while working with a document.

If you have Word 2013 or 2016 installed, then to display the toolbar, you need to click on the button "Ribbon Display Options", which is located to the right of the file name, next to the minimize, full screen and close buttons.

After clicking, a small menu will open. The first item automatically hides the ribbon - the window expands to full screen and it hides, when you move the cursor to the very top, it appears. When you click on the second item, only the menu items "Home", "Insert", "Design" and others will remain. If you choose the latter option, then it will be possible to fix not only the names of the items, but also the commands - in fact, this is what we need.

Now let's figure out what to do if not the control panel itself disappeared, but some tabs on it. Go to the top "File" and select "Options" from the list on the left.

A window like this will open. Go to the tab "Customize Ribbon".

For example, I did not have a tab on the toolbar. So I put a checkmark next to it. To save your changes, click "OK".

After that, the item we need will appear, and you can use all the commands that are in it.

In Word, in addition to the toolbar, there is also a quick access toolbar. You can add icons of those commands that you use most often to it. It is displayed either below or above the ribbon. By default, it has three buttons: save, cancel or redo.
To customize it for yourself, click on the little black arrow pointing down and select from the list "Other Teams".


Look for the desired command in the list, select it with a mouse click, and then click "Add".

Everything that will be in the area on the right will also appear in the quick access toolbar.

If necessary, all items can be arranged in a suitable order for you. To do this, select one and change its position using the up/down arrows on the right. To save the changes made in Word to all other files, in the top field, select "For all documents". When you're done, save by clicking OK.


Removal occurs in a similar way. Open a familiar window, select an unnecessary command and click "Delete". Save by clicking on "OK".

That's all. Now you know not only how to get the hidden toolbar back, but also how to customize it and the quick access toolbar in Word.
Rate article:Almost all users who have ever opened the Word editor remember the program workspace: at the top is the control panel with various sections and functions. After analyzing the sequence of user actions, the developers grouped the commands into separate blocks, thereby facilitating the search for the required option. In this article, we will tell you how to pin the toolbar in Word if it is "hidden" under the document.
Hidden tape mode is especially convenient to use on netbooks, laptops with a small screen. It allows you to increase the overview of the page and not be distracted by unnecessary details.
Proven ways:
id="a1">- Method number 1: you can fix the toolbar in Word by double-clicking on the panel, in the same way you can display it again.
- Method number 2: near the quick access panel responsible for saving the document and undoing actions, you will see an arrow, by clicking on which you will open the context list. Putting a checkmark next to the Collapse Ribbon command will hide the panel, and removing it will show it again.
- Method number 3: right-clicking on any empty field will bring up a short list of commands, among which there will be “Collapse Ribbon”.
The state of the ribbon is retained even after the document is closed, regardless of which of the methods listed above you used. In the minimized position, the menu will open commands when you hover the mouse over the required tab, and then “hide” the commands again.