Scan and fix hard drive errors. Checking a hard disk or how to check a disk for errors
Even the most "licked" and the most secure operating system is by no means guaranteed against failures perceived by the user as errors. Particularly annoying are unknown and unexpectedly occurring errors, sometimes fraught with extremely unpleasant consequences.
It's not hard to imagine the emotions of a person working on a complex document that gets lost as a result of a windows system crash. To avoid such problems, it is better to prepare for them in advance. And for this you need to be aware of how the Windows 7 OS is checked for errors. Let us consider separately two serious questions related to the stated topic:
- Checking system files and windows registry.
- Condition control hard drive computer.
old-timers computer world The utilities of the world-famous Peter Norton are well remembered - not only the author of excellent books, but also the creator of programs under the Norton utilities brand. The first versions of these programs worked even before advent windows- in the then popular MS DOS operating system. These utilities made it possible to detect the presence of errors on the hard drive and to detect the presence of other DOS problems. We will be interested in similar tools for windows.
Files and registry
Checking OS files can be done in two ways: either using standard windows tools, or using third-party software. The OS has built-in file control tools. To use their capabilities, you need to open the window command line and type the sfc command in it with the /scannow parameter, like this:
As a result, system files will be scanned to detect errors in them. The result will be displayed immediately in the command line window.
 The information received can be analyzed (at least using the same Internet), which is useful for determining the degree of depreciation of the OS and equipment. During operation, the program will try to correct all detected violations in system files on disk.
Additional service, better scan quality and more reliable corrections are provided by third-party software.
For example, the same Norton Utilities (NU) package for windows. Though this remedy and is the most popular and powerful software package for dealing with OS and computer problems - it still costs a lot of money. Especially in its "professional" configuration. Nowadays, there are a lot of free analogues this creation.
windows registry- the very place where, in addition to the necessary OS information, a lot of rubbish and garbage accumulate. Periodic cleaning of the registry is our direct responsibility. For this purpose, it is worth installing and periodically running the time-tested CCleaner utility (although NU also does a good job of this task). Look it up online and download it.
HDD
The appearance of errors in the file structure on the hard disk is caused by the wear of the disk surface, failures in the operation of windows disk services (drivers) and errors in the positioning of the laser subsystem of the hard drive. Check and cure HDD possible in ways similar to the previous ones. We will consider the easiest way - running standard program the disk error checker that comes with windows. For this:
- Open the "My Computer" shortcut, select the icon of any of the partitions (for example, "Local Disk C").
- Open context menu right click mice.
- Select "Properties". A tabbed window will open.
- Go to the "Service" tab
- Click on the "Perform verification" button.
 The program will examine the partition and troubleshoot. Do the same for the rest of the sections.
windowsTune.com
Check disks for errors in windows 7

One of the important factors of system performance is the serviceability of such a basic component as hard drives. It is especially important that there are no problems with the drive on which the system is installed. Otherwise, problems such as the inability to access individual folders or files, regular crashes from the system, “ blue screen death" (BSOD), up to the inability to start the computer at all. We will learn how to check the hard drive for errors on Windows 7.
See also: How to check SSD drive for mistakes
Ways to study HDD
If you have a situation that you can’t even log into the system, then in order to check if the problems on the hard drive are to blame for this, you should connect the disk to another computer or boot the system from Live CD. This is also recommended if you are going to check the drive where the system is installed.
Checking methods are divided into options using exclusively internal Windows tools (Check Disk utility) and options using third-party software. In this case, the errors themselves can also be divided into two groups:
- logical errors (file system corruption);
- physical (hardware) problems.
In the first case, many programs for studying a hard drive can not only find errors, but also correct them. In the second case, using the application, it will not be possible to completely eliminate the problem, but only mark the bad sector as unreadable so that no more writing is done there. Complete hardware problems with a hard drive can only be resolved by repairing or replacing it.
Method 1: CrystalDiskInfo
Let's start with an analysis of options using third party programs. One of the most popular ways to check the HDD for errors is to use the well-known CrystalDiskInfo utility, the main purpose of which is precisely to solve the problem under study.


If several physical HDDs are connected to the computer at once, then to switch between them for information, click the "Disk" menu, and then select the desired media from the list.

Advantages this method using CrystalDiskInfo lies in the simplicity and speed of research. But at the same time, with its help, unfortunately, it will not be possible to eliminate problems if they are detected. In addition, it must be recognized that the search for problems in this way is rather superficial.
Lesson: How to use CrystalDiskInfo
Method 2: HDDlife Pro
The next program that will help assess the condition of the drive used under windows 7 is HDDlife Pro.


To update the data, you need to click "File" in the main window of HDDlife Pro and then select "Check disks now!".

Main disadvantage of this method lies in the fact that the full functionality of HDDlife Pro is paid.
Method 3: HDDScan
The next program with which you can check the HDD is the free HDDScan utility.
Download HDDScan


Method 4: Checking with the Check Disk utility through the properties of the drive
But you can check the HDD for errors, as well as fix some of them, using the built-in windows utilities 7 called Check Disk. It can be launched different ways. One of these methods involves launching through the properties window of the drive.

Method 5: "Command line"
The Check Disk utility can also be run from the Command Prompt.


If the user wants not only to carry out research, but also to automatically correct the errors found in the process, then in this case the following command should be entered:
Press Enter to activate.

If you want to check the drive for not only logical, but also physical errors (damage), as well as try to fix bad sectors, then the following command is used in this case:

When checking not the entire hard drive, but a specific logical drive, you need to enter its name. For example, in order to scan only partition D, enter the following expression in the "Command line":

Accordingly, if you need to scan another disk, then you need to enter exactly its name.
The "/f" and "/r" attributes are the main ones when running the chkdsk command through the "Command Line", but there is also whole line additional attributes:
- /x - disables the specified drive for a more detailed check (most often used simultaneously with the "/f" attribute);
- /v - indicates the cause of the problem (the ability to apply only in the NTFS file system);
- /c - Skip scanning in structural folders (this reduces the quality of the scan, but increases its speed);
- /i - quick check without detailing;
- /b - re-evaluation of damaged elements after an attempt to fix them (used exclusively with the "/r" attribute);
- /spotfix - spot fixes for errors (only works with NTFS);
- /freeorphanedchains - instead of restoring content, clears clusters (only works with FAT/FAT32/exFAT file systems);
- /l:size - specifies the size of the log file in case of an emergency exit (without specifying the size, the current value remains);
- /offlinescanandfix – offline scanning with disconnection of the specified HDD;
- /scan - proactive scanning;
- /perf – increase the priority of scanning over other processes running in the system (used only together with the "/scan" attribute);
- /? – calling the list and attribute functions displayed through the “Command line” window.

Most of the above attributes can be used not only individually, but also together. For example, entering the following command:
chkdsk C: /f /r /i
will allow you to quickly check section C without detailing with the correction of logical errors and bad sectors.

If you are trying to perform a check with a fix on the disk on which the windows system is located, then you will not be able to immediately complete this procedure. This is due to the fact that this process requires exclusive rights, and the operation of the OS will prevent this condition from being met. In this case, a message appears in the "Command line" that it is impossible to perform the operation immediately, but it is proposed to do this the next time the operating system is rebooted. If you agree with this proposal, then you should press "Y" on the keyboard, which symbolizes "Yes" ("Yes"). If you change your mind to carry out the procedure, then press "N", which symbolizes "No" ("No"). After entering the command, press Enter.

Lesson: How to activate the "Command line" in Windows 7
Method 6: Windows PowerShell
Another option to start scanning the media for errors is to use the built-in tool Windows PowerShell.

As you can see, you can check the hard drive for errors in windows 7, both with the help of a number of third-party programs, and using the built-in Check Disk utility by running it in various ways. Error checking involves not only scanning media, but also the possibility of subsequent correction of problems. True, it should be noted that it is better not to use such utilities too often. They can be applied when one of the problems that were described at the beginning of the article appears. For the purposes of prevention, it is recommended to run programs for checking the drive no more than once every six months.
We are glad we were able to help you resolve the issue.
Poll: Did this article help you?
Not reallylumpics.ru
Check for errors on the hard drive. Check hard drive for errors, windows 7
Often, unstable computer operation is associated with file system errors. HDD systems. To deal with this problem, you need to check for errors on your hard drive. Among other things, it would be nice to know about the state of the hard drive if, while the PC is running, it publishes strange sounds such as clicks or grinding noises. If information about hard disk damage is obtained in advance, you can save all user data until the device fails.
Victoria
First of all, you need a specialized program. One of the best and most reliable is Victoria. With its help, on any operating system, a hard disk check for errors can be performed. whether you have windows 7 installed, XP or 8, Victoria will work stably under each.
The application is absolutely free and can be downloaded from the developer's website. However, it is distributed in two versions. The first is the standard binary packages to run on the OS. The second is an ISO image to run without having to boot the operating system. This is handy when windows refuses to work due to HDD errors.
If the HDD has a capacity of about 700 GB, it will take at least one to two hours to check the hard disk for errors. windows 7 will perform this procedure with built-in tools much faster. However, the quality of testing and the amount of data obtained with the help of "Victoria" will be disproportionately higher.
Testing
Download the app first. It comes in an archive. Extract it to any empty directory and double click on executable file. If the work is done in windows 7 or 8, you need to right-click on the exe file, and then select in context menu the inscription "run with administrator rights".

Checking hard disk for errors should begin with a few preparatory steps. After starting the program, go to the "Standard" tab. On the right side of it, you can see all the drives in the computer. Select the HDD to be tested. Then click on the "Passport" button. If nothing goes wrong, the name and model of the hard drive will be displayed at the bottom of the window.

After that, go to the tab called "SMART" and click on the inscription "GetSMART". If the status next to the button changes, then everything is done correctly. This area usually displays the word "GOOD", but "BAD" may also appear. Both in the first and in the second case, the sensor data were read correctly.
Possible mistakes
It happens that the HDD controller works in AHCI mode. In this case, there is no way to read the SMART attributes, so the hard disk cannot be checked for errors. The program will send the message "Error reading SMART" to the log. Also next to the button, which is responsible for reading data from the sensors, “Non ATA” will be displayed, and the area under the text itself will be highlighted in red.
To allow Victoria to work with the hard drive, you need to change the BIOS settings. To enter them, you should press the "DEL" button several times at the time when the very first messages appear on the screen when the computer boots. How to run the utility BIOS settings may differ for different models motherboards. If the "DEL" key does not result in positive result, you should familiarize yourself with the information that is easy to find on the developer's website.
After entering the BIOS, go to the path Config (maybe Advanced) - Serial ATA - Controller Mode, and then change the setting to Compatibility. Remember that after the hard disk test is completed, the settings should be returned to their original state.
Continuation of the check
After reading the SMART information correctly, go to the "Test" tab and click on the inscription "Start". This will start checking for errors on the hard drive. In the main area of the program, rectangles that were previously monochromatic will be painted in different colors. On the right, the total number of sectors sorted by access time will be written.

The main attention should be paid to the numbers near the blue and red marks. They mark the dead or bad sectors. That is, those to which access is impossible, or it takes a very long time to read them. Thus, when accessing them, the computer seems to freeze.
Recovery
To attempt to recover bad sectors, the hard drive's error checking must be run again, but now set the switch on the bottom right to the "remap" position. The program will mark the "bads" as non-working, entering their addresses in a special area on the HDD.
Be carefull! If bad sectors began to appear on the hard disk, most likely, after the restoration, the drive will continue to "crumble". It is advisable to replace it, or at least make backup all important data by copying them outside the HDD.
Built-in tools
The tools built into the OS can also check the hard disk for errors. windows 8 allows you to run it in a few clicks.

- First, open File Explorer by clicking on the "My Computer" icon.
- Then right-click on any section and select "Properties".
- Go to the tab called "Service", and in it click on the inscription "Perform verification".


Check hard drive for errors via command line
The command line is a powerful tool that is used by many system administrators while solving various system problems. Its main advantage is the launch of testing even when the graphical shell refuses to start. At the same time, it is worth using safe mode with command line support" by pressing the F8 key while windows is loading, but before the logo is displayed on the screen.

If the standard mode works fine, follow these steps to run the scan:
- Press the combination "windows + R" on your computer keyboard.
- In the input line of the window that opens, type "cmd.exe" and click on the "OK" button.
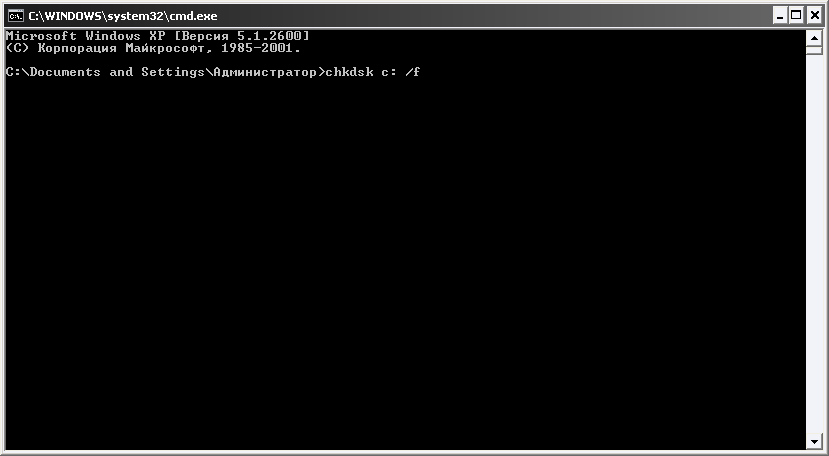
- A command line will appear on the screen. To run the check, write "chkdskX: /f /r" into it. Instead of the letter "X", press the one that is used in the operating system to indicate the partition that needs testing.
- After entering the OS, it may not be possible to complete the procedure without the obligatory reboot of the PC. When the message appears, simply press the "Y" key and restart your computer. After that, error checking on the hard drive will start automatically.
Remember: when performing an HDD check, you should wait for it complete completion. Turning off this process must be performed only by means built into the program. If there is no way to stop the procedure, do not try to interrupt it by turning off the computer or by pressing "RESET". These actions may lead to additional errors and data corruption on the hard drive. The most dangerous thing is the impossibility of restoring information after an incorrect shutdown.
fb.ru
How to check windows for errors
If your computer often freezes, does not start some programs, or crashes, it makes sense to check the operating system for errors. They are sometimes so serious that the only way to solve the problem is to reinstall the system.
To prevent serious damage to the system, check disks for errors from time to time. To do this, use the error checking service. Go to "My Computer", select one of the disks, call the "Properties" menu by right-clicking on the disk. In this menu, select the "Service" section, then "Check the disk for errors."

Disk defragmentation helps to prevent the occurrence of serious system errors. It is recommended to do this at least once every six months. Go to the start menu. Select "All Programs" - "Accessories" - "Utilities". In this section, start defragmenting the disk you need.

If you notice that a certain error appears regularly, you can try to find its cause and description in the OS. To do this, go to "Start", select "Control Panel" - "System and Security" - "Administrative Tools" - "Event Viewer". Next, carefully examine the items "Application" and "System". Errors will be marked with a red cross in a circle. By clicking on an error, you will read a message about its cause. You can solve the problem by going to the windows website and indicating the error number there.

If you active user Internet, do not forget about a reliable antivirus. This software is far superior in reliability and capabilities to standard system components. Antivirus and firewall can protect your computer from viruses and the operating system from errors. Choose proven software, such as Kaspersky, Dr.Web, Eset NOD32 and more.

Various utilities also help to identify and fix system errors. For example, CCleaner or IObit Security 360 programs. They help diagnose the system and, having identified errors, fix them.

Remember that stopping or interrupting the system error checking is prohibited. This may result in disk damage or data loss.
SovetClub.ru
How to Check Hard Drive for Errors in Windows 7
This article will help you understand and fix problems on your PC. First you need to figure out why you need to check your computer for errors. As a rule, you can observe the presence of a situation when the computer starts to reboot, while giving out some sounds like tapping.
Also, the PC may restart several times a day, and even when the computer is turned on, the startup may be interrupted by the so-called screen of death. Screen of death refers to a blue screen with white text. It is to prevent such problems that you need to carry out diagnostics.
Using the standard windows utility


Using the CHKDSK command
- Click "Start", select "All Programs", click "Accessories" and run the "Command Prompt" utility;
- For example, we want to test our disk (D :), then we should specify the “chkdsk / r” command in the window and click on Enter.
This command of the windows operating system makes it possible to diagnose the HDD and detect errors. It will also notify you of any problems it finds.
Syntax and parameters of the CHKDSK command
The command CHKDSK [volume:[[path]filename]] ] starts the actual hard drive diagnostics in windows. It should not be entered on the command line square brackets.
Volume - indicates the disk on which the check or any other operation will be performed.
Path, file name - lists the name of the object or objects that will be worked on. Applies to FAT/FAT32 file system only;
Description of other parameters:
- /F - completely fixes all found problems;
- /V - a command for the NTFS file system, which shows what was the cause of the problem;
- /R - execution searches for and restores incorrect information;
- / X - if there is such a need, it completely disconnects the disk from the system for a deeper and more thorough check. Typically used with the /F command;
- /I - less detailed diagnostics of disk elements. Produces the so-called "quick check";
- /C - makes it possible to skip checking cycles inside the folder structure, the check is also fast, but not deep;
- /L:size - makes it possible to change the size of the log file to the specified value (in kilobytes) during the scan. In the event of a crash, a log file is used during the check;
- /B - the ability to re-evaluate bad clusters on the disk (only with the /R option).
The process of identifying errors on a hard disk in windows may take time depending on the speed of your computer and the presence of errors on this disk.
Checking a hard disk (HD -Hard Drive, hard drive) for errors is not as difficult a task as it seems to many users. There are many reasons that may prompt you to check your hard drive for errors. To do this, you can use the built-in tools of the operating system. At the beginning of this article, we will look at the reasons, and then we will tell you how to use software tools to fix system errors and bad sectors on the hard drive.
Symptoms
Today, the computer (which we can) is essential device not only for processing, but also for storing data. This applies to both business and personal computers. If the hard drive suddenly fails, then there is a big risk of losing all the data stored on it. That is why it is very important to see in advance the initial signs that indicate an upcoming device failure or data loss in the near future.
There are cases when the hard drive literally instantly fails, but, as a rule, problems with reading data begin with the appearance of several bad sectors, which gradually continue to multiply.
So, let's look at the most typical signs indicating a malfunction:
- The Winchester emits a click/clicks at startup or during normal operation. Usually after that a blue screen appears, with a description of the error, or the computer restarts;
- The program used for recommends that you check the hard drive for bad sectors;
- If you cannot access a certain part of your hard drive (a specific file), or if accessing one of the disks takes a long time.
Anyone who has ever used DOS (disk operating system) should be familiar with the command CHKDSK. The command is still very useful, although there are currently many both paid and free utilities for diagnosing and correcting hard drive malfunctions.
Using CHKDSK
The CHKDSK command can be used to find and fix many hard drive related problems. These can be data loss in bad sectors or problems with the FAT (MFT) - the main table, which is actually a cataloger for the operating system.
To use this command, you must be logged in as an administrator. Go to command prompt, type chkdsk<метка тома>. How is it done with pictures. (who hates the command line, skip this and read the section below about the windows system utility).
We press the button Start, then All programs—Standard.

Choose Command line and press Run as administrator.
Then at the command line we type CHKDSK and press the key Enter.

Let's see the result:

Hooray! No errors found. But it could be otherwise...
The amount of time it takes for CHKDSK to check will depend on the size of the hard drive and the number of files and folders it contains. In order for CHKDSK to fix errors, set the /F flag, in order to look for bad sectors, set the /R flag.
Now let's move on to the results that were obtained during the verification of the device. If 0, it means that no errors were found.
- Indicates that errors have been found and fixed.
- Indicates that the hard drive has been cleaned, i.e., some files have been deleted (with the /f flag set). If the /f flag is not specified, then disk cleanup cannot be performed. And if displayed
- then it means that the errors cannot be checked or corrected.
Check the hard disk for errors using the Windows system utility
If the command line drives you into a stupor and despondency, then the next method that we will tell you about will surely please you. Here everything will be done using a graphical interface. We present step by step instructions:
- Select the "My Computer" item in the "Start" menu, a list of devices will open, including all hard drives (hard drive partitions) installed in your system.

- Right-click on the device (partition) you want to check and select "Properties", go to the "Service" tab, click the "Run Check" button.

- Check the boxes "Automatically correct system errors” and “Check and repair bad sectors”, run the scan.

We also note that there are a number of free utilities to check and fix bad sectors and other problems associated with the hard drive. Some of them have their own set of functional options, which allows them to work with the hard drive without interfering with the operation of the operating system.
Most hard drive manufacturers provide proprietary software for their devices, which, as a rule, has advanced features for working with a particular hard drive model. You can find and download it on the official website of the manufacturer.
A short video about checking the hard drive
This article shows the steps you can use to check and fix hard drive errors using the CHKDSK utility.
CHKDSK (check disk- disk check chkdsk.exe- standard utility in the operating room Windows system, with which you can check the hard disk for file system errors, detect bad sectors of the hard disk, fix the found file system errors, and also search for bad sectors on the disk and, if possible, restore their contents.
Over time, the hard drive begins to accumulate errors that are caused by various reasons (from unexpected system shutdowns to damaged software and from bad sectors to metadata corruption). Not only can this be detrimental to the overall lifespan of a hard drive, but it can also slow it down in the short term, and no one likes a slow hard drive. In this case Windows users should always check their hard drives for errors after a while and correct any errors they find to prolong the life and functionality of the drives.
The main function of the chkdsk utility is to check the file system and file system metadata on a disk partition and fix any file system errors it finds. Such errors may include corrupt entries in the partition's master file table (MFT), invalid security descriptors associated with files, inconsistent timestamp or size information. individual files, or the same sector is marked as belonging to two different files.
Chkdsk can also optionally scan every sector on a disk volume for bad sectors. When bad sectors (bad sectors) are detected on the hard disk, they are marked as bad sectors and the operating system no longer reads or writes information from bad sectors. The utility will also try to recover data from bad sectors, if possible.
You can check the hard drive for errors in GUI operating system or using the command line.
How to check disk for errors in GUI
To check the disk for file system errors in the GUI, open windows explorer, right-click on the local drive you want to check and in the context menu that appears, select Properties

In the opened properties window of the selected local disk, go to the tab Service, and in the section Error checking press the button Check

In the next window Error checking select ➜ Check disk


After the verification process is completed, you will see information about the scan results. In this case, the disk was successfully checked and no errors were found. If errors are found, you will be prompted to fix them.
For getting details, click on the link Show details

In the snap window Event Viewer Press Intelligence

In the window Event Properties, in tabs Are common and Details available detailed information about the result of the disk check.

The resulting information about checking the disk for file system errors can be copied to any text editor for further study.
When checking the file system for errors, the following actions are performed:
Checking the basic structure of the file system…
Checking filename associations...
Checking security descriptors...
Using the chkdsk Command at the Command Prompt
How to check a disk for errors on the command line
You can also check the disk for file system errors using the open administrative privileges.
If you run the chkdsk command without parameters on the command line, the utility will scan the disk in read-only mode, reporting errors, but not trying to fix them.
This scanning mode does not require a reboot, and the chkdsk.exe utility performs the same check as in the method presented above, but only using the command line console.

How to Check and Fix Hard Drive Errors at the Command Prompt
To check and fix file system errors, as well as search for bad sectors on the disk and restore their contents, run the following command as an administrator:
In most cases, this command is used to check the file system and fix bad sectors on the hard drive.


Where C is the letter of the drive to be checked and corrected. In the command prompt window, you will see a message stating that the CHKDSK command cannot be executed because the specified volume is being used by another process. Should this volume be checked the next time the system is rebooted? To run a test system disk After rebooting the system, press the Y key and then press the Enter↵

After rebooting the system, the process of scanning and fixing errors will begin.
Below are some options for the chkdsk utility:
/F - check the file system and automatically fix the errors foundTo find out all the parameters of the chkdsk utility, run the command:
/ R - search for bad sectors on the disk, restore content (the command requires the mandatory key / F , command example: chkdsk C: / F / R )
/V - show full paths of files, display file names on the disk, in the NTFS file system - show messages about cleaning
/X - disconnect disk before checking, handles this disk will not be checked (mandatory key /F must be set, command example: chkdsk C: /F /X )
/I - perform a less strict check of the index entries, CHKDSK performs a faster but less thorough check
/C - Skip checking cycles inside the folder structure
/L: size - change the size of the log to the value specified in kilobytes
/B - reset scan results, re-scan previously found damaged hard disk (mandatory key / R , command example: chkdsk C: / F / R / B )

Also, you can use the chkdsk utility in the recovery environment when the operating system does not boot.

CHKDSK- standard application to check the hard disk for errors, detect bad sectors on the hard disk, fix file system errors. The CHKDSK (short for Check Disk) application is built into the Windows operating system.
The Chkdsk.exe program finds file system errors, bad sectors on the hard drive, and fixes the detected problems. If the disk file system error check finds problems, the CHKDSK check runs when the computer is turned on.
When using Chkdsk.exe in different versions Windows, there are some differences:
- In Windows XP, the chkdsk utility finds file system errors and repairs bad sectors on a disk.
- For Windows 10, Windows1, Windows 8, Windows 7, Windows Vista, at default settings, CHKDSK finds file system errors but does not fix them. To fix file system errors and check disk sectors, you must manually set certain parameters.
Problems in the Windows operating system affect its performance. File system errors occur in the following situations:
- Due to a power outage - if the computer is suddenly turned off, an unexpected system failure may occur (to prevent such situations, use UPS - uninterruptible power supplies).
- If the system is infected with malware.
- Due to computer hardware failure.
Bad sectors may appear on the surface of the hard drive. When checking a disk with chkdsk, bad bad sectors of the hard disk are marked as damaged, the system no longer reads or writes information from bad sectors of the disk. The system will try to recover data from bad sectors (clusters, directories), if possible.
Check disk chkdsk runs in two modes:
- in the graphical interface by means of the system;
- using the command line.
If the computer does not boot due to problems, you can check the hard drive using the Windows installation DVD. After booting from removable media, in the system recovery options, select the command line to start checking the disk for errors.
In this tutorial, I will show you how to use the CHKDSK application using the Windows 10 operating system as an example.
CHKDSK check for file system troubleshooting in GUI
The easiest option for checking the file system for errors is to run the CHKDSK program in the graphical interface using the system tools.
Do the following:
- Launch File Explorer.
- Right-click on the local drive you want to scan.
- In the "Properties: Local Disk (X:)" window, go to the "Service" tab.
- In the "Check for errors" section, click on the "Check" button.
- In the Error Checker (Local Disk (X :)) window that opens, select "Check Disk", despite the fact that the operating system says that no errors were found during the disk check.

Available in Windows 7 additional options checks, to run them, you must check the boxes next to the items:
- Automatically fix system errors.
- Scan and repair bad sectors.
- The scanning process starts and will take some time. The scan time depends on the size of the local disk and on the amount of data on the disk.

During file system error checking, the status is scanned:
- The basic structure of the file system is checked.
- Filename associations are checked.
- The security descriptors are checked.
- The USN log is checked.
- After the verification process is completed, information about its result will open. In this case, the disk was successfully checked, no errors were found. If errors are found, you will be prompted to fix them.
For details, click on the "Show Details" link.

In the Event Viewer snap-in window, click Details.

In the "Event Properties" window, in the "General" and "Details" tabs, detailed information about the result of the disk check is available.

The resulting information about checking the disk for file system errors can be copied into Notepad or another text editor for further study.
How to Run CHKDSK (Check Disk) on Command Prompt
chkdsk command to check hard drive with given parameters executed from the command line:
- Run command prompt as administrator. Read How to Find the Command Prompt in Windows
- To check the system partition (system disk) in the command line interpreter window, enter the command:
- Press the "Enter" key.
- A message will appear in the command prompt window stating that the CHKDSK command cannot be executed because the specified volume is in use system process. To start checking the system disk after rebooting the system, press the "Y" key, and then press the "Enter" key.
- During the system reboot, the system disk will be checked and repaired.

An example command template looks like this: ["chkdsk" (application name)], space, [drive letter followed by a colon ("c:", "d:", "f:", etc.), path, or filename], space, [command options].
Command parameters have the following meanings:
- /F - checking the file system and automatically fixing the errors found.
- / R - searching for bad sectors on the disk, restoring the contents (the command requires the mandatory key / F, example: "chkdsk C: / F / R").
- /V - display full paths of files, display file names on the disk, in the NTFS file system - display messages about cleaning.
- /X - disconnect the disk before checking, the descriptors of this disk will not be checked (the /F key must be set, command example: "chkdsk C: /F /X").
- /I - performs a less strict check of the index entries, CHKDSK performs a faster but less thorough check.
- /C - Skip checking cycles inside the folder structure.
- /L: size - change the size of the log to the value specified in kilobytes.
- /B - reset the scan results, re-scan the previously found bad sectors of the hard disk (the /R key is required, command example: "chkdsk C: /F /R /B").
In most cases, to check the file system and eliminate bad sectors on the hard drive, it is enough to use the "F" and "R" flags.
How to Disable Check Disk in CHKDSK on Windows Boot
In some cases, disk check starts when you turn on the computer, before loading the Windows operating system. In most cases, you need to wait until the end of the check, a restart will not follow.
A constant check of the disk every time the system starts, signals the presence of problems and the need to fix them. Perhaps you should consider replacing the hard drive. There are programs, for example, that constantly monitor the status of computer disks.
To disable Chkdsk from starting when Windows boot You can use 2 methods: change the values in the registry of the operating system, or use the command line.
Disable check disk on the command line:
- Run command prompt as administrator.
- In the command line interpreter window, enter the command ("C:" is the name of the drive on which you want to disable the launch of the disk check at system boot), and then press the "Enter" key:
- If you need to disable checking on multiple drives, add the corresponding drive letters to the command separated by spaces, for example, "chkntfs /x c: d:".
- Using the "chkntfs / d" command, you can return the original settings.
You can turn off automatic disk check when the operating system boots in the following way:
- Launch the Registry Editor (type "regedit" in the search field, run the command).
- Follow the path:
- Click on the "Session Manager" option.
- Find the parameter "BootExecute", click on it with the left mouse button.
- The Edit MultiString window displays the default value.

- To disable disk check during Windows startup, add a parameter before the asterisk:
- To disable scanning on multiple partitions, add drive letters separated by a space. Example for drives "C:" and "D:":
Article Conclusions
The CHKDSK system application, built into the Windows operating system, is used to check the file system for errors and to detect bad sectors on the computer's hard drive. Using the utility, you can fix system errors and eliminate the negative impact (disable reading and writing) on the system due to the presence of bad sectors of the hard disk.
Often, users are faced with situations where Windows starts to work incorrectly. Loading slowly, giving strange messages. Slow to respond to actions. Files suddenly disappear. All this can be the result of errors in the disk file system and physical damage to the surface. The appearance of poorly readable and bad blocks of sectors. Bad (unreadable) blocks are also called Badblocks. To eliminate such manifestations, you need to check the disks for errors. In the arsenal of services Microsoft Windows there is a utility Check disk, designed just to check and fix errors on disks. Sometimes the Windows system, when it detects problems on a disk or when a new disk (for example, a flash drive) is connected, starts Check Disk itself when it boots. Some uninformed users get scared when they see a blue screen with a disk check utility running Check disk. Some people confuse running Check Disk with blue screen of death BSOD. If Check Disk has started, you need to let it work, if you do not want it to

run every time you boot Windows. If you want to check disks, first of all you need to check the system disk, usually it is the “C” drive, but not necessarily. To check the system disk, the error-correcting utility cannot be launched under the Windows operating system. You can only assign a task to check the disk, which will be performed at the next boot in DOS mode. If error correction is not set during the check, then the system disk will be checked, and the results can be viewed by going to the control panel, administration, event viewer, application. The rest of the disks can be checked when the Windows operating system is loaded. You can set up a check or run Check disk with several
ways.
 The first way (normal, with a graphical interface):

After checking the system disk in DOS mode, a report is displayed. If there are no errors, then the view will be as in the presented photo. If errors are found, records about them and their correction will be added. Sometimes there are quite a few entries. This indicates that the condition of your disk is not good. Perhaps he, as the system engineers say, “began to crumble”, and a more thorough check should be done using special programs.
Second way (in DOS mode):

Third method (in command line mode)

If you add the / f parameter to the chkdsk command, as in the previous method, you will receive a warning about the impossibility of checking and a suggestion to set the check when Windows starts next time.
List of parameters of the Check Disk utility:

Many experts do not recommend using the Check Disk utility too often due to the risk of system and data damage. I am personally behind the utility of such sins when dealing with file system NTFS did not watch. It happened only on FAT32, and the negative comes rather from here. Frequent checks, in general, are not needed. Once every six months and in case of malfunctions will be enough.
Note: In operating systems Vista and Windows 7 do not have a Run command in the Start menu by default. To make it appear, do the following:
- Right-click on the "Start" button on the desktop and select "Properties" from the list.
- In the window that opens, on the Start Menu tab, click Customize.
- In the list of the next window, find the "Run" command and check the box next to it.
- Click "OK" to close the windows.