How to move to a new Android phone. Transferring data from one Android device to another: moving without problems
Replacing a phone can be a serious problem for the user. With a memory capacity of more than 16 GB, they accommodate your entire life: from personal to business. The storage contains business contacts, photos and videos, documents and other files that are difficult or impossible to recover.
Everyone will be happy with a new phone, but using it without the usual applications and information is difficult. Modern technologies will help you quickly transfer the necessary files without wasting a lot of time. You can transfer everything, from photos to WhatsApp correspondence. The necessary files, except for registry entries, will be transferred to the other phone.
Transfer contacts, calls, SMS, photos and videos to your phone
Most of the information on your phone is stored on SD cards. However, they are not present in all models. Since the beginning of 2017, there has been a fashion for flagships that do not provide for memory expansion. The most prominent representatives of phones without the ability to insert a memory card are the iPhone.
Apple phones were never designed with storage expansion in mind. Because of these features, transferring data causes a serious headache, especially if its volume exceeds 100 GB.
But thanks to special programs, phone owners don’t even have to install additional software: you can transfer contacts, calls, SMS, photos and videos through the phone’s native utilities. Android based and iPhone.
The Android operating system was created by the American company Google, which provided a special program for storing data. With it, users do not have to take additional steps to access their files from any device.
To do this you will need to create an account. Often, owners of Android phones create it when activating the device. If this has not been done in advance, you can create a profile through the settings at any time:
- Go to the “Settings” application (on phones from different companies, the names of applications and items differ, but remain logically similar).
- Find the “Users and Accounts” section and click on the plus or select “Add a new account.”
- Step by step fill in the fields that open: “e-mail”, “First name”, “Last name” and move on.
- Create a new user name. The main requirement is uniqueness. If the system has an account with an identical login, the error “This name is already taken” will be displayed. The nickname will also be linked to mailbox@gmail.com, which is created automatically when registering an account. It will receive news related to Google. After confirming your username, proceed further.
- In the window that opens, enter a password that consists of at least 8 characters. If the password is missing at least 1 capital letter, number and special character, the program will generate an error. The resulting combination must be written down in a safe place. Restoring it will be problematic, especially if the account is not linked to a phone number.
- Enter your phone number and confirm it using the code that will be sent to you via SMS. This step is not necessary, but linking it to a number makes the account more secure and will prevent attackers from changing the password undetected.
- The last step is to agree to the privacy rules and terms of use. After this, the Account is officially considered created and is linked to the mobile phone.
How to transfer data to a memory card
If the broken smartphone and the new product support SD flash drives, you can transfer information through it. Content on the card is exported via Explorer. You cannot cut and paste files: this will delete them system folders, which means Android will stop working.
You can transfer videos, photos and music, but you need to mark them in the appropriate folders or find them in one of the manager tabs. Visually, the conductors differ, but in all modern phones There is such a tab. For example, on smartphones from Xiaomi, the Explorer application automatically opens a page sorting files by type: photos, videos, documents, music, ARK, downloads and archives.
To transfer data from your phone to a memory card:
- Insert the SD flash drive into the device.
- Go to Explorer and select the files you want to export. You can move them in stages. For example, first go to the “Video” tab and transfer files of this type to the flash drive. Then repeat the steps with music, photos, ARK, documents, sms and mms.
- When the necessary files are selected, click on the “Copy” button that appears below. There is an option to simply cut them, but they will disappear in the initial folder. If you are doing this for the first time, it is not recommended to cut files right away, because... In case of any error, their recovery can become a problem.
- When everything is copied, go to the SD card folder, which is located separately in Explorer and click “Paste”.
- Once the download is complete, all content will appear on removable media. It can be removed from the smartphone and moved to another device. The only requirement for a new smartphone is support for SD cards.
Attention! Exporting contacts via SD is done via phone book. In Explorer, these entries are not displayed on all phones.
Transferring applications
Programs stored on smartphones can be of two types. The first is installed through downloaded ARK files from third party sources. This type of application is located in the phone storage, and can be transferred to the SD card using the method described above. After moving, they will have to be reinstalled, because... registry entries will remain in the system of the old phone, and will only appear on the new gadget setup files. This type of program only works on Android.
The second type of files is actually impossible to transfer. They are downloaded via official sources, such as Play Market And App Store. Separately transfer ARK files from your phone similar programs it is forbidden.
However, for those who store a lot of programs on their phone, there is good news. Android keeps a record of everything downloaded through the Play Store. Music, movies and games can be restored along with the backup copy by simply connecting to your account as described above. To do this, synchronization must be enabled. However, applications are a little more difficult to restore: they will have to be downloaded manually again. To make this process as easy as possible, Google has created a My Apps & Games tab in Play Store. There are 3 lists in this section:
- “Updates” - programs installed on the phone that have new versions;
- “Installed” - a general list of applications that are on the phone;
- “Library” - programs that have ever been downloaded.
It is based on this list that the owner of a new phone will be able to completely restore his ARC files and immediately download them.
If the app is never installed again, you can simply remove it from the library. To add it back, just download it again using the search.
When transferring managers, for example, Viber to another phone, their entire history is downloaded automatically from backup versions stored on their official servers.
Attention! The presence of a SIM card does not affect the transfer of content to other smartphones. It doesn’t matter whether the gadget has an SD card if the files will not be transferred through it.
Transfer music
Modern users rarely store music files on their smartphones. To do this, use social networks or applications for listening to audio recordings. The most popular of them:
- Spotify;
- Deezer;
- Music Play;
- iTunes.
If your music library is stored in one of these applications, you won't have any problems exporting it. You just need to download the program on your new phone and log into your account.
If the files are stored on the phone, you will have to resort to one of the data transfer methods. It is best to transfer files via a memory card. If old or new smartphone Does not support SD card, you will have to use cloud storage. For this, there are both branded programs that are already preinstalled on the smartphone, and third-party applications. The most popular of them:
- iCloud- a proprietary utility from Apple that allows you to synchronize files from your smartphone;
- - application on smartphones from Chinese brand Xiaomi;
- Google Drive- space for storing system backups on phones with Android OS;
- Yandex Disk- application from Russian developers with 10 GB free storage and the possibility of paid expansion;
- Dropbox- a cloud from a third-party company, in which you can place up to 2 GB for free.
Music can be transferred to a new smartphone via a computer. To do this, connect the device via USB cable and select the connection type “Data transfer” on your smartphone. After this, you just need to save the necessary files in a folder on your computer. Then disconnect the old mobile phone and connect the new one to the cable. Paste the previously transferred files into root folder smartphone.
By the way, this method will work with any type of content. Before you transfer data from phone to phone, make sure both devices are connected to Wi-Fi.
All methods of transferring data from Xiaomi to Xiaomi (Mi Mover, Mi Drop, Mi account)
Chinese Xiaomi brand cares about the convenience of its users. Even for data transfer, Xiaomi has provided many options that will save time and nerves.
The most popular among them is cloud storage, which permanently saves files from the phone. Restoring through this source is considered one of the easiest and fastest methods.
Initially installed on all smartphones with MIUI shell.
To set up synchronization via Xiaomi proprietary cloud storage:
- Go to settings, find the “Accounts” section.
- Find “Mi Account” and go to it.
- If you are not logged in, log in using your email or phone number.
- After that, log into Mi Cloud.
- In the application that opens, select the types of content you are interested in and enable synchronization for them. If it is disabled for all file types, a message will appear at the top asking you to enable autosave. Instead of selecting individual data types, set up synchronization for all files with one click.
- If you want the cloud storage to contain, for example, only contacts and messages, enable autoloading for them optionally by going to the section of interest.
- Once the files are downloaded, connect to Mi Cloud on another phone and the files will be downloaded automatically.
Another tool for transferring information is, which is available on all Xiaomi smartphones that have the proprietary MIUI shell installed starting from version 7. To transfer files this way you don’t need anything other than Wi-Fi. The program is focused specifically on data transfer, so it has no unnecessary functions. To transfer files to a new smartphone using
- Open the app on two phones.
- On the main screen, select the files, including applications, that you want to transfer to your new device.
- Click on the "Submit" button, which will start searching for devices nearby.
- Confirm the file transfer on both smartphones and wait until the export is completed.
Third application, with which you can go to new phone without loss of information - Like previous utilities, it is already in the smartphone. The user does not have to download or configure anything. The main thing is that before you transfer data from Xiaomi to Xiaomi, you need to make sure that Wi-Fi is turned on. In this case, you can quickly transfer many files to another device in one action, along with a system backup.
Unlike previous methods, Mi Mover requires the simultaneous presence of two smartphones in close proximity, because To connect you need to read the QR code. To transfer files:
- Go to the “Settings” menu and find the “Advanced” section, where Mi Mover is located.
- Assign roles: receiver and receiver, respectively.
- A QR code will appear on the recipient's smartphone. To read it you need special application, which is already preinstalled on all Xiaomi smartphones, released after 2017. The code must be read by the sending smartphone.
- Wait for the process to complete.
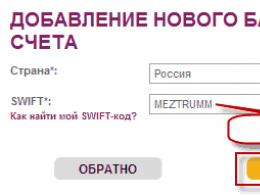
Attention! To transfer files from iPhone to Xiaomi you will need additional application. You can use Google Drive file hosting. It is suitable for any operating systems.
You can transfer data from Xiaomi to a computer, and then transfer it to iPhone via iTunes. In this case, the scheme for downloading files from a smartphone will be similar to the downloading of content via USB described above.
Transfer data from one iPhone to another
Like Xiaomi, Apple tries to put the convenience of its users first. When you activate your smartphone, synchronization with iCloud is automatically enabled. This allows you to quickly transfer data from your iPhone to your new phone. It is important to ensure that there is enough space in the storage for all files, otherwise at a crucial moment it will turn out that only part of the content is in the cloud. Manufacturers have provided the possibility of expanding the volume, but any changes are paid.
To transfer files to a new IOS smartphone, the user does not have to do any action. Just log in to another device and the system will automatically start downloading all iCloud content only if the smartphone is connected to Wi-Fi. IN otherwise, it will prompt you to restart the process later, if there is a wireless network. This decision is justified, because downloading a large amount of information via 4G can take much longer.
Transfer data from iPhone to Android
To transfer their files to iOS, Google OS users will have to install an additional utility. Since the systems are different, they initially do not provide the ability to switch from one smartphone to another. Most often, the “Move to IOS” application is used for this, which is available for download in Google Play. After installation is complete on both devices, you need to connect to Wi-Fi networks, then:
- On your iPhone, go to “Settings” and find the “Applications and Data” section, where the “Transfer data from Android” option is located.
- Log in to the “Move to IOS” application from your Android smartphone and click on the “Continue” button. The screen will appear Terms of use, which you must accept and click the “Next” button.
- Find “Code Search” and run it. The field is reserved for numbers that appeared on the iPhone. At this stage, sometimes a message appears that the Internet quality is too low. The warning does not have to be taken into account: it does not affect further work.
- After successful connection, select the files that you want to display on the new smartphone. When all files are selected, you need to click the “Next” button, the process of downloading information to the new phone will begin. If the volume of the selected files exceeds 50 GB, the developers recommend connecting the devices to power, because... Transferring system backups and content consumes battery power.
Methods to transfer data from Nokia, Samsung, HTC, Sony, Lenovo and LG
Other brands also have proprietary utilities for transferring files between devices. All Nokia phones, Samsung and HTC support work with any cloud storage. The most convenient way to transfer files is from using Google synchronization Step by step method its settings are described above. Works on any Android devices.
Also suitable specialized utilities. They are more convenient, but are primarily aimed at exporting between 2 phones from the same company.
To transfer information between phones, Samsung uses the “Smart Switch Mobile” program, which is available for download on the Play Store or Galaxy App.
A similar application is installed on Sony phones- "Xperia Transfer Mobile". Used less often than synchronization via Google account. HTC has an application - "Media".
U Lenovo smartphones and LG have no such utilities. It’s more difficult for Nokia owners who long time were released only on Windows based Phone. Modern Products of this company are released on Android, but users have not yet received a full-fledged shell and special utilities.
When purchasing a new phone, people do not always feel a sense of joy. Now they will have to spend time to transfer all the files to the new phone.
In reality, everything is simple: the process takes no more than half an hour, depending on the number of files. To save energy, it is better to store information from your phone in cloud storage. Then the process of switching to a new smartphone will take no more than 10 minutes.
Purchased new device on Android? Well, congratulations. Most likely, you will now want to transfer data and files from your old device to it. As practice shows, music and video are not at all difficult. Sometimes users encounter some difficulties in cases where there is a question of transferring other information, or rather, contacts and installed applications. But depending on the device you are using, you can solve the problem using built-in or third-party tools, as you will learn about below.
From the article you will learn
Transferring phone book contacts
First of all, let's talk about the most important thing - transferring contacts. Unlike old-style smartphones, for example, those that ran on Symbian OS, in Android everything is much simpler with the transfer of user data.
Option one - Using the Internet and your Google account
All you need to do is register a Google account and log in from your device, on which it should be enabled in the settings "Backup" And « Automatic recovery» . After this, all contacts from the phone book will be automatically added to your account. If you log into your account from another device, for example, a new one, the previously saved contacts in your account will be copied to the phone book. Convenient and simple.
Option two - Export to memory card
If you are one of those users for whom the Internet is unavailable for some reason, this moment, or simply want to transfer contacts manually, then you need to export them. This method is only relevant if both devices have a memory card slot.
Follow these steps:
- Open the Contacts app on your Android device.
- Go to the settings menu and find the item "Export contacts" or similar.
- Export contacts to separate file and save it to SD card.
- Move the SD card to the device to which you want to transfer contact data.
- Go to the Contacts app on your device to transfer.
- In the application settings, find the item "Import contacts" or similar.
- Import contacts from the memory card to the phone's internal memory by specifying the path to the file with the exported contacts.
Transferring SMS and MMS messages
Transferring text messages is usually the most difficult and fickle process. The best option There is an application for this task. It downloads messages to the card microSD memory, if it is on your smartphone. Another way is to transfer SMS to a computer and then use the application to restore them on a new smartphone by connecting it to the computer. Testing has shown that the program copes with its work and all messages are successfully transferred. detailed instructions on working with software is presented in the article -.
It is best to stop using SMS and MMS services altogether and switch to third-party instant messengers. For example, with Facebook Messenger, all you have to do is log into your account and all your messages will be at your fingertips. The same can be said about WhatsApp, Viber and others.
You should not erase data on your old smartphone until you have set up a new one. Thus, all data will always be at your fingertips.
Transferring music files
It's unlikely that you'll want to fill out your music collection from scratch on a new smartphone. Even if you don't use Google Play Music, this program is the best way music transfer.
It is best to do this using a computer. Play Music stores up to 50,000 audio tracks. You can then play them on any of your devices by logging into the app. In your browser, open settings and download music to Google app Play Music for your computer desktop. On your new smartphone, log into your Play Music account and all the music will be in front of you.
Google Play Music will help you move your music.
Using universal programs to solve a problem
The Play Market offers many applications, among which you can find practical solutions. For example, for our task, and are well suited. Using their functionality, the user gets the opportunity to transfer data (contacts, calendar, photo and video files) from one Android phone to another via wireless network Wi-Fi. These applications have rightfully earned high ratings from users.
I would like to specifically mention CLONEit - Batch Copy All Data. The program can transmit different types mobile data in just a few simple steps. Among them:
- Contact details;
- SMS and MMS;
- Call log;
- Program data and the programs themselves;
- System settings and more.
 CLONEit - Batch Copy All Data can move more than 10 types of mobile data.
 Step-by-step instructions on how to work with CLONEit - Batch Copy All Data:
- Install it on both Android devices and run it.
- On the old phone you need to press the “Sender” button, and on the new one, “Receiver”.
- After the gadgets find each other and establish a connection, the user will have the opportunity to select the mobile data that needs to be transferred.
- To start the process you need to press the button.
Transferring information between Android devices from the same manufacturer
How to transfer data from Android to Android in this case? After all, many users always buy a new product from their favorite brand if their model is already outdated.
Fortunately, Android smartphone manufacturers are not sitting idly by and are developing special software designed to easily and quickly copy data from the memory of one device to the memory of another.
Samsung
Owners of Samsung smartphones can use a special utility “Smart Switch” to transfer information. The utility is capable of transferring contacts, notes, calendars, photos, videos and much more.
Any Android device running version 4.0 and higher can be used as a migration source.
LG
For LG devices, a special application has been developed “LG Backup”, which can export almost any type of user data. The only thing that may upset many is the limited support, since data can be transferred using this utility only if the device used for migration is running under Android control JellyBean.
Sony
Perhaps one of the most best apps For Reserve copy and data transfer – “Xperia Transfer Mobile”, which allows the owner of Sony smartphones to easily exchange data between the most different devices. Almost all smartphones and tablets are supported.
HTC
Owners of HTC smartphones have access to an excellent utility – “Transfer Tool”, thanks to which you can quickly and easily transfer all SMS messages, notes, calendar schedules, etc. from one device to another important information. To transfer data, this application uses a wireless protocol called “Wi-Fi Direct”.
Even a beginner can understand the application. You can install it on any Android device, but you can transfer data only to smartphones and tablets from HTC. To run it you will need operating system version 2.3 or higher.
Motorola
Especially for users of Motorola smartphones, company specialists have created a software tool called “Motorola Migrate”. The application is available for the operating room Android systems version 4.1 and higher.
The software allows you to transfer data from any Android devices running operating system version 2.2 and higher. It is noteworthy that the oldest models are also partially supported, but portability is somewhat limited. For example, on some devices, only contacts can be transferred.
Meizu
In smartphones from this manufacturer, the data transfer procedure is organized very conveniently. You can use the proprietary Flyme shell application "Migration Tool" or built-in function "Backup copy".
The “migration tool” works on the principle of the above-mentioned universal application CLONEit. The interface is intuitive and simple. On the old device, you need to click the “Send from this phone” button in the program window, and on the new device, click “Transfer to this phone.” As a result of these actions, the system will offer a 4-digit code that must be entered on the old device. Next it will be installed WiFi connection. The user must then select the content to be “migrated” and click the “Start Sending” button.
As for the “Backup” function, in “Settings” go to the “About phone” section, then “Storage”, and then “Backup”. The system will prompt the user to do data backup, having previously selected which ones. Everything is saved in the Backup folder, which can be found via file manager. The resulting file can then be transferred to a new Meizu smartphone and place it in the same folder. Then you need to go to “Settings” along the same path, where you will see the backup file from the old smartphone. To begin transferring from your backup, simply click “Start Restore.”
Xiaomi and Redmi
The popular manufacturer Xiaomi offers several tools for transferring data between smartphones - the Mi Mover, Mi Drop and cloud service Mi Cloud. The first and last are great for working with large amounts of data, while Mi Drop is aimed at transferring selective files. It is also worth noting that thanks to Mi Mover, you can transfer data from Android of any other manufacturers, but only to Xiaomi. In some cases it can even be very useful.
Huawei and Honor
A proprietary application called Phone Clone is responsible for the reliable transfer of information on the devices of this company. Can work on any Android device, not just Huawei and Honor. Moreover, there is even a version for iOS. Thus, the functionality provides ample opportunities for “migration” of data from one phone to another.
Backup as a transfer method
First, make sure that you are logged in to your account on your Android smartphone. Google entry. Open "Settings" and go to the section (on different models This section may have different names).

Make sure your settings are enabled and "Auto-recovery", and that the smartphone is associated with a Google account.

These settings ensure that application data Wi-Fi passwords and the smartphone settings will be transferred to Google servers. They will be available to you when you log into your account on your new smartphone. Thanks to this, you will not have to re-enter network passwords that you have already saved. Of course, Google will know all your Wi-Fi passwords, but this is unlikely to scare anyone very much.
If you have samsung device, you can use the “Data backup” option in your account Samsung records. Will be saved here text messages, phone logs, contacts, email accounts that you used in Samsung apps. You can make choices: for example, choose a Google account to sync contacts, mail and photos, but at the same time save text and call records to your Samsung account, since Google does not have this option.
Advanced settings
Having dealt with backup recovery, you need to pay attention to another application “Settings”. On your smartphone you will find an application called “ Google Settings" (if it runs on Android Marshmallow (6.0), this will be another section in standard application"Settings"). Here you can manage various services connected to your Google account. There's a lot more to it than just backing up data, but that's what we'll focus on in this case.
To get started, select Smart Lock for passwords. Here passwords from supported applications and sites are saved to your Google account. So if you log in via Chrome browser On a new smartphone, you will not have to re-enter the password for the site. This also works with some third party applications, if their developers took care of it. There are currently few such applications, so it is better to trust password managers. You can choose between Dashlane, LastPass, 1Password.
To others important aspect is a Google Photos backup. All photos and videos you take will be sent to Google service Photo. The user gets unlimited storage, but will have to endure content compression. Also, any content can be stored in Google cloud Drive, where 15 GB is given for starters.
Conclusion
Using modern technologies, you can easily switch from one Android device to another, while maintaining all the information and user data in memory. There is nothing complicated in the process of data transfer and backup; the main thing is to understand and understand how everything works. Of course, there is no point in transferring some data, for example, if we are talking about contacts saved on a SIM card or bookmarks in Google Chrome.
Also solve this question possible using special universal applications, for example, Copy My Data and CLONEit - Batch Copy All Data. If you have Root rights on your device, you can use the Titanium Backup functionality.
Many of us have faced the problem transferring contacts from phone to phone when purchasing a new device with a different operating system. If you need to transfer your contacts to a new smartphone, inexperienced users often complicate this process by entering data manually and forgetting about the possibility of automating the transfer process and in various ways synchronization But there is no general algorithm, because there are several operating systems and contacts are transferred using different methods depending on where they need to be copied from. If we are dealing with a new Android phone, then in almost all cases the common feature is the participation of a Google account as an intermediary. To enable synchronization of your smartphone with your Google account, you need to follow the path “Settings” - section “Accounts” (Accounts) - item “Google” - select your account— and check the box “Synchronize Contacts”. This procedure is often repeated, so at the end of the article I wrote about it in a little more detail.
Transfer from SIM card

This option assumes that your contacts are stored on SIM card, partially or completely. Be careful, some contacts may be stored in internal memory phone/smartphone.
Procedure for transferring contacts from a SIM card:
- Open to Android smartphone Contacts app
- Press the “Menu” button and select “Import/Export”, which will open access to the list of contacts on the SIM card
- Press “Menu” again, then select “Import All”
- If you have duplicates in your list or you just want to selectively transfer contacts, you can select individual entries from the list to copy.
Transferring contacts from iOS devices (iPhone, iPad, iPod) to Android

- Open iTunes, select that Apple device, from where you will transfer the data.
- Go to last tab"Information"
- Check the box next to “Sync contacts with: Google Contacts”
- Click the “Settings” button and enter your Google account information.
- Save the settings, click the “Apply” button.
Transfer contacts from Windows Mobile on Android
- Open the ActiveSync app on your old device.
- From the menu, select Exchange Server settings.
- You must specify m.google.com as the server address, and SSL must be enabled.
- Login and password are details from your Google account.
- At the final stage, you can select the information to synchronize (Contacts, Calendar, E-mail and Tasks) and after completing the settings, press the “Synchronize” soft key.
- Sync your Android device with your Google account.
Transfer contacts from Windows Phone on Android

- Log in to the mail.live.com service using your Microsoft account and go to the “Contacts (People)” section.
- Click the Manage - Export button.
- All Microsoft account contacts will be downloaded as an attachment.
- Go to the “Contacts” section, click on the “Import contacts” link and upload the downloaded file.
- Sync your Android device with your Google account.
Transferring contacts from Symbian on Android

- Download Nokia PC Suite to your PC and connect your phone/smartphone to it.
- Open contacts in the application on your PC, select all the files and click “File” - “Export”.
- Export contacts to CSV format and save the file to your PC.
- Sign in to Google Mail using your account at mail.google.com.
- Go to the Contacts section, click on the “Import contacts” link and upload the downloaded file.
- Sync your Android device with your Google account.
Android - accounts and synchronization

Synchronization, which I wrote about at the end of each contact transfer method, is one of the most important features and most useful features Android devices. It allows you to interact with different accounts social networks And network services. The ability to add a new account depends on the relevant applications installed. For example, when installing Facebook, Evernote or Skype, you can set up synchronization with these services and add new accounts for them.

By default, only adding Google accounts, with which you can synchronize contacts, mail, calendar, tasks, applications, and even create backup copies of settings. By clicking on the selected entry, you can configure the synchronization frequency and the data that will be copied.
In September, I talked about transferring data from one Android phone to another (). The described method allows you to transfer contacts with photos and links to ringtones, call history, SMS and MMS, all applications, GoLauncher EX desktop settings, photos, music.
The only thing that could not be transferred was data and program settings. For some programs this is not at all important, in some (for example twitter, facebook, instagram) it is enough to re-enter your login and password, but with games it is more complicated: data on the completion of the game cannot be restored so easily.
In order to copy program data, the Android device must have root access. As it turns out, getting root on many devices is very easy. Yes, on mine Samsung Galaxy S II just copy two files to the memory card and run them from the recovery console by simultaneously pressing the “power”, “home” and “volume plus” buttons when turning on (http://w3bsit3-dns.com/forum/index.php?showtopic= 259348&st=9980#entry13059622, for Android 4.1: http://4pda.ru/forum/index.php?showtopic=296324&st=180#entry14633175). You don't even need to be connected to a computer to get root rights.
After gaining root access, program data can be copied and restored using one of the special programs. Titanium Backup is often used for this, but it is paid and has a completely unintuitive interface.
The GO Backup Pro program (https://play.google.com/store/apps/details?id=com.jiubang.go.backup.ex), which I suggested using in the September article, is good because it can work with both with or without root rights. When there is no root, Go Backup Pro simply saves the applications and then prompts you to install them one by one manually. As soon as you are rooted, GO Backup Pro starts installing apps automatically and saving and restoring all settings and app data.
The program interface is very simple. There are only two buttons on the first screen.
On the second screen you can choose what to save or restore.
The free version of Go Backup Pro has a limit on the volume of saved applications of 200 megabytes, but you can very easily bypass it by saving all applications 2-3 times (first all data and applications, except for large ones, and then the remaining applications separately).
Thus, using the programs “Go Backup Pro” and “
When choosing a new phone, everyone first of all thinks about what kind of camera it will have, how much memory, system or user, what the display diagonal is and much more. But not everyone thinks about how to transfer data from Android to Android correctly, although they are too lazy to repeat everything manually. Regardless of the brand and model, there are 4 ways to avoid losing information when transferring.
Via personal computer
This method is the most common and accurate in terms of data safety. This is because by dumping information on a PC, the user, as it were, creates backup copy, which can later be transferred to any other medium.
With all its advantages, this method is also the most labor-intensive, due to the need to perform the following actions:
- Install on your computer software for a specific brand of device. Usually the software is supplied together with the gadget on a disk, but it can also be found online, preferably on the official website. If the brands are different, you will need the appropriate utilities (for HTC phones this is HTCSync, for Samsung - Kies, etc.).
- To avoid any problems during the data reset process, you may need to enable USB debugging on each device. But this option is available in developer mode, which is enabled by repeatedly tapping on the build number in the settings.
- After this, the first Android needs to be connected to the PC using a cable and select the connection type for synchronization.
- Then launch the software and, following the prompts, make a backup copy of the necessary data on HDD computer.
- Then the information needs to be transferred to the second Android in the same way.
Another disadvantage of this method of data transfer is that it does not allow you to restore application and system settings on the new gadget. But the following method will help with this.
Using a Google account
Due to the fact that Android and Google have common developers, they are directly related. Without a Google account, it will be difficult to use most services, and some are impossible at all, for example, downloading software from the Play Market.
When you first start your phone or tablet on the Android platform, the system will prompt you to enter the details of an existing account or create a new one. Then in the settings you can mark what information needs to be synchronized with the cloud.
So, the algorithm of actions in this case is as follows:
- go to settings, General tab, Accounts and synchronization section;
- find Google and open it;
- long press on the name to open a list of data that can be synchronized;
- check the date of the last synchronization of each desired item;
- if necessary, check the box next to those items that are also needed but not included;
- Log in on the new device using the same username and password;
- wait until the automatic pumping of all applications, settings, contacts and other things ends.
The advantage of this method is its autonomy, i.e. the entire process occurs virtually without owner intervention. In addition, using a Google account, you can transfer data even to a device that is located at a great distance from another.
Each game or application will be re-loaded, and this leads to a minus - a network connection is required.
Special software
This option involves installing the same program on both devices. Let's look at this process using CLONEit as an example, which can be downloaded for free from the Play Market. You need to do the following:
- run the utility on both devices;
- select type of this device(on the first Android it is the sender, on the second it is the recipient);
- after the connection is established, a window for selecting the data to be transferred will appear on the screen of the sending phone;
- check the required boxes and start the process.
Thanks to this program, you can quickly and losslessly transfer local network Wi-Fi information:
- phone book data;
- SMS and MMS messages;
- call log;
- all software with settings and data;
- system configurations and so on.
Via memory card
In this case, everything is clear and familiar:
- insert a flash drive into one phone;
- copy to it necessary information(even contacts can be exported);
- take it out and insert it into the second phone;
- leave it or copy the data.
But what if you need to transfer not only photos and music to a second gadget? In this case you will also need to use special utilities that will help you make a backup old system on a new smartphone or tablet.
Most programs for creating or uploading backups require superuser rights, and therefore you should think carefully before the procedure. After all, obtaining Root rights is a hacking of the system, and therefore violates the rules warranty service. An example of such software is Titanium Backup. With its help you can make a copy of the following information:
- publicly available software and configurations;
- secure software and configurations;
- system applications and settings;
- all files available in the device memory.
It is preferable to store the backup file on a memory card. This method is also convenient because it is very helpful in cases where the first phone was lost or broken. That is why every Android user is advised to make periodic backups on their own to prevent such situations.
Video “Creating a backup”
You can see how to properly make a backup using Titanium Backup in this video.
Was this article helpful?
Thank you for your opinion!