Installing xp after windows 7. Easy setup of Windows XP
This article explains how to install Windows XP on a computer that already has Windows 7 installed and the steps required to create a dual-boot configuration when a boot operating system selection menu is available when the computer is turned on.
Introduction
It is generally accepted that a more correct Windows installation sequence is to install a minor version before an older one. In this case, it is possible to download more old system, and after installing a newer OS, a menu for selecting a bootable system appears.
However, the sequence does not matter if you know the principles of loading operating systems. Consider a situation where Windows 7 is already installed, and you need to install Windows XP on your computer. The article is designed to help avoid the pitfalls of those who plan Windows installation XP after Windows 7.
Initial data
Installing Windows XP
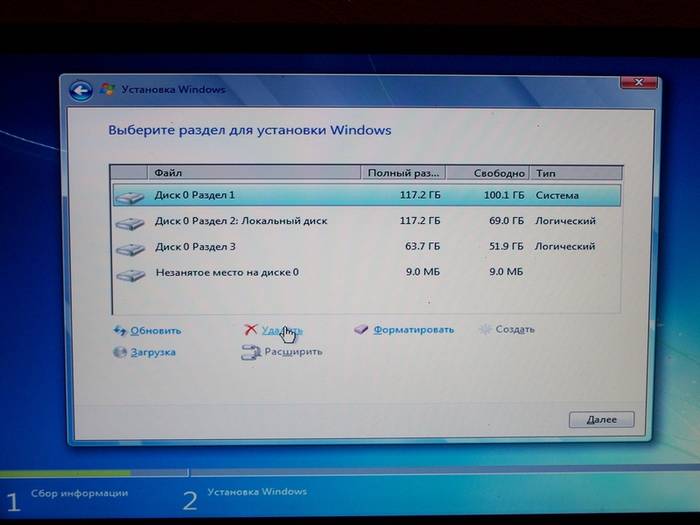
A lot of articles have been written about installing Windows XP, so it makes no sense to dwell on this issue in detail within the framework of this article. The only thing is to install Windows XP with already installed Windows 7 you can only boot from installation disk Windows XP. During installation, you must specify the disk partition that was previously prepared.
Figure 2 - Selecting a partition for installing Windows XP
Already in this figure, you can see that the partition that does not have a letter in Windows 7 is assigned the letter C, and the letter D is assigned to the partition with Windows 7.
The picture of "disk management" looks the same after installing Windows XP
Figure 3 - Disk Management in Windows XP
After installing Windows XP, neither the choice of operating systems at boot, nor, accordingly, the possibility Windows boot 7 will not.
Pay attention to the changes that have taken place with the hidden "System Reserved" section: it has become visible (it is assigned the letter C). Let's see what is located on the active partition (C). To do this, you need to disable the hiding of system files in the folder properties and allow their display:

Figure 4 - Enabling the display of hidden and system files
So, on the C section, we see the Windows 7 boot files: bootloader - bootmgr and folder Boot, which contains the files of the boot menu interface, the boot data storage file - bcd, memory checker files - memtest.exe. In addition, it now contains the Windows XP boot files: ntldr, ntdetect.com, boot.ini.
Figure 5 - Boot files for Windows 7 and XP operating systems
Repairing the Windows 7 Boot Loader in Windows XP
To restore the boot of Windows 7, you must use the Windows 7 installation disc.
Insert the Windows 7 installation disk, find the file on it bootsect.exe in the folder BOOT. Note that the path to the bootsect.exe file is F:\boot\bootsect.exe. In your case, instead of F, there will be a letter belonging to the CD - DVD drive

Figure 6 - Contents of the BOOT folder of the installation Windows disk 7
Run command line: press Start - Run, in the field enter cmd. At the prompt, enter the following command
Figure 7 - Progress of the bootsect command
The result of executing the command will be the restoration of the master boot record Windows systems 7 and the boot code that passes control to the Windows 7 boot manager.
Creating a Dual Boot Configuration in Windows XP
As you know, there is no utility for changing configuration data in XP, but it is in the folder with Windows 7 installed. To correctly apply it in XP, you need to enter the System32 directory of the Windows 7 operating system on the command line. After the transition, run the following commands in sequence:
Bcdedit /create (ntldr) /d" Microsoft Windows XP"
This command creates a Windows XP boot store in the Windows 7 boot store. This command may fail because the store is already created by default, so you only need to rename it:
Bcdedit /set (ntldr) description "Microsoft Windows XP"
The following command will tell the Windows 7 bootloader the location of the XP boot files:
The following command will point the Windows 7 bootloader to the Windows XP bootloader:
bcdedit /set (ntldr) path \ntldr
The following command will add a line about choosing Windows XP in the boot menu and put it below the rest:
Bcdedit /displayorder (ntldr) /addlast
Figure 8 - Full list commands to create a boot menu in Windows XP
You can check the correct execution of commands and the presence of a boot menu by running the command in the command line window bcdedit or by parsing the bootcfg file resulting from bcdedit >c:\bootcfg.txt. The file will be located in the root directory of drive C.
Figure 9 - Checking for a Windows XP Boot Entry and Boot Menu
After executing these commands, when you boot your computer, you will be given the option to select the OS to boot.
Figure 10 - Selecting OS to boot
It may be more convenient for many to reduce the OS boot selection timeout, which is 30 seconds by default. To set this parameter, use the command
Bcdedit /timeout XX
Where XX is the timeout in seconds.
Features of creating a dual-boot configuration in Windows 7
If you are just going to install Windows XP, then you can create a dual boot configuration in advance, even under Windows control 7. The same recommendations will help when you have restored Windows bootloader 7 while on Windows XP, and decided to create a dual-boot configuration later.
In this case, some features should be taken into account.
Commands, just like in Windows XP, are executed on the command line. On Windows 7, these commands must be run from an elevated command prompt. To do this, click the button Start, select an item Standard, click right click click the command prompt shortcut and select , or like this:
Click Start and in the search field enter cmd
Right click on the found file and select context menu paragraph Run as administrator.

Figure 11 - Launching an elevated command prompt (as administrator)
The order of execution of the commands is the same, with the exception of one. As you know, Windows 7 and Windows XP boot files are located on a hidden partition that does not have the letter . So instead of the command
Bcdedit /set (ntldr) device partition=C:
Need to be done
bcdedit /set (ntldr) device partition=\Device\HarddiskVolume1
This remark does not make sense if for any reason (for example, if you have HDD partitioned prior to installation), hidden boot partition was not created, and the system boot files are on the same partition as Windows 7.
Conclusion
Even if the installation sequence of operating systems is not quite correct, it is easy to organize their correct loading without resorting to complex manipulations or third party programs. Using the Windows 7 installation disc, you can restore the ability to boot into this operating system, and using the utility bcdedit configure the boot of two operating systems.
Every day Computer techologies are developing more and more, as software to them. But today, many have computers that do not correspond to the declared technical requirements. An example of such software is Windows 7, where at least 1 GB of RAM is required for comfortable operation.
And what about those who have only 512 MB of memory? In this case, our good old friend Windows Xp comes to our aid. It is in this article that you will learn how to install windows xp. This operating system is the second most popular in the Microsoft line. But this is not even strange, because the quality and convenience of work was and is on top.
Compare Xp with its older brother Windows Vista, this OS somehow didn’t take root with us, since there were many shortcomings there. And this was proved by the same users who worked on Xp without switching to a new OS. And most people, having bought a laptop or computer already with Vista, eventually rearranged it to XP or Windows 7.
If you are ready to learn how to reinstall Windows XP correctly, then let's move on to our installation, starting with preparing the computer.
Preparing to install Windows XP
To install, we first need a Windows xp installation CD. Or as an alternative, it can be a bootable USB flash drive, from 2GB or more. You can learn how to create bootable flash drive. If your choice fell on a CD - disk, then be sure to read how to burn a disk with a Windows image
Of course, we will need to save all our data to the "D" drive in case you reinstall Windows. And you may need. For example, I have a lot of bookmarks of pages I like, and it would be expensive to look for everything again after reinstallation. But after exporting, I saved all my favorites in one file, and after installation I restored them in a few clicks, and this is quite convenient.
Having saved all the data, the last step remains, we need to put in or a flash drive. Having done all this, you can proceed to the installation itself.
Installing Windows XP
Having prepared the computer and set everything in the BIOS as recommended, after inserting the CD into the drive, booting from it should begin. A window will open asking you to press a key to continue the installation. The main thing is to react in time and have time to press, because if there is nothing to do, the computer will start to turn on as always with the previously installed OS.
Pressing any key will display blue screen which will check the configuration of your computer. Here you have to wait a bit.

After verification, the installer will prompt you to install new Windows XP or restore an existing one. Since we will be installing a clean system, click " Enter».


To install Windows XP I used blank disk and created one partition by pressing just "Enter". But if you want to divide the disk into 2 partitions, press "C" and indicate the size that suits you, for example, a 20GB disk "C:\" and confirm. Selecting the "Unallocated area" again, press the "C" key and indicate the remaining 20GB, thus creating a second logical drive "D: \".

Having finished with the distribution of free space, select "Format the partition in the NTFS system<Быстрое>».

The formatting process will begin, it will take a few seconds, but if you chose simple formatting, you will have to wait a little longer.

After formatting, copying will automatically start installation files, again, here we do not need to press anything, we just wait.

After copying all the files, the system will reboot and proceed to the installation itself.

Our computer rebooted and the installation of Windows XP began, with an estimated time to completion.

At 33 minutes, a window will appear for setting up regional settings, changing the layout and adding a language, just click "Next". Thus, you will leave the standard set of languages English and Russian. As a rule, I set additional languages after installation.

In the next window, we need to specify the Name.


We give a name to our computer.

Set the time zone and set the date and time.

Select the normal options.

We simply skip this step without changing anything.

Attention!!! If you set boot from CD-drive, then again a window will appear asking you to press some key to boot from disk. Your task is not to press anything, because Windows XP is almost installed and we will not need the disk further. After the reboot, the auto-adjustment of the image will begin, we agree with everything by clicking "OK".


We are greeted by Windows and thank you for your choice, proceed to the next step with the "Next" button.

"Delay this action" is what we need to select. In the screenshot I scored to change the selection.

If Windows XP was able to install the drivers for the network card and the cable was plugged in, an Internet connection test may begin. But we just need to click on "Skip".

Again, if there is a connection then Windows will offer to register with Microsoft. Select "No" and click "Next".

Be sure to enter your account name.

We finish setting up Windows XP SP 3

Everything is ready Windows XP is installed.

How to Install Windows XP
This article will tell you in detail how to install Windows 7 on Windows XP. At the end of last year, Microsoft announced that the XP version would no longer be updated. In this connection this question remains highly relevant.
What is needed for this
There are still quite a few users who are loyal to XP. This is largely due to the fact that the "seven" is very demanding and old computer it is not possible to install it. In an era of rapid development of high technologies, even software products have become very demanding.
Owners of old hardware have no choice but to use an outdated system. This allows the system to function normally. Those users who decided to install "Seven" were sometimes dumbfounded by the terrible slowdown of their computer.
Nevertheless, having updated their equipment, the lion's share of people immediately decide on windows update.This allows you to enjoy all the innovations of modern technologies.
- processor with clock frequency not less than 1 GHz;
- 1 GB random access memory(for 32-bit) and 2 GB (for 64-bit);
- at least 16 GB of free hard disk space. If your version of Windows includes additional software (office, antivirus, drivers, etc.) you will need much more;
- Internet access (for further registration);
- graphics card that is compatible with version of DirectX from 10;
Advice: this condition only needed for modern games. If you intend to use only office programs, then it can be omitted.
- some features may require additional hardware (such as a TV tuner or flash memory);
If you are sure that your equipment fully meets these requirements, then you can proceed with the installation. You can view all the parameters through the control panel, then the “system and security” item, in which we select the “system” tab.
BIOS setup
First of all, you need to make some settings in the BIOS. To many inexperienced users, this seems like a complicated operation, but it's actually quite simple.

We do the following:


That's all, now the next time you start your computer, the system will start from the desired device and installation will begin. Also in the BIOS, you can immediately make additional setting, for example, increase the intensity of coolers. However, if you are not familiar with BIOS, it is better not to do this in order to avoid mistakes.
How to install Windows 7 if Windows XP is installed
Before installation, you will need to transfer all files from your computer to removable media, because it is better to install the OS with disk formatting. If there is not enough space, you can add some files to a file sharing service.
Having made all the preliminary manipulations, it's time to proceed to the main procedure. Almost all latest versions OSes are installed automatically, so this usually does not cause difficulties even for not the most experienced users.
After starting the installation, you can go do other things. The system will do everything itself, and you will only need to specify some additional parameters.
Installation process
After turning on the computer, it will immediately begin installing the operating system. Almost the entire process takes place automatically, so usually there are no problems with it.

You only need to make some settings:
- the language in which the system will run. However, it can always be changed through the control panel;
Important! Choose a full installation, as this will save you additional hassle.
- creating sections. You can divide the entire disk space into several parts. It is recommended to make a separate partition for Windows;
That's all. Now you just have to wait until the installation is completed. At the end, a window will appear in which you will need to enter a username and password (if necessary).
Some versions enter the username themselves at the end (usually the standard "Administrator"). You can edit this setting if you wish.

If you did not format the partitions, then in one of them (most likely in C) all XP files were saved. They need to be removed so that errors do not occur in the future.
It is done like this:
- Open Start and in the search menu type Disk Cleanup. A list of found items will appear, among which you need to select the very first one;
- The disk selection window will appear. You need to select the one on which the previous OS was installed and click "ok";
- in the window that opens, select "clear system files»;
- then you need to check the box next to the item "previous installations" and click "ok;
- when finished, click "delete files";
- after a few seconds, the unnecessary folder will be deleted.
Install drivers
Now it remains only to install drivers for all available devices (video card, chipset, network, sound, etc.). If you have a driver disk specifically for your computer (it is usually issued upon purchase), then you will only have to insert it and trust the instructions.

However, if it is missing, then you will have to select drivers for all equipment.
You can do this in several ways:

Now we can confidently judge that all the work is finished, and you have coped with the task. Do not forget that you will have to reinstall all the software again. Therefore, get distributions in advance so as not to experience problems in the future.
In addition, software products that work in XP may not work in the "seven". Therefore, before switching to this system, you should acquire more modern software products.

As you can see, this is a very simple process and strictly following all the instructions, you will certainly cope with this. If necessary, you can supplement the system with various additional utilities.
>As everyone knows, to work with a computer, we need an operating system, which eventually becomes “unusable” due to viruses, “garbage” and other factors. Many people think that it is better to ask a professional for reinstallation, but I suggest you step by step instructions installation of Windows XP. By studying which you will have no doubt that you yourself will be able to install Windows XP.
Why do you have to reinstall Windows?
According to statistics, even with good protection computer from viruses and careful handling once every three years, you still have to reinstall Windows xp. The "garbage" that accumulates in the system is sometimes leftovers from the removal of programs and games that contain settings, configuration files and other system files of the old application. Many programs make entries in the registry, and after deletion, the entry still remains "live" in the system. It also happens that the computer has hung and it’s impossible to “revive” it, and the conclusion suggests itself: you need to install a new Windows xp.
Setting up your computer to boot from a disc.
The splash screen usually appears for a moment when the computer boots up. motherboard, then the post is checked and here we see the greeting "Windows XP". To install, we do not need to run Windows itself, but we need to run the disk with our way windows xp. To do this, you need to go to Bios. To enter Bios, you must press the DEL or F1 key when you turn on the computer. (On laptops, F1, F2, F3, DEL, Ctrl + Alt + Esc are used. If more than one combination does not work, then you need to look at the official site how to enter bios).
Most often there are only two types of bios:

1.Phoenix AwardBIOS.
If you have this particular version, then you need to do the following: enter the Advanced BIOS Features section, select the First item in it boot device and assign the value CD-ROM. Then press the F10 key (to save the settings and exit) and select Yes in the dialog box that appears.

2. American Megatrends BIOS.
In this version, the background will be gray and the sections will be inline at the top. First you need to enter the Boot section, then the Boot Device Priority subsection and select your CD-ROM drive in the 1st Boot Device item. And just like in Phoenix AwardBIOS, press the F10 key and confirm Yes.
This completes the computer setup.

Launching the windows installer.
The first step is to insert the Windows disc into the drive and restart the computer. On the dark screen we will see the inscription "Press any key to boot from CD", which means - press any key to boot the disc, which we do. This inscription is displayed for no more than five seconds, so you must immediately press any key. If you did not have time, then you should restart the computer and press the key again.

On the monitor, we will see that the installation of windows has gone. It is not worth interfering except if you want to establish a special RAID driver or SCSI. In this case, you need to press the F6 key.


We press Enter and it appears license agreement, to agree and continue the installation, press F8. Next, you need to select a section hard drive which will be installed. If the disk is new and there is only an unallocated area on it, you need to create a partition (key C), specify the required size in it.

We will also be asked hard formatting disk fast and normal. Formatting is best done with the usual file ntfs system. After all, the long-awaited installation of windows xp will finally go, upon completion, the computer will reboot itself and a window will appear with the inscription “Press any key to boot from CD”, this time we don’t press anything!

A window will appear in which you don’t need to change anything, but in the next one, be sure to enter the Name and Organization.


The password is set at the request of the user. Leave the date, time and time zone as is or adjust if necessary.

If the driver network card was built into this assembly of Windows, then you will see the network settings in which you must select "Normal settings" and click "Next".

When choosing working group or domain, it is worth noting the first item with the value WORKGROUP.

Well, here we see the Microsoft logo and the latest windows configuration settings.
Welcome with login and desktop loading.
In contact with
This article will tell how to install windows 7 second system on a laptop or computer with an already installed Windows XP or with Windows Vista.
So you have a need installations second Windows to a computer or laptop. The need to install a second Windows can be due to completely different reasons, someone wants to try Windows 7 without deleting old Windows XP, and someone can't live without certain version programs running only on one of the Windows. In general, each has its own reasons and after FAQ friends - how to do this, I decided to write this guide.
Many people think that installing two Windows operating systems on one computer or laptop is quite problematic - this is not at all the case! Well, let's get started.
And now carefully: the next step is the most important in this installation. Having reached the disk selection, select disk D (partition 1 is disk C, and partition 2 is disk D, respectively) and continue installing Windows 7. You do not need to format the disk, because a lot of the information you need is stored there. Then we just continue with the standard installation of Windows 7.

During the installation process, the computer will automatically detect the presence of two operating systems and configure the bootloader. As a result, after a reboot, a menu will appear in front of us offering to choose which of Windows to start. Until the installation is completed, select Windows 7.

After several reboots - Windows 7 is installed. Now, when you boot, you can choose which system to boot and fully enjoy both Windows 7 and Windows XP.
If you don't like the title Previous Windows version in the bootloader do the following. Go to "Start" - "All Programs" - "Accessories" and run the command prompt as administrator by right-clicking on the shortcut and selecting the appropriate startup mode.