How to clean your computer from unnecessary processes. A selection of the best programs to clean your computer from garbage
Over time, the system becomes a lot of garbage that slows down the laptop: not desired programs, temporary files, registry entries. You can clean the system and speed up its work using built-in tools or special software.
How to clean the system
The main thing in cleaning the laptop from debris is the regularity of the process. If you have never tried to clean the system, then so much unnecessary data will accumulate in it that you can forget about normal operation. Many users immediately begin to think that the hardware is no longer pulling, and they need new laptop or at least complete reinstallation systems.
Reinstalling will solve the problem, there will be no garbage left, but you can also speed up the system in a less radical way that does not involve deleting user data from the laptop. Even cleaning with built-in tools will bring a huge positive effect. But in order not to forget anything, we will make a clear sequence:
- Desktop cleaning. Delete junk files and shortcuts to unused programs.
- Checking documents, including downloaded torrents. Typical situation- I downloaded the season of the series, watched it, left it as a dead weight on the disk. Delete - the more space, the faster the system works.
- Uninstall unused programs.
- Disk cleanup from temporary files.
- Cleaning the registry with CCleaner.
- Checking the autorun list.
If the file is not removed, use the Unlocker utility. It independently unloads from memory the processes that the file is busy with, helping to quickly clean the system of data that, when deleted, gives the error “Cannot be deleted. The file is being used by another program."
Uninstalling programs
Try to ensure that only really desired applications. It is better to clean the system from software "garbage" in order to free up space and slightly increase performance. There are several ways to uninstall a program:
- Through the Uninstall a Program applet in the Control Panel.
- Using its own uninstall file Uninstall.exe.
- Using the capabilities of the Revo Uninstaller utility (there is a free version).
The third option looks preferable, because Revo Uninstaller removes the program completely, including erasing entries in system registry. After a standard uninstallation, traces remain that are not good for the system.

After Revo removal Uninstaller will offer to clean the system from the remaining debris. Select a mode and click Scan. 
The program will show the remaining files and folders. Select them and click Remove. 
With advanced scanning, you can erase entries in the registry, so that the application will be destroyed without a trace.
Deleting temporary files
The system accumulates a lot of temporary files that clog memory, which you need to get rid of.

The same operation can be performed using the free cleaning utility CCleaner:

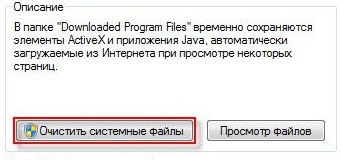
Deleting temporary files will empty the Recycle Bin, so make sure that there is nothing useful in it before you start cleaning the system. Additionally, you can clean system files:

Another list of data that can be deleted will be formed. Among them will be old updates, which sometimes take up a lot of hard drive space. After the list is formed, click "OK" to clean up.
Registry cleaning
The system registry also accumulates a huge amount of garbage - entries about programs that were deleted long ago. If you uninstalled through Revo Uninstaller, then there will be no entries left, but cleaning the registry will not hurt in any case - there are still incorrect extensions or incorrect firewall rules. ABOUT manual removal out of the question: it is too long and dangerous - you can erase the wrong entry and get errors in the system. The registry should be cleaned using CCleaner:

If you have never performed such a procedure before, you will immediately notice that the system has become faster and more stable.
Autorun settings
To speed up the loading of the laptop, you need to clean the autorun list. Programs that are loaded with Windows are added to it. The more applications, the more time it takes to launch them. To clear the startup list from garbage:

In the standard autorun list, you can only disable programs, but you will not be able to remove them. If you want to literally clean up startup junk to speed up your system, use CCleaner.

Since you have already opened the "Service" tab in CCleaner, use another handy laptop cleaning feature - the search for duplicates. Everything is simple here: start the search, see the result, select which version of the file you want to get rid of (usually they are completely identical and created at the same time), and click "Delete Selected". 
After such cleaning of the laptop from debris, you will notice a serious increase in system performance. The main thing is not to let all the work down the drain by the irregularity of cleaning. But it’s not worth deleting temporary files and cleaning the registry too often: it’s enough to clean up the system 1-2 times a month.
And this time I will tell you how to manually remove computer trash on your own, using Windows tools and programs.
1. Where is garbage stored in operating systems
On Windows XP
We go and delete everything in the folders: Windows temporary files:
- C:\Documents and Settings\username\Local Settings\History
- C:\Windows\Temp
- C:\Documents and Settings\username\Local Settings\Temp
- C:\Documents and Settings\Default User\Local Settings\History
For Windows 7 and 8
Windows temporary files:
- C:\Windows\Temp
- C:\Users\Username\AppData\Local\Temp
- C:\Users\All Users\TEMP
- C:\Users\All Users\TEMP
- C:\Users\Default\AppData\Local\Temp
Browser cache
Opera cache:
- C:\users\username\AppData\Local\Opera\Opera\cache\
Cache muff:
- C:\Users\username\AppData\Local\Mozilla\Firefox\Profiles\ \Cache folder
Google chrome cache (Chrome):
- C:\Users\ username \AppData\Local\Bromium\User Data\Default\Cache
- C:\Users\User\AppData\Local\Google\Chrome\User Data\Default\Cache
Or we drive in the address chrome://version/ and see the path to the profile. There will be a folder Cache
Temporary internet files:
- C:\Users\username\AppData\Local\Microsoft\Windows\Temporary Internet Files\
Recent Documents:
- C:\Users\username\AppData\Roaming\Microsoft\Windows\Recent\
Some folders may be hidden from prying eyes. To show them, you need .
2. Cleaning the disk from temporary and unused files using
Standard Disk Cleanup tool
1. Go to "Start" -> "All Programs" -> "Accessories" -> "System Tools" and run the "Disk Cleanup" program.
2. Select a drive to clean up:
The disk scanning process will begin...
3. A window will open with information about the amount of space occupied by temporary files:

Check the boxes next to the partitions you want to clear and click OK.
4. But this not all. If you did not install Windows 7 on blank disc, and on top of the previously installed operating system, you probably have space-consuming folders like Windows.old or $WINDOWS.~Q.
In addition, it may make sense to delete system restore checkpoints (except the last one). To perform this operation, repeat steps 1-3, but this time click "Clean up system files":
5. After the procedure described in paragraph 2, the same window will open, but the “Advanced” tab will appear at the top. Go to it.

Under System Restore and Shadow Copy, click Clean.
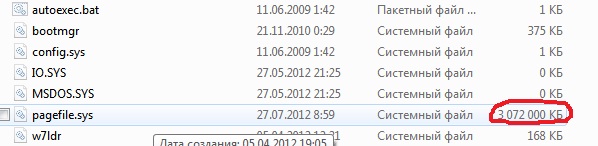
3. Files pagefile.sys and hiberfil.sys
The files are located in the root system disk and take up quite a lot of space.
1. The file pagefile.sys is system paging file(virtual memory). It cannot be deleted (it is not recommended to reduce it either), but it can and even needs to be moved to another disk.
This is done very simply, open "Control Panel - System and Security - System", select "Advanced system settings" in the "Performance" section, click "Settings", switch to the "Advanced" tab (or press the win + R key combination, the command will open and there type SystemPropertiesAdvanced) and in the section " Virtual Memory» Click Edit. There you can choose the location of the paging file and its size (I recommend leaving "Size at the choice of the system").
4. Removing unnecessary programs from the disk
Good way free disk space (, and how extra bonus increase system performance) is to remove unused programs.

Go to the control panel and select "Uninstall programs". A list will appear from which you can select a program. which you want to delete and click "Delete".
5. Defrag
defragmentation of the hard disk, carried out by the defragmenter program, allows you to organize the contents of the clusters, that is, move them on the disk so that clusters with the same file are placed sequentially, and empty clusters are merged.
This leads to an increase in the speed of access to files, and hence to some increase in the speed of the computer, which, when high level Disk fragmentation can be quite noticeable. The standard disk defragmenter program is located along the path: start> all programs> standard> system utilities> disk defragmenter.

This is what the program looks like. In which you can analyze the disk, where the program will show a diagram of disk fragmentation and tell you whether or not you need to defragment. You can also set a schedule for when the disk will be defragmented. This is a program built into Windows, there are also separate disk defragmentation programs, for example, which you can download here:

Its interface is also quite simple.

Here are its advantages over standard program:

- Analysis before disk defragmentation.
- Do a disk analysis before defragmenting. After the analysis, a dialog box is displayed with a diagram of the percentage of fragmented files and folders in the disk and a recommendation for action.
- Analysis is recommended to be carried out regularly, and defragmentation only after the appropriate recommendation of the disk defragmenter. Disk analysis is recommended to be performed at least once a week. If the need for defragmentation is rare, the disk analysis interval can be extended up to one month.
- Analysis after adding a large number of files.
- After adding a large number files or folders, disks can become excessively fragmented, so in such cases it is recommended to analyze them.
- Availability check at least 15% free space on disk.
- For a complete and proper defragmentation using Disk Defragmenter, the drive must have at least 15% free space. Disk Defragmenter uses this volume as an area for sorting file fragments. If the amount is less than 15% of free space, then Disk Defragmenter will only perform partial defragmentation.
- To free up more disk space, delete unnecessary files or move them to another disk.
- Defragmentation after installation software or Windows installation.
- Defragment drives after installing software or after performing an update or clean install Windows. Drives often become fragmented after software is installed, so running Disk Defragmenter helps ensure the best file system performance.
- Saving time on disk defragmentation.
- You can save some time required for defragmentation if you remove garbage files from the computer before starting the operation, and also exclude from consideration the system files pagefile.sys and hiberfil.sys, which are used by the system as temporary buffer files and are recreated at the beginning of each Windows session .
6. Remove unnecessary stuff from startup
7. Remove everything unnecessary with
Well, what you do not need on the desktop, I think you know for yourself. And you can read how to use it. , a very important procedure, so do not forget about it!
As you know, timely Windows cleaning, will become the key to the high performance of your computer and the versatility of its software resources. We have considered the best programs that can perform a complete cleaning of the system. Which of the above utilities should you choose?
The undisputed leader among programs for cleaning the computer system is Computer Accelerator. This program has amazing features that are only partially available to other analogues. Control the cleaning process, optimize as much as possible Windows registry and get rid of any software failures and malfunctions that have been bothering your computer for a long time. Computer Accelerator is able to quickly increase the performance of all computer resources, providing reliable stability and versatility of all its important system resources!
System Mechanic can be recommended for both beginners and professionals, however, specialists will like the product more. Its reliability and quality conquer, only slightly hinders English language on the menu. In the west, the utility package is widespread and popular, development has been going on for more than 20 years, so all functions have been honed to perfection.
An inexpensive alternative is Wise Care 365. The software is distinguished by the most convenient controls in comparison with analogues, powerful tools for ridding the system of computer debris, as well as the optimal ratio of the cost of a license and the high quality of the productivity tools offered by the developer.
CCleaner is one of the most widely used computer junk cleaners in the world. The utility gained its popularity thanks to user-friendly interface and rich built-in features. Owners of CCleaner receive virtually the entire list of most paid modern counterparts among the "cleaners" and "optimizers" of the operating system. Usage Advanced System Care Free will help you not only clean up the platform, but also seriously overclock your computer's performance. Thanks to the presence of a whole range of specialized tools, the program can increase the level of RAM and processor performance, which will have a great effect on the performance of the entire OS.
In addition to the common functions for cleaning the system of unnecessary and damaged files, Glary Utilities, will provide you with the proper protection of all sensitive data, increasing not only performance, but also the level of security of the operating system. The program is able to fix even incorrectly entered links, as well as find any errors in the registry and correct them correctly. If you have to share your computer with several other users, Comodo System Cleaner will help you get rid of even the slightest suspicion of stealing your information, the utility can delete any confidential data without the possibility of their subsequent recovery. Komodo System Cleaner has a simple interface and will quickly remove all unnecessary files, in addition, it will analyze the system for duplicate files.
Wise Registry Cleaner, is one of the leading registry cleaners. The program does not have such extensive functionality against the background of its main competitors, but it will perfectly cope with its direct duty. The application will give you the possibility of both manual and automatic control modes. Do not worry that Weiss Register Cleaner will clean up anything important automatically, because the developer has implemented convenient option creation backup register. Using Wise Care 365 Free, you can quickly clear the cache and cookies within web browsers. The utility has a convenient ability to customize (an already simple interface) to your preference. Weiss Care 365 will protect user personal data, defragment the required disks and clean the system of excess garbage.
System: extra services
Cluttered "Windows slows down programs and can cause errors in your computer. What do you need to clean up?
1. ANALYZE WINDOWS Before you put things in order, you need to get an idea of the extent of the chaos that is happening on your PC. To do this, press the "Win + R" keys and enter the command "perfmon / report". Windows will start monitoring performance and provide a list of system health indicators. At the very beginning, errors will be highlighted in red - for example, non-functioning devices or too long responses from system services. If there are a lot of these marks, tackle those issues first by tackling them with our cleaning tips. Green entries indicate that Windows is normal, but often there are still many opportunities for perfect cleanliness.
 |
2. CLEAR AUTOLOAD Too many programs in the startup folder slows down Windows startup. To view the processes taking place in background, you need to turn to external analysis tools such as Autoruns. This program checks the system and displays running applications, loaded drivers, and running services. You can find the information you need to optimize startup on the Logon tab. Unlike their own Windows features"msconfig", Autoruns provides a description of the program and, if possible, the name of its developer. Thanks to this, if an unfamiliar service is detected, you can decide whether to disable it or leave it alone.
 |
3. "RAKE" THE SERVICES The well-coordinated interaction of various components - for example, network connections- provided in Windows by background services. Use the combination "Win + R", enter the command "msconfig" and go to the "Services" tab. Here, check the box in front of the "Do not display Microsoft services" entry to view only the services additional applications. When you eventually find software entries related to the utilities you actually use, decide if they require automatic start. For example, iTunes installs the Bonjour service to share your music library. If you don't need it, you can turn it off. The same applies to SkypeUpdater. Click on the "Start" button, open the "Run" dialog and type "services.msc". Is the list of service entries still amazing? Not only does Windows offer many services, it is also very common for programs to inject themselves into the system through services. To manually disable, right-click on the service and select Properties. In the window that appears, click on the "Stop" button - the service will be immediately disabled. Now change the "Startup Type" to "Disabled". However, don't spend too much time Microsoft services, as well as autoloading, since the not very significant benefit from these actions is hardly worth such an effort.
 |
4. CLEAN OUT THE GARBAGE WITH CCLEANER Windows accumulates a lot of data that has become unnecessary. Although their inhibitory effect in the G7 and G8 is no longer as great as in Windows times 95, from time to time they should be removed, if only to clear the place, which on solid state drives always missing. Our choice fell on the CCleaner utility, as it not only removes temporary files and cache in Windows, but also purposefully deals with memory “eaters” among installed programs. The latest (fourth) version even removes the cache of the Photoshop installation process. To do this, on the left side of the Cleanup screen, simply select the Windows items and programs you want to clean up. Now click on the "Analyze" button. CCleaner will check your selected partitions for digital garbage and compile a visual list of results. Clicking on the "Purge" button will start the process. If cleaning with CCleaner left you wanting more, you can continue with the CCEnhancer extension. This utility adds CCleaner 500 additional cleaning options for other programs. In addition, once a year, you should review installed apps and delete unnecessary ones. This can be done either through the Panel Windows controls, or using special program- for example, Revo Uninstaller.
 |
5. SORTING WINDOWS 8 APPS Applications under tiled interface G8s, which exist alongside classical programs, create additional opportunity littering PC. In this case, the rule also applies: once a year, find time and look at the installed applications. The "Win" key will take you to the start windows screen 8. On it you will surely find applications that you will definitely not use anymore. In this case, they should be removed. It's very easy to do this: select the application on the main screen with the right mouse button, and then click on the "Uninstall" button in the bar at the bottom of the screen.
 |
6. CLEARING THE WORK SPACE Desktop interface fans love to fill their screen tightly with various shortcuts. To a certain extent, this is convenient, but at one point you can stop orienting yourself. Icons that you no longer need should be deleted. If they belong to installed programs that you no longer use, then delete the entire software through the Control Panel. For the remaining desktop icons, the rule applies: order is above all. Commercial program Fences (stardock.com, about 350 rubles) will provide more visibility to your desktop. Like a system drawers, Fences neatly sorts all programs, files, folders and shortcuts into categories and organizes a hodgepodge of icons.
NOTE Free Fences is distributed only in version 1.01, but the latest version 2.10 will already require costs.
8. GET RID OF OLD DRIVERS Corrupted and outdated drivers can cause performance issues in Windows. In this regard, it is worth looking into the Device Manager. see here exclamation points? Update the appropriate drivers via context menu. Free software - such as SlimDrivers (driverupdate.net) - will also perform this check for free and automatically.
2. TAKE CARE OF THE FILE SYSTEM The built-in Windows health check does not affect file system. A suitable utility must be run through the command line as an administrator. In the "seven" this line is called up by pressing the "Win + R" keys and entering the "cmd" command. When confirming with the "OK" button, hold down the "Ctrl" and "Shift" keys. In Windows 8, use the keyboard shortcut "Win + X" and select the option "Command Prompt (Administrator)". Now in command line type "chkdsk". You can fix the detected errors with the "chkdsk / f" command.
 |
3. CLEAR THE HARD DISK Regular defragmentation not only collects broken files together, but also adds speed. IN Windows versions from XP to 8 there is a native defragmenter. However, in XP, it must either be started manually or configured to run regularly using the Task Scheduler. In Windows 7, the defragmenter starts automatically when the PC is idle or at one in the morning when the PC is usually turned off. You can also use third party program- for example, Defraggler.
ATTENTION! Defragmenting only makes sense on regular hard drives. On solid state drives, it will not be useful. Embedded fans Windows tools can use the little-known Disk Cleanup function for cleaning. It can be called directly from the Start menu through the search bar with the query "cleanmgr" and get rid of unnecessary files.
5. ERASE WINDOWS.OLD Those who have upgraded Windows (for example, upgraded to version 8) will find the Windows.old folder on the C: drive. It contains files previous version, occupying, depending on the size of the installation, from 5 to 15 GB. If you no longer need files from old Windows, just delete the Windows.old folder. To do this, call the Disk Cleanup service through the search bar by keyword"cleanmgr", select "Clean up system files" and check the box in front of the "Previous Windows installations" entry. Click OK and then Delete Files to completely erase the entire Windows.old folder from your computer.
 |
Internet: tricky surf tracks
The browser and web services also collect data that, among other things, can compromise you. How to clean them up? Here are some pertinent tips.
1. CLEAN IE Users Internet Explorer 10 can, of course, resort to the help of external utilities, such as CCleaner, to erase unnecessary web browser data. However, now we will talk about our own funds. In Internet Explorer 10, click on "Settings" and then on "Internet Options". On the General tab, in the Browsing history section, check the box next to the Delete browsing history on exit entry. Internet Explorer will now delete temporary files such as history, cookies, passwords, and form information when it shuts down.
3. ORGANIZE THE DROPBOX Dropbox is a well-implemented online storage, but after a while it often becomes like a file dump. Vigorous cleaning required. We recommend the WinDirStat utility. When using it, you do not need to go to Dropbox through the site - the program simply scans the integrated into Explorer Windows folder Dropbox. WinDirStat is able to report the space allotted for individual folders and very clearly display the volumes occupied by certain types of files by coloring them in different colors. So you instantly calculate the "eaters" of memory and can purposefully get rid of them.
 |
4. "DESCARE" FACEBOOK Even Facebook accumulates a huge number of applications in a year that you used once and then forgot about them.
We recommend that you visit facebook.com/appcenter/my to review the programs and remove unnecessary ones. Sorting by "Recently used" will help with this. In addition, Facebook saves every search query. This log is deleted on your profile via the Activity Log. To do this, select "Search" in the menu on the left, and then click on the line "Clear search history" at the top.
 |
5. CLEAN GOOGLE To view your saved search terms, go to any Google service of your choice - for example, Gmail. If you are already logged in, then in the upper right corner of the browser window next to your profile picture, find the small arrow, click on it and select "Privacy" from the drop-down menu. Here in the "Google" section, go to the entry " Personal Area". Under the Web History category, you will see a corresponding link to Remove entries from Web History. Follow it and Google will make a list of all your saved Internet queries, which can be easily deleted with one click on the "Delete Entries" button.
Absolutely every computer during operation after a while starts to work worse than before: it freezes, slows down, gives errors, etc. This is explained simply: installed programs or remote ones always leave so-called fragments. These unnecessary files do not carry anything useful, but they occupy a certain place, and a huge amount of such “debris” accumulates over the years.
There is also dust that accumulates in the system unit over time. It covers the motherboard, graphics card, HDD. All these parts are very sensitive, they begin to overheat and malfunction.
The user ceases to like the operation of the computer and one has to turn to specialists. Private masters or specialized services do not work for free, although, in most cases, you just need to clean your computer. Everything is fair - you have to pay for knowledge, but you can also learn how to do it yourself.
It is only necessary not to be afraid, be patient and have two or three hours. We divide the entire cleaning process into three phases:
- The first one is cleaning system block from dust.
- The second is to check for viruses and fix errors.
- Third - you need to free the hard drive from garbage and defragment it.
Cleaning the system unit from dust
We will carry out the operation with a screwdriver, a vacuum cleaner and a paint brush (necessarily natural pile), you will also need an eraser.
Training
It is necessary to turn off the power and disconnect all wires. We put the block on its side, using a screwdriver unscrew the screws from the sidebar. All this is more convenient to carry out on the table. Having removed the panel, we can verify the amount of dust inside the computer.
Starts preparing. It is necessary to disassemble the system unit.
- You should start with a video card, it will not interfere in the future. It is attached to the back of the case with a screw, it must be unscrewed. First of all, remember or mark the wires that go to the video card, if any. It is necessary to pull out the card and bend the plastic latch at the same time.
- It will be correct to remove all RAM modules (RAM). They are always located next to the CPU cooler. To do this, you need to press the latches on both sides, the module itself comes out of the slot.

System unit
After preliminary preparation, we proceed to cleaning the system unit from dust.
We clean everything around motherboard: bottom, body, partitions. We simply “paint” with a brush, and the vacuum cleaner draws in the raised dust and debris.
The front cover of the case will also have to be removed and cleaned of dust, this is not difficult. It is fastened with plastic latches, which you just need to squeeze out from the inside.
Inside the system unit there are several components, all the same, with the help of a brush and a vacuum cleaner, we clean the surfaces.
Brush work without effort, without pressing. With this approach, even the smallest details will remain in place and nothing will break.

CPU
We pay special attention cpu cooler. Carefully unscrew the screws of the fan and remove it, you may have to pry it with a screwdriver between the radiator and the cooler.
Look how much dust is on the radiator, you can say that it is cotton wool. One can well imagine what CPU cooling- none! This first reason, by which your computer can freeze and give all kinds of errors.
We clean the fan, heatsink and processor, as well as the space around it. Some experts even advise to disconnect the heatsink from the processor, but you should not do this. Enough if you do all the above.

Power Supply
Now it's the turn of the power supply. Without a power supply, a computer is a piece of iron; when it fails, almost all the stuffing burns out.
It is held by four screws on the back of the block. When removing the power supply, prepare for disconnect all connectors. It is very good to remember everything or to photograph. Of course, you can not remove it, but it will be extremely inconvenient to clean it.
We disassemble the PSU by unscrewing the four screws on the cover. We collect all the dust with a vacuum cleaner, we work with a brush. We also clean the place where the block stands so that the conscience remains calm.
We unscrew the screws holding the entire board, and carefully lift it up. To remove the board, you need to solder the contacts, you do not need to do anything. Just lift it up and sweep the dust with a brush, collecting it with a vacuum cleaner.
Let's carry out an operation to clean the fan, and the PSU case. Carefully inspect the board, dust often collects near the insulating gasket, clean all visible dust.
We assemble the PSU in the reverse order and put it in its place in the system unit.
Video card and RAM
Now you need an eraser to clean the connectors on motherboard where the video card is inserted and RAM. Carefully, several times draw with an eraser by connectors - the result of cleaning the accumulated dirt is visible to the naked eye.
A special protective casing can be installed on your card, this is the cooling system. Below it is GPU and cooler. It also needs to be cleaned up. We install the cleaned video card in place.
To correctly install a memory module, you need to compare the notch on the slot and on the module. The notch is the key. It will not be possible to install it incorrectly in any way, but you can break the slot.
You will need to spread the side latches on the slot on the sides in accordance with the key, insert the memory module and press on it. The memory is installed correctly when the side latches are in place.

The card is screwed on, the memory is installed, it remains to close the cover of the system unit, connect all the cords and wires.
Checking for viruses and fixing system errors
Cleaning and Windows optimization This is a creative job that requires perseverance.
Virus cleaning
The list of anti-virus programs is large, use any of them, it is quite suitable and installed as standard on your computer.
The steps to launch an antivirus program are extremely simple. Should run antivirus program with a full system scan and wait while the system scan and virus cleaning are in progress.
If any threats are detected or malware offer suggestions on how to solve this problem. By default, the program contains the right decisions, you just have to agree. If offered the option to "treat" or "remove", in most cases it is better to remove. It is worth trying to treat only programs that are well known to you.
Very well, when there are no viruses and malware, a corresponding message will appear. In case when computer is well protected, you can rejoice, but even if viruses are found, there is no reason to panic. The antivirus knows what to do in such a situation.
After the procedure for checking the system for viruses, it is recommended to restart the computer, which we do.

Finding and fixing system errors
First, we determine whether the hard disk is divided into local sections or not. If so, which disc is the last one. You need to start checking with him.
Let's say your computer's hard drive has three local disk C, D and E. You need to start the scan from the last drive E, and we will end with the system drive, this is always drive C by default.
To start the scan, click on the "Start" button, in the right column we see the "Computer" menu, click on it. Hovering over the last drive E, call the context menu using the right mouse button. We find the last line "Properties" and call it.
The information window of the corresponding drive will open. You need to find the "Service" tab and open it.
The window that opens offers:
- Check disk for errors.
- Defragmentation of files stored on this drive.
- Backup files stored on this drive.
Now we are interested in checking the disk for errors, we start the check by clicking the appropriate button.
A window will appear in which you need to check the boxes, put both and click on the "Run" button.
All stages of verification will take quite a long time. Enough time to eat and drink tea. The test is completed by clicking "OK". We do the same with all the remaining disks.
Questions will arise when you start checking the system drive C. A message will appear: “Windows cannot check the drive that is in this moment used. Want to check disk for failures the next time you restart your computer? - click "Schedule disk check". We reboot the system ourselves using the "Start" button.
The system check will take place before Windows boot, a verification alert will appear, displayed on a blue screen.
Checking the system disk is similar to the others, except for the ending. When the check is over, the computer will reboot itself and open the “desktop”.
So the second phase of cleaning the computer is over. There is very little left.

Removing junk files and defragmenting disks
After you finish complete cleaning your computer, the system will work much faster, depending on the period of operation without maintenance, it can be 30-50%.
This is the final phase of cleaning your PC, and before that you have already on one's own:
- Using a brush and a vacuum cleaner, they removed all the dust from the system unit.
- Updated contacts in the connectors.
- Make sure there are no viruses.
- Fixed errors in disk partitions.
So there is nothing to fear, let's get started.
Removing junk files
We carry out cleaning in a standard way: open the "My Computer" folder, select the drive to clean up and open the menu with the right button, click "Properties". Click on the "Disk Cleanup" button.
You are probably already used to the fact that the system drive C, if it is not alone on the hard drive, is cleaned up last.
The computer will evaluate the possible amount of free disk space and suggest deleting some unnecessary files. The cleaning program offers to delete, in most cases, files created by the computer itself, they can be deleted without finding out their origin.
It will indicate how many megabytes can be freed, with the possibility of correction. We put ticks, marking junk files, we deal with the rest personally, maybe there is something necessary.
Front final removal the computer will ask again about the intention, if you have not changed your mind, click "Delete files".
File deletion has begun. Removal is quite fast, we proceed to clean up the following disks. After clearing all partitions hard drive- restart the computer. Experts recommend to carry out such cleaning of garbage, twice a month.
Attention! In any partition of the disk, there should always be 15% free space. It's necessary for normal operation programs, if there is no such space, it must be freed. You can do this by moving some programs or files from this drive to another.

File defragmentation
Absolutely all files are fragmented, this is how Windows records any information. Recording occurs in small particles, the so-called clusters. These clusters can be placed in one place, or scattered throughout the hard disk space. Defragmentation forcibly collects all clusters of one file side by side, this allows you to speed up the reading of the file if necessary.
We can use specialized defragmentation programs or run the standard one from Windows, which we will do. It is worth noting that this process is not fast, and the defragmentation procedure can take quite a long time.
During defragmentation, you cannot use the disk whose space is being processed. We close everything that can interfere with us, and we start.
Already familiar procedure, "My Computer", select required disk. System disk required defragment as usual- last. Right button mouse - "Properties", click on the "Tools" tab and click "Perform defragmentation".
A window will appear in which you should use the "Analyze disk" button. The analysis will show the number of scattered files on the selected disk as a percentage.
At the end of the analysis, click "Disk Defragmenter". You have to be patient, the process will take some time. After finishing defragmentation, a system alert will appear that there are no fragmented files in this partition.
So, disk by disk, analysis and defragmentation, analysis and defragmentation. After fixing the system disk, and we remember that we fix it last, we restart the computer.
This procedure is best done once a month for prevention. Every time the speed personal computer noticeably improves.

This completes the cleaning of the PC from dust, and the system from debris. Such cleaning can be carried out without the help of a specialist. At the same time, learn something new and save some money.
Video
From the video you will learn the original way to quickly and easily clean the system unit from dust.