Installation on the server 1c iis. Configuring web servers to work with 1C:Enterprise
After the release of new 1C platforms (for example, already in 8.3.11.2867) on 64 bit systems Windows Apache version 2.0, 2.2 stops working. There is a way to go to 2.4. Its installation is somewhat more complicated than usual - installation files no, so everything needs to be run and configured manually. Taking into account the fact that I was interested in using IIS, I decided to write an article at the same time.
- For Windows x64, you will need a 1C x64 distribution kit (this applies to both the server and client applications)
- Installing the IIS Web Server
Installing the Internet Information Server web server. When installing, be sure to select the components:
- Common HTTP Features
- Static Content
- Default Document
- Directory Browsing
- HTTP Errors
- Application Development
- ASP.NET 3.5
- .NET Extensibility 3.5
- ISAPI Extensions
- ISAPI Filters
- Correction and diagnostics (Health and Diagnostics)
- HTTP Logging
- Request Monitor
- Management Tools
- IIS Management Console
4. Then we give the rights for the IIS_IUSRS and IUSR users to the folders:
- folders with the installed platform;
- folders with database publications;
- folders of the databases themselves (in the case of the file version).
6. Configuring IIS to use the 32-bit Web Server Plugin
Facilities» (Tools) - « IIS Manager
Default Web Site- a virtual directory converted into an application appeared with the name that we set when publishing the database. All that's left to complete the publishing is to allow 32-bit applications for the default application pool. To do this, in the connection tree, go to the " Application pools» (Application Pools).
In the list of application pools, find a pool with the name DefaultAppPool. Let's click on it right click mice and context menu choose the item " Extra options» (Advanced Settings).
In the application pool settings window that opens, in the " General» (General) find the item « 32-bit applications allowed» (Enable 32-Bit Applications) and set the value of the parameter to True. Then save the changes by clicking " OK».
7. Configuring IIS to use the 64-bit Web Server Plugin
You can register a 64-bit web server extension module using the utility webinst.exe the corresponding version located in the directory bin, directory with installed program 1C:Enterprise, or use the method below.
Launch Internet Information Services (IIS) Manager. You can do this from the Server Manager by selecting the menu item " Facilities» (Tools) - « IIS Manager» (Internet Information Services (IIS) Manager).
Here, expanding the tree in the connections window, we will see that for the default website - Default Web Site- a virtual directory converted into an application appeared with the name that we set when publishing the database. To complete the publication, it remains only to specify this application use a 64-bit request handler. To do this, open the handler mapping settings page for this virtual directory by selecting the " Handler Mapping» (Handler Mappings) on home page applications.
In the handler mapping table, find the "1C Web-service Extension" handler. Let's open given handler by double-clicking on the corresponding line in the table.
Let's edit the handler, replacing the path to the executable dll of the 32-bit web server extension module that is selected in this moment, to the path to the 64-bit version of the library. AT this example change the path c " C:\Program Files (x86)\1cv8\8.3.?.??\bin\wsisapi.dll" on the " C:\Program Files\1cv8\8.3.?.???\bin\wsisapi.dll» using the select button. After changing the path, press " OK» to save changes.
Modern conditions, with the widespread use of mobile devices and the available Internet, place new demands on information systems of even small firms. If a few years ago remote access was the lot of large organizations, today the ability to access information from anywhere is taken for granted. Today we will tell you how to quickly and cost-effectively organize web access to 1C:Enterprise databases working in file mode.
The traditional scheme of working with 1C:Enterprise in file mode implies sharing infobase files via SMB protocol(Microsoft networks). In this case, one of the computers acts as a file server, while the others work with the hosted public access information base.
 However this scheme has a number of significant drawbacks. The speed of work is significantly affected by how throughput networks and computing power client computers. We discussed this issue in more detail in our material. This is especially true after moving to managed application-based configurations, which are much more resource intensive than previous generation configurations.
The issue of remote access is also acute, if for remote computers you can still organize remote access via RDP, which, by the way, is not always available for small companies that do not have a dedicated server, then with mobile devices it's all pretty sad.
However, managed application provides new features such as web access to information base, including those working in file mode. This allows you to qualitatively change the work with information system with virtually no additional cost.
 On the computer with the infobase, the additional role of the web server is raised, on which the infobase is published. After that, you can continue to work with it both in file mode and in web server mode.
At the same time, it is not necessary to use a browser to work; the platform in thin client mode can also access the database through a web server. This feature allows you to organize access not only for remote and mobile clients, but also improve work on underperforming machines in the office, since all the main calculations will be performed on the server side and the traffic transmitted over the network will be minimized, as well as the load on the client computer.
And, of course, there are practically unlimited possibilities for remote access to the database: from anywhere, from any device, there would be a browser.
Below we will consider possible configurations for organizing web access to small databases operating in file mode based on client operating systems.
On the this moment the two main web servers Apache and IIS are supported, the platform must also be installed on the machine with the web server and web server extension modules. You can always install them additionally by simply running the platform installer again:

Windows and IIS
Internet Information Services (IIS) by unknown reasons not popular with administrators and 1C nicknames. But in vain, ignoring a regular solution in favor of some third-party software, even if it’s not bad, looks at least strange.
For IIS installations on the client OS, in our Windows case 7 x64, go to Control Panel - Programs and Features - Enable or disable Windows components .
 In the window that opens, select IIS Services, then expand the list and go to Internet Services - Application Development Components and check the box next to ISAPI Extensions, the rest of the parameters can be left as default.
 After installing IIS, let's move on to configuring it, for this open Control Panel - Administrative Tools - Internet Information Services (IIS) Manager.
 Select from the tree on the left Application pools, right click on DefaultAppPool - Additional options and allow 32-bit applications by setting the appropriate option in True.
 Now let's expose necessary rights for groups IUSR and IIS_IUSRS. We issue rights to the folder with the infobase Change and Read and execute:

per folder bin platforms - Reading and Execution:

Then we run 1C:Enterprise as an administrator and load the required infobase into the configurator mode.
 On the menu Administration choose Publishing to a web server. 1C:Enterprise will automatically detect the web server (IIS) and offer to place the web application in the root of the web server in the directory with the name of the infobase folder, which will also be the name of the publication, you can change these settings if necessary.

Ready! To access the database, we can use the address of the form http://hostname(address)/publication_name, in our case http://192.168.3.109/Acc30, launch the browser and check the work.

You can also configure the database to work with it through the platform, for this, in the dialog for adding a new infobase, specify the location on the web server:

The next step is to enter the connection address:
 After launching the infobase, you can make sure that it works in the web server mode, and not in the file mode:

Windows and Apache 2.2
If for some reason you do not want to use IIS, you can configure 1C to work with another popular Apache web server. Unfortunately, the Apache developers have stopped publishing binary builds for Windows, offering to contact their partners, so let's go to the Apache Haus website and download the build 2.2.x architecture x86 even if you have a 64-bit operating system.

Attention! To obtain an Apache build, you should only use reliable sources, which are listed on the project website. The security of your web server and your data depends on it!
You will also need to install the Microsoft Visual C++ 2008 Redistributable Package, which is required for the Apache build to work properly.
Then unpack the downloaded Apache archive into an arbitrary directory, for example, c:\apache22, from the whole set of folders we are interested in folders bin and htdocs, the first one contains the web server executable files, the second one should contain the web content.
Let's open command line with administrator rights and go to the directory bin web server:
Cd C:\Apache22\bin
Now let's install Apache as a service:
Httpd -k install
We do not pay attention to warnings, for the purposes of use with 1C, the default Apache configuration is suitable.

Since the service runs on behalf of the system account it is not necessary to set the rights to the folders with the base and the platform.
Then, in the same way, we launch 1C as an administrator in the configurator mode and proceed to publishing on a web server. Unlike IIS, in this case, the platform itself cannot specify the path and create a folder, so we do it manually. The folder must be created inside a directory htdocs and its name must match the name of the publication:
 In our case, this C:\Apache22\htdocs\Acc30\ By the way, you can create the desired directory directly in the folder selection dialog. Then we publish the information base.
The next point, 1C is not able to restart this assembly of Apache, so we will do it manually through the snap Services:
 After restarting the web server, the published database will become available at the same address as in the case of IIS, and work with it will also be no different.
Tags:
In this article, I will describe in detail the process of organizing web access to 1C:Enterprise databases8.3 on the IIS (Internet Information Server) web server included in the delivery Microsoft Windows server. For older versions of 1C:Enterprise (8.1 and 8.2 ) the algorithm for publishing databases is generally similar. The algorithm for configuring IIS for 1C:Enterprise operation will be considered, and the process of publishing databases on a web server will be described as for32-bit, and for 64-bitweb server extension module.
- What you need
- Installing the IIS Web Server
- Installing 1C:Enterprise components
- Setting operating system
- Publishing a database to a web server
- Configuring IIS to Use the 32-bit Web Server Plugin
- Configuring IIS to use the 64-bit Web Server Plugin
- Connecting to a published infobase via a web browser
- Connecting to a published infobase via the 1C:Enterprise client
- Virtual directory configuration files
- default.vrd file
- web.config file
1. What you need
- A computer that meets the minimum system requirements for running a web server running one of the following operating systems:
- Microsoft Windows Server 2012 (R2)
- Microsoft Windows Server 2008 (R2)
- Local administrator rights on this computer.
- Distribution kit for installing 1C:Enterprise components. For setting up a 64-bit web server extension module, a distribution kit for installing a 64-bit 1C:Enterprise server. This example uses the version 8.3.4.389 . For older versions of 1C:Enterprise ( 8.1 and 8.2 ) the algorithm for publishing databases is generally similar.
2. Installing the IIS Web Server
Install the Internet Information Server web server, which is included by default with Microsoft Windows Server. When installing, be sure to select the components:
- Common HTTP Features
- Static Content
- Default Document
- Directory Browsing
- HTTP Errors
- Application Development
- ASP.NET 3.5
- .NET Extensibility 3.5
- ISAPI Extensions
- ISAPI Filters
- Correction and diagnostics (Health and Diagnostics)
- HTTP Logging
- Request Monitor
- Management Tools
- IIS Management Console
I wrote in detail about the process of deploying the IIS web server:
- In Microsoft Windows Server 2012 (R2) - here. IIS version 8, after installation, you should see the Default Web Site page of the form:

- In Microsoft Windows Server 2008 (R2) - here. IIS version 7, after installation, you should see the Default Web Site page of the form:
3. Installing the 1C:Enterprise components
On the same server where the IIS web server is deployed, install 1C:Enterprise (32-bit components), be sure to select the components during installation:
- 1C:Enterprise
- Web Server Extensions
If you plan to configure a 64-bit web server extension module, you must additionally run the 64-bit server installer from the corresponding 1C:Enterprise distribution and install the following component:
- Web Server Extension Module

4. Operating system setup
Now you need to set the necessary rights to key folders used for web access to 1C:Enterprise databases. For the storage directory for website files published on the web server (default C:inetpubwwwroot) you need to give full rights to the group " Users» (Users). In principle, this step can be skipped, but then to publish or modify the publication of the database, you will need to run 1C:Enterprise as an administrator. To configure the security of this directory, right-click on it and select " Properties» (Properties).

In the properties window that opens, go to the tab " Security» (Security) and press the button « Change» (Edit…), to change the current permissions. The permissions window for this directory will appear. In the list of Groups or users (Groups or user names) select the group " Users" (Users) and in the list of permissions for the selected group, set the flag " full access» (Full control). Then press " Apply" (Apply) to save the changes and close all windows using the button " OK».

Next, you need to give full rights to the directory with installed files 1C:Enterprise (by default C:Program Files (x86)1cv8 for 32-bit expansion module and C:Program Files1cv8 for 64-bit) group IIS_IUSRS. To do this, we perform the same actions as described above, with the only difference that in order for the required group to appear in the list " Groups or Users” (Groups or user names), you must click the button located under the list “ Add" (Add..), and in the window for selecting groups or users, click " Additionally» (Advanced…).

Then click on the button on the right Search"(Find Now), then select the desired group IIS_IUSRS in the search results table and click " OK».

Group IIS_IUSRS will appear in the list of groups or users. Give it full rights to the selected directory and click " Apply» (Apply) to save the changes.

And finally, if the publication is performed for the file base, you must also give the group IIS_IUSRS full rights to the directory containing the files of this infobase.

5. Publishing the database on the web server
We proceed to the direct publication of the database on the web server. To do this, launch 1C:Enterprise in the Configurator mode for the database that you want to publish. Then select " Administration» - « Publishing to a web server...»

The window for setting the properties of the publication on the web server will open. The main fields required for publication are already filled in by default:
- Virtual directory name - the name by which the database will be accessed on the web server. Can only contain Latin characters.
- Web server - selected from the list of web servers found on the current computer. In our case, this is Internet Information Services.
- Catalog - physical location directory where the files will be located virtual application.
- The corresponding flags can specify the types of clients to publish, as well as indicate the possibility of publishing Web services. In the table below, you can edit the list of Web services that will be published, as well as in the column " The address» change the synonym by which this Web service will be accessed.
- Also, for the IIS web server, it is possible to indicate the need to perform authentication on the web server using OS tools by setting the appropriate flag.
By choosing necessary settings publications click " Publish».

If the publication went without errors, we will see a corresponding message.

Publishing to the IIS web server is always done for the default website and for the default application pool. It is worth bearing in mind that when publishing from the configurator, the 32-bit web server extension module will be registered, and the default application pool will be DefaultAppPool- works only with 64-bit applications without configuration. Accordingly, further actions depend on the bitness of the web server expansion module that you plan to use. For a 32-bit web server plug-in, you must allow the application pool to use 32-bit applications, or register a 64-bit web server plug-in. This will be discussed below.
6. Configure IIS to use the 32-bit Web Server Plugin
Facilities» (Tools) - « IIS Manager

Default Web Site- a virtual directory converted into an application appeared with the name that we set when publishing the database. All that's left to complete the publishing is to allow 32-bit applications for the default application pool. To do this, in the connection tree, go to the " Application pools» (Application Pools).

In the list of application pools, find a pool with the name DefaultAppPool. Right-click on it and select " Extra options» (Advanced Settings).

In the application pool settings window that opens, in the " General» (General) find the item « 32-bit applications allowed» (Enable 32-Bit Applications) and set the value of the parameter to True. Then save the changes by clicking " OK».

7. Configure IIS to use the 64-bit Web Server Plugin
You can register a 64-bit web server extension module using the utility webinst.exe the corresponding version located in the directory bin, directory with 1C:Enterprise installed, or use the method below.
Launch Internet Information Services (IIS) Manager. You can do this from the Server Manager by selecting the menu item " Facilities» (Tools) - « IIS Manager» (Internet Information Services (IIS) Manager).
Here, expanding the tree in the connections window, we will see that for the default website - Default Web Site- a virtual directory converted into an application appeared with the name that we set when publishing the database. To complete the publication, all that remains is to tell this application to use the 64-bit request handler. To do this, open the handler mapping settings page for this virtual directory by selecting the " Handler Mapping» (Handler Mappings) on the start page of the application.

Find the handler in the handler mapping table "1C Web Service Extension". Open this handler by double-clicking on the corresponding row in the table.

Let's edit the handler, replacing the path to the executable dll of the 32-bit web server extension module that is currently selected with the path to the 64-bit version of the library. In this example, change the path c " C:Program Files (x86)1cv88.3.4.389binwsisapi.dll" on the " C:Program Files1cv88.3.4.389binwsisapi.dll» using the select button. After changing the path, press " OK» to save changes.

8. Connecting to a published infobase via a web browser
Well, that's all. For connections to a newly published database, run Internet Explorer, and in the address bar enter the path of the form http://localhost/<Имя публикации информационной базы> . In this example, this is http://localhost/DemoAccounting/.

You can also connect to this infobase from any computer on the network by accessing the web server via its internal (or if the port 80 , by external) IP address.
In this case, for 1C:Enterprise to work correctly, the name of the domain to which the call is made (or IP address) must be added to Internet Explorer's trusted sites, and pop-up windows must be allowed for it. More about Internet setup Explorer for the 1C:Enterprise web client, read here.

9. Connecting to a published infobase through the 1C:Enterprise client
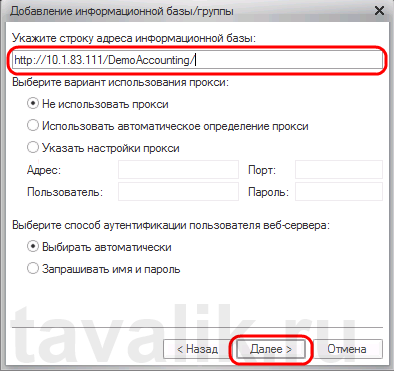
You can also connect to an infobase published on a web server using the 1C:Enterprise thin client. To connect, open the 1C:Enterprise launch window and click the " Add» to add an infobase.

In the window for adding an infobase/group, set the switch to " Adding an existing infobase to the list» and press « Further».

Enter the name of the database as it will be displayed in the list of infobases (must be unique for this list), select the location type " On the web server» and press « Further».

Enter the address string to connect to the infobase (without the /ru_RU/ prefix). You can also specify the proxy server settings (if any) and the method of authentication on the web server here. Having specified the necessary settings, click again " Further».
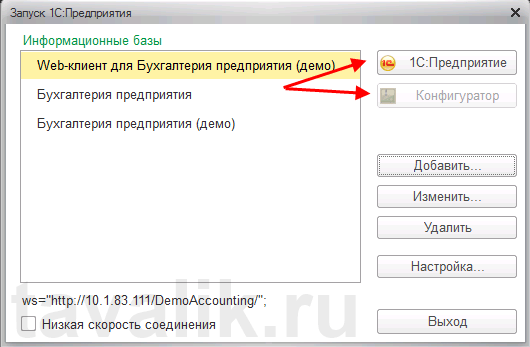
Specify launch parameters for the infobase and click " Ready» to complete the wizard.

After that, this infobase will appear in the list of databases in the 1C:Enterprise launch window. Please note that the launch mode Configurator is not available for of this type connections. Press " 1C:Enterprise» to connect to the infobase.
10. Virtual directory configuration files
Let's take a closer look at the structure of the files that were created during the publishing process. If web access to the published infobase does not work for some reason, configuration files can be edited manually to achieve the desired result (the configuration files from this article for the 64-bit web server extension module can be downloaded here).
Let's go to the directory that we specified during the publication of the database. We will see two files in it:
- default.vrd
- web.config

Both files are viewable and editable using any text editor, such as Notepad. Let's take a closer look at the structure of these files.
10.1. default.vrd file
In file default.vrd describes published Web services (element
Ib="File="C:1C_BASEDemoAccounting";"
As you can see from the example, if there are characters in the connection string that are invalid according to the XML standard (http://www.w3.org/TR/xml11/), they must be replaced accordingly.

You can specify the username and password in the connection string. In this case, the connection to the infobase will be performed on behalf of the specified user. For example, to connect as a Seller user, the connection string would be:
Ib="File="C:1C_BASEDemoAccounting";Usr=Seller;Pwd=123;"
For a server infobase, the connection string will look like this:
Ib="Srvr="WIN2012;Ref=Accounting;"
Where WIN2012- the name of the 1C:Enterprise server cluster, and Accounting- the name of the database in the cluster.

More about the structure given file can be read in the Administrator's Guide 2nd Edition, Appendix 2, Chapter 3.12.
10.2. web.config file
File web.config is a file that defines options for an ASP.NET web application. Every web application should have a file web.config located in its root directory. Our virtual directory is no exception. The current file contains data about the 1C Web-service Extension handler that processes requests to this application. The handler is configured in such a way that all requests are passed to the library wsisapi.dll located in the directory bin, directory with 1C:Enterprise files. If server infobases are used, the version of the library must match the version of the 1C:Enterprise server cluster.

You can find this handler (or add it if it doesn't exist) in the Internet Information Services (IIS) Manager. To do this, select the tab with the current application and in the properties window select the item " Handler Mappings» (Handler Mappings).
In the handler mapping table, we will see our handler "1C Web Service Extension". If there is no such handler in the list, it should be added by selecting in the window « Actions» (Actions) item « Adding a wildcard script match» (Add Wildcard Script Map…).

When adding, enter the name of the handler and specify the path to the file wsisapi.dll. These parameters can also be changed for the current handler by selecting the item " Change…» (Edit…) in the action list window.

You also need to make sure that the flag is set for the handler " Performance» (Execute) in the function permission change window. You can open this window by selecting " Change feature permissions...» (Edit Feature Permissions…) in the window « Actions» (Actions).

Reduce as much as possible system requirements to user machines and make full use of the possibilities implemented in you by publishing 1C on a web server. This will allow you to organize work with the database not only using thin client, but also using any browser, without installing additional components and applications.
Primary requirements
The minimum system requirements for the back-end architecture can vary considerably and are highly dependent on:
- Tasks solved by the program;
- Intensity of document flow;
- The number of simultaneously connected users;
- The size and number of published and registered databases.
However, it is simply impossible to do without two things when publishing 1C on a web server:
- Web server deployed in the system;
- An installed and running expansion module supplied by 1C.
Web server
This element of our structure can be either the Internet Information Server (IIS), supplied as part of operating systems from Microsoft, or the Apache server. Of course, there are also paid analogues of these solutions, but we will not talk about them.
An additional advantage of Apache products is the ability to run them from Linux-like operating systems.
We will consider the option with IIS, because. it does not require searching and installing third-party products.
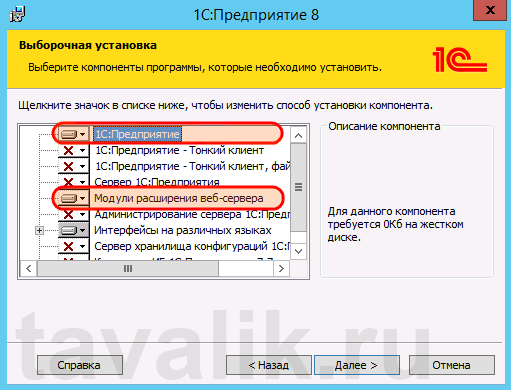
Web Server Extensions
These modules can be installed by running the platform distribution file. Reaching the window appearance which is shown in Fig.1, you must activate the installation of the corresponding component.
Naturally, in addition to extensions, the 1C Enterprise platform itself must be installed on the computer, in otherwise we will not have access to the Configurator, through which the main part of the publication is performed.
Having decided on the tools, let's move on to the configuration.
Installing and Starting the Web Server
To run IIS on a computer with installed Windows, it is necessary to perform the following sequence of actions (on Windows example 7):

 Fig.3
Fig.3
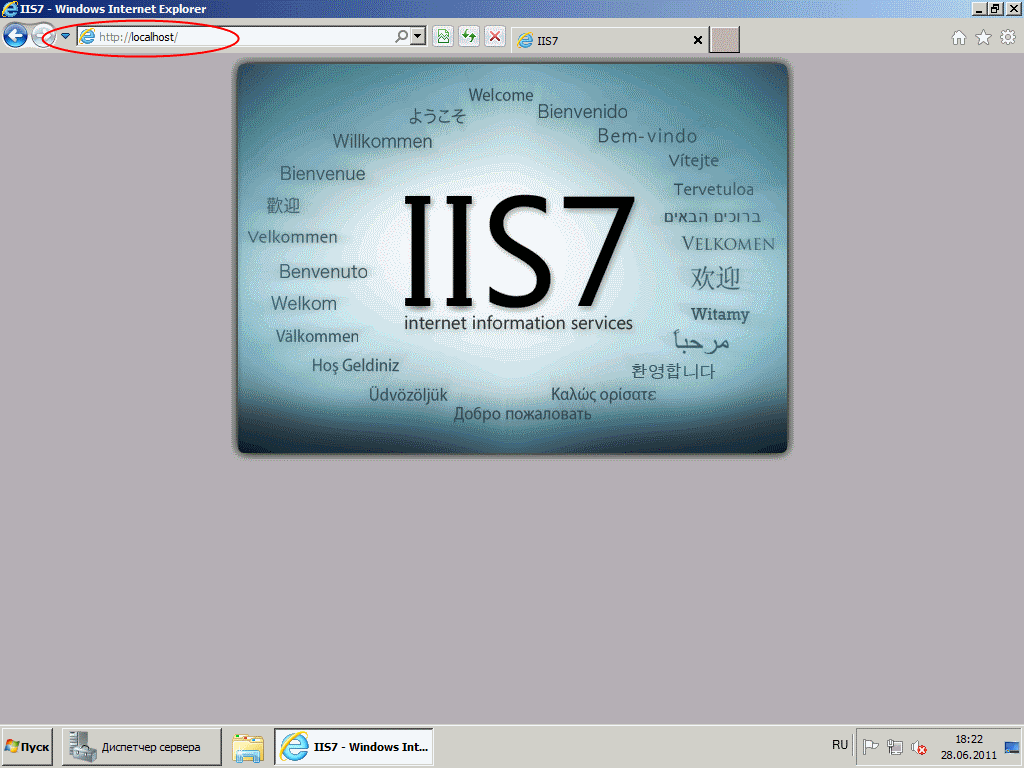
You can make sure that the web server is running by typing in address bar any browser with a string like "http://localhost" and getting a picture, as in Fig.4.
 Fig.4
Fig.4

 Fig.6.
In some cases (in particular, if the program is running in a 64-bit operating system), after publishing the database on the server, you may have to adjust the work with the libraries used by the 1C platform. This can be done from the "Sites" submenu.
Having selected a specific, just published base in the list, you need to activate the "Handler Mapping" utility (Fig. 7).  Fig.7
Fig.7
In our case, we need to establish a correspondence between ISAPI-dll and the wsisapi.dll executable file located in the BIN folder, installed version platforms.
In principle, on this the main part of the work with the server can be considered completed, we proceed directly to the publication of the database.
Publishing the database to the server

Setting user rights
Having received the above window, we move on to setting up access rules for users.
We need to allow full access IIS_USERS user:
- To the folder "C:\inetpub\wwwroot\Publication name" where the resource is stored;
- To the folder with the version of the program used, where the wsisapi.dll library is stored;
- To the place where the base is stored.
Having completed the above steps, we can check the performance of our publication by typing in the browser window a line like “localhoct / Publication name” and finding a user identification form there.
Step-by-step instructions on how to set up web access to 1C databases. I wrote for myself as an instruction so as not to forget in the future. Maybe someone else will come in handy.
Setting up client-server access to 1C through the WEB interface
This article provides instructions on how to organize work with the 1C configuration through an Internet browser.For the article, the 1C setting was used to work with the MS database SQL Server and Internet Information Services included in the delivery of the operating system was used as a web server.
Before starting the installation, 1C with an application server, SQL Server 2005 and higher, Internet Information Services must be installed.
The following software versions were used as an example to describe the article:
All the described steps can work both on older releases of programs and on younger ones. Minimum Requirements listed on the 1C website - http://v8.1c.ru/requirements/
Before starting the settings, the above products indicated in the table must be installed on the computer. At the same time, the 1C server, the SQL server can be located on different physical or virtual computers. It is desirable that the 1C Server and Internet Information Services are located on the same physical and logical server (this way there will be fewer problems with the settings).
The entire setup process is divided into 5 steps:
1 - Registration of configuration and database on 1C and SQL servers
2 - Setting up IIS on the server to publish the configuration
3 - Publishing a WEB application from 1C
4 - Configuring libraries to work in a 64-bit OS
5 - Configuring folder permissions and Windows Firewall
In addition, the article contains information on how to access the published site
As well as information about the resources used
7. Resources used
1. Registering the database on 1C and SQL servers
1.1. Start Server 1C
After installing 1C, you need to make sure that the 1C server is running. The author usually starts the server manually. But if you are sure that the 1C server is running, then this step is not necessary.1.2. Register cluster 1C
Run the 1C server administration utility:
In the window that opens, register a new central server 1C enterprise:

In the window that appears, enter the network name of the computer running 1C Server (or its IP address):

1.3. Register 1C database on SQL server
To start registering the base, you need to run the 1C application. In the appeared window "Launch 1C: Enterprise" we register new base by clicking on the "add" button:
Select "Create a new infobase":

In the window that appears, it is possible to create a database from a template, or create a new empty database (later you can load the database, load the configuration, or create your own configuration):


 It should be noted that the field Database name" are the names of the database on the SQL server. And the field " Infobase name"- the name of the database on the 1C server.
Then we select the authentication option in 1C (Select automatically) and click the "Finish" button:

1.4. Download or create a 1C configuration
Run the configurator with the database:
Load previously uploaded infobase:

2. Setting up IIS on the server
For this item, the information was taken from the article: http://infostart.ru/public/71480/2.1. Checking installed IIS components
For the 1C:Enterprise web client to work, IIS services are required, which were not installed by default when Windows installation 8.1 x64.To install them, go to "Start - Control Panel - Programs and Features - Turn Windows features on or off". In the tree that appears, in the "IIS Services - Internet Services - Application Development Components" branch, select all the components, as shown in the figure. Then click the "OK" button:

2.2. Allowing 32-bit Applications in an Application Pool
1C:Enterprise 8.3 Web Client is a 32-bit application. Therefore, for a 64-bit OS, you must allow them to work in the application pool of the IIS server. To do this, go to "Start - Control Panel - Administrative Tools - Internet Information Services (IIS) Manager". In the Service Manager, select "Application Pools - DefaultAppPool - Advanced Options". In the list of additional parameters for the variable "Allowed 32-bit applications", set the value to "True":
Set the value to True for the parameter "Allowed 32-bit applications":

2.3. Setting the Application Pool Identity as Anonymous User Identity
Default as anonymous user the user IUSR is set, which is not present in the system. In order not to create one, you can simply include the application pool identity as an anonymous user identity. To do this, go to "Start - Control Panel - Administrative Tools - Internet Information Services (IIS) Manager". In the Service Manager, go to "Authentication:
On the item "Anonymous authentication" by calling the context menu "edit":

In the dialog that opens, check "Application Pool Identity". Close the dialog by clicking the "OK" button.

3. Publishing a WEB application from 1C
To publish an application, you must have full access to the IIS projects folder. There are 2 ways to publish an application from 1C. 1 - first create the necessary folder in the directory "C:inetpubwwwroot", in our case it is a folder called "Base1C" and give the current user full access rights to this folder. 2 way to log into 1C as an administrator and then give the necessary rights to the folder of an already published application. This article describes the second way.3.1. To publish the configuration on the IIS server, you need to run 1C as an administrator:
We call the context menu on the 1C shortcut and select "Run as administrator"
We select the base and run 1C in the configurator mode:

3.2. Start publishing to web server
To start publishing, go to the menu "Administration - Publishing on a web server":
In the window that appears, specify the name of the publication, specify the web server and specify the path on the web server.
1C allows you to publish to any available web server on the network using the webinst utility. The article used the example of publishing to a local computer:

More detailed information items in the publication window can be obtained from the 1C configurator by pressing the F1 button.
4. Setting up libraries to work in 64-bit OS
After publishing on a web server from the configurator, if you use a 64-bit operating system on a computer that is used as an IIS server, you must configure work with 1C libraries. This is done every time after publishing to the web server.To set up libraries, follow these steps:
We open through Control Panel - Administrative Tools Internet Information Services (IIS) Manager.
In the window that opens, expand the "Sites" group and our site (in the Base1C example).
Click on "" in the group IIS:

In the window that opens, look for a line with the name "ISAPI-dll" and click the menu item in the actions "Add script mapping ..."

AT open window"Add script mapping" in the "Query path" field, enter the character * (asterisk, i.e. all). In field " Executable" select the wsisapi.dll library from the directory of the installed 32-bit version of 1C. In the "Name" field, you can specify any name (in the example, Name = 1C):

Some experts in other articles indicate that it is necessary to disable the request matching restriction. The author did not find the dependence of the work of this mark for the 1C program. This information provided informatively, may be useful to someone.
You can configure query limits by clicking the "Query Limit" button in the Add Script Mapping window. In the window that opens, uncheck "Invoke the handler only when matching a request with:":

Press the Ok button.
Answer "Yes" to the question that appears.

Then you need to restart the IIS service. To do this, go to the root of the "Connections" panel (to the name of the server) and select "Restart" in the action menu on the right:

After that, we can check if the connected library works. To do this, go to "ISAPI and CGI Restrictions":


Once again, it should be noted that this procedure for setting up libraries should be done every time after publishing an application from 1C.
5. Setting permissions for folders and Windows Firewall
5.1. Configuring folder access
For all users, not just administrators, to work properly with published web applications, some folder permissions need to be configured.To set the rights to the pakpi, you need to Windows Explorer call the context menu for the required folder and select the item " Properties"and go to bookmark" Security"
In this case, we are talking about the rights to 3 folders:
1. "C:Program Files (x86)1cv88.3.5.1088bin"(this folder contains the wsisapi.dll library) (the release number "8.3.5.1088" may be different)
2. C:inetpubwwwrootBase1C(this is the folder we created that will be used for access from the Internet)
3. CatalogBase(this is a 1C base if the file type of the base is used), in our example the base is stored on the SQL server, so there is no base directory and no need to give access to it.
For all folders (Items: 1,2,3) required for user IIS_IUSRS set access" Full access":

For the folder with our database (Item 3) data for the user Users, set access " Change".
5.2. Configuring Port Access in Windows Firewall
If you plan to use web access not only locally, then you need to configure the Windows Firewall for access from external resources by specifying access port 80. The author did not use the firewall settings, but simply turned it off:


