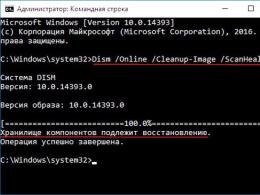
Safe BIOS update. Instructions for updating the BIOS on a computer Is it possible to update the BIOS without a processor?
Personal computers must be compatible with new hardware even several years after their purchase. This is necessary so that you can upgrade later.
Often, PC component manufacturers offer users to update the BIOS themselves so that the computer meets modern requirements and is compatible with new hardware. By performing this operation, you can easily install a processor that was not yet released when you bought the motherboard. In this case, your system will immediately recognize it and will function correctly. How is this possible?
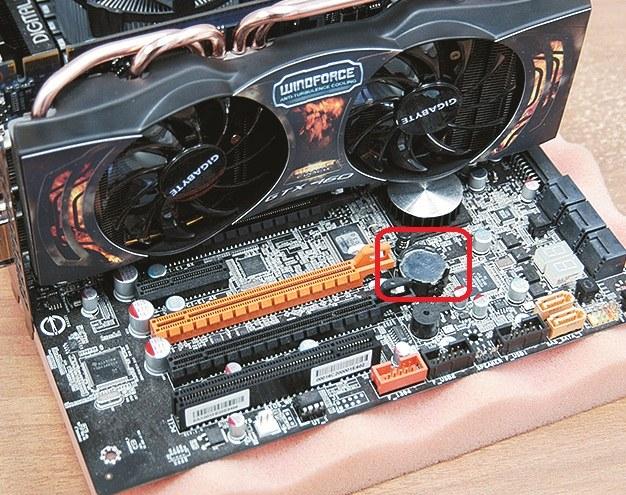
Standalone system: BIOS with battery
BIOS (Basic Input/Output System) is the heart software and an important element of any PC. It acts as an intermediary between computer components and the operating system: without the BIOS, the latter would not be able to communicate with and control the equipment. When you turn on the computer, long before the OS logo appears on the screen, the BIOS always starts first. It determines which components are installed on the PC, initializes them and provides all the information for booting the system. The BIOS itself is located on a special flash memory chip on the computer's motherboard, and the contents of the memory are retained even in the absence of power. This is possible thanks to the presence of a separate battery, which is responsible for the BIOS.
We will answer the most important questions about BIOS and possible updates. Who needs to flash it? How can I find out what motherboard is installed in my computer and what BIOS version it uses? If there is a need to update the latter, how to carry out this procedure? And what to do if problems arise? It’s worth noting right away that not every PC needs an update: if the system works stably, there is no point in this. But for those who are planning a computer upgrade and a thorough replacement of equipment or want to improve system performance, they cannot do without flashing the BIOS.
BIOS Setup: additional features after update
BIOS Setup. Main BIOS menu consists of many sections. Any motherboard supports only a limited number of processor models, but by updating the BIOS, this list can be significantly expanded to include more modern chips. A prerequisite for this is the compatibility of the central processor with the motherboard connector. Problems can only arise with very old motherboards: the older they are, the less likely it is that updating the BIOS is worthwhile.
It is also worth noting that when flashing it is not always possible to achieve an increase in system performance. However, special BIOS features and functions - such as increasing the CPU clock speed - are often only available after an update. In the same way, only after flashing the BIOS are new processors correctly recognized and run on the desired clock frequency. In addition, fresh BIOS version provide useful features, which expand the customization options for your system. A typical example is support Turbo technology Boost for Intel processors. But before you update, you need to make some preparations: in addition to the motherboard ID, you need to find out the number installed version BIOS. The free CPU-Z utility will help you with this.
CPU-Z: getting useful information
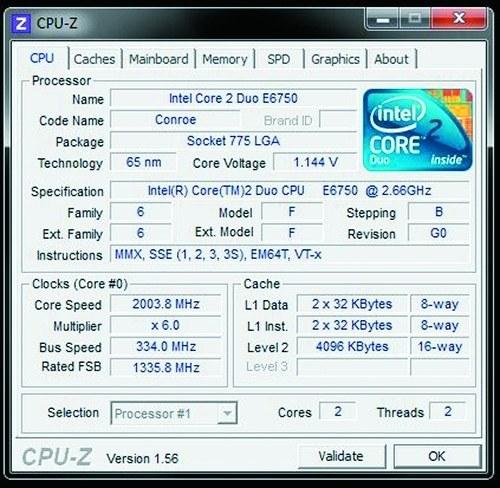
CPU-Z will provide the most details about components This application provides information about the installed processor: name, manufacturer, core voltage, cache memory information, sets of supported instructions and other data. CPU-Z can also determine whether the processor has been overclocked or is running at factory frequency. After launching the utility, on the “Motherboard” tab, you can find out all the information about the manufacturer, the name of the model and chipset, as well as the current BIOS version. Compare this data with the parameters of your motherboard indicated on the manufacturer's official website. If the number indicated in CPU-Z matches the number itself latest version BIOS, no flashing required. If there is a more recent version on the site, download the necessary archive. Typically it contains executable file with the exe extension, which is used to update the BIOS (for example, amiflash.exe, awdflash.exe, etc.), and a file with the BIOS code in BIN or ROM format. Flashing methods may vary depending on the motherboard manufacturer. Most developers offer to use their own utilities that allow you to update the BIOS directly from the Windows environment. However, for security reasons, we recommend using a more reliable method.
DOS: the best environment for updating BIOS
DOS is the safest environment for flashing the BIOS. With the least risk, flashing is performed using a boot floppy disk, disk or flash drive in DOS mode. The first of these media can be created, for example, in Windows Explorer: just right-click on the drive shortcut and select “Format”, activating in context menu the option “Create a bootable MS-DOS floppy disk” and specifying the path to the downloaded BIOS files.
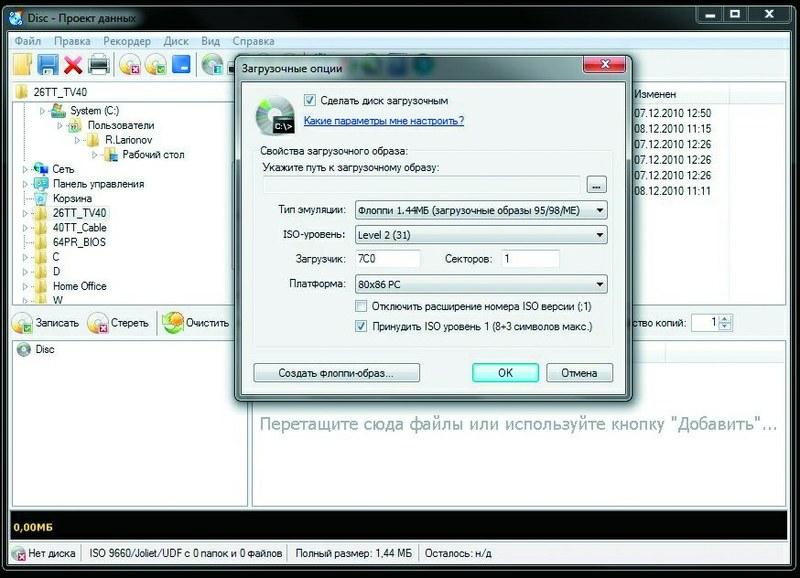
CDBurnerXP is a free disk burning program that allows you to emulate a boot floppy disk for flashing the BIOS. A bootable CD can be created using almost any free disk burning program - for example, the CDBurnerXP utility.
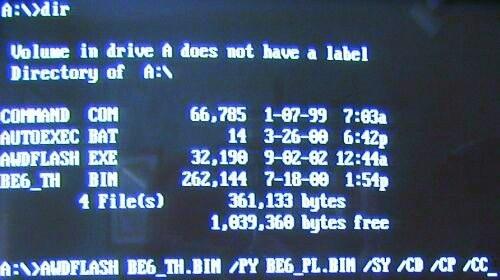
You will need an image bootstrap named boot.ima, which can be found on the CDBurnerXP website or our DVD. It should be opened using the Ultra ISO program, drag files with your BIOS code into the list that opens and save. After that, launch the CDBurnerXP program, select the “Data Disc” recording mode and click OK. The main program window will open. Make the disk bootable: select “Disk | Boot options”, in the window that opens, check the box “Make the disk bootable” and set the path to the saved boot image, indicating the emulation type “1.44 MB floppy”. Burn the CD by clicking the burn button, then restart your computer and select your drive in the startup menu. The computer will boot into DOS with the command prompt opening the A:> directory. If you type "dir /w", you can view the contents of the floppy disk or disk. Flashing the BIOS can be done from the command line. Sometimes the BIOS update does not start automatically - in this case, run the dir command and run the file with the BAT extension (for example, update.bat). After successful flashing, remove the disk and restart the computer.
BIOS types: AMI, Phoenix and Award
As a rule, for each model motherboard your own BIOS is required, since it must take into account the features of the chipset and peripheral equipment used. However, it is not profitable for board creators to spend time and money on the full development cycle of their own BIOS, so obtaining them usually consists of two stages. The BIOS manufacturer (the most well-known companies are AMI, Award and Phoenix) develops a basic version that implements all functions that do not depend on the features of a particular chipset. The motherboard creator, independently or together with him, improves the basic version, taking into account the features of a particular product. Moreover, for the same model, the BIOS code can be changed several times after the board is released - for example, to fix bugs found or add support for new devices.
Thus, the term "BIOS version" can be used to refer to a variant of the BIOS base code released by a specialized company. For example, AwardBIOS 6.0 is the sixth BIOS version from Award, modifications of which are used in many motherboards. For each board model source is being finalized taking into account the features of the chipset and peripheral devices. Sometimes you can find BIOS versions entirely created by motherboard or laptop manufacturers - Intel, IBM, Compaq, Toshiba, Dell and some other well-known companies. In terms of their operating principle and interface, they are not very different from BIOS produced by Award, AMI or Phoenix, so understanding them is not very difficult.
If an AMI BIOS is installed on the motherboard, then to update it, use the “amiflash.exe BIOS.bin” command, and the word BIOS must be replaced with the name of the file with the code. After executing the command, a window will open showing the progress of the BIOS update. During flashing, you should never turn off the computer or turn off the power supply, as this can lead to irreparable damage to the system. Once the process is completed, the program will automatically restart the PC. Remove the boot floppy or disk from the drive and boot into Windows. Using the CPU-Z utility, you can check whether the a new version BIOS. However, flashing does not always go smoothly. But even if some problems arise and after updating the BIOS your computer no longer boots, this does not mean that it cannot be saved.
If the warranty on your PC has not expired and you were dealing with programs and firmware from official developers, you can file a claim against the manufacturer.
However, the use of modified BIOS files from third party vendors that promise higher performance or greater system overclocking potential is not covered under warranty. As an alternative, you can resort to paid services companies specializing in the restoration of motherboards with BIOS errors. In some situations, it helps to create a floppy disk with a firmware program and a file with BIOS code on another, working computer. In the case of a BIOS from Phoenix or Award, you must create a file on the floppy disk called autoexec.bat. Use standard for this Windows program- Notebook. The file should contain the following line: awdflash.exe BIOS_DATA /py /sn Replace the word BIOS_DATA with the name of the file with the BIOS code (including the extension - usually bin or rom).
The /py and /sn keys are needed to perform flashing without further user intervention.
Advice.
If an AMI BIOS is installed on the motherboard, just save the file with the BIOS code on a floppy disk and rename it to amiboot.rom.
Insert the floppy disk and press the “Ctrl+Home” key combination during boot.
However, this solution only helps in 10–20% of all cases, since if the BIOS is damaged, it is often impossible to access the drive.
Last resort: when all else fails

A damaged BIOS chip can be restored using another, working computer. If someone you know has the same model of motherboard, you can restore your BIOS using another computer. Boot a working PC in DOS mode and prepare a floppy disk with all the data necessary for flashing the firmware. While the computer is running, carefully remove the BIOS chip from the motherboard using tweezers and insert your damaged one. This requires extreme caution since the PC is turned on.
Now start the firmware process from the floppy disk. This way you will update your faulty BIOS chip on a working motherboard software. After this, turn off the computer and swap the components again. If everything was done correctly, the PC with a working BIOS will boot again.
However, it should be noted that updating the BIOS and correcting errors using all the described methods is performed entirely at your own peril and risk.
If your computer won't start
After updating your BIOS, your PC stops turning on and you can't even get into the BIOS settings? Unplug your computer by unplugging the power plug from the outlet.
Open the case system unit and touch the inside of a flat metal surface with your hand to release static electricity.
Locate the battery on the motherboard. Remember how it is installed (usually the “+” is on top). Remove it by pressing the metal contact to the side. Wait a minute and put the battery back in its original place. After turning on the computer, the BIOS settings will be returned to factory settings.
If you are not sure about the newly set parameters, activate the “Load Setup Defaults” function and exit the BIOS and save.
The PC must be constantly updated. And this applies not only to hardware, operating systems and applications. But it is advisable to do this only when a serious need arises.
If the machine operates normally without glitches and errors, then there is simply no need to update to the latest Bios version. Since this procedure is extremely unsafe.
Why update?
The device in question requires new firmware:
- Newly installed device is not supported;
- when a conflict arises with any application that needs to be installed on a personal computer;
- when you need to increase PC performance;
- if the outdated firmware is damaged.
Most often, an update is required due to the installation of new hardware - a processor, hard drive. Much less often - video cards, RAM. This need arises as a result of a conflict between hardware and firmware. Very often, old Bios simply do not see large-capacity hard drives. In most cases, this situation is corrected by updating.
Some applications do not support working with certain BIOS and their programs. In most cases, this situation can be resolved by updating the version. Sometimes this is required to run some professional applications.
Often, old firmware simply does not allow you to overclock the processor in various ways. If you need to change the CPU frequency upward or apply a higher voltage to it, you need to update the Bios. This usually provides ample opportunities for performing various manipulations with the parameters of the central processor and other devices.
Sometimes the PC starts producing errors just like that, for no apparent reason. Often the culprit is Bios. In many cases, problems of this kind can be resolved by installing new program in Bios.
Video: reflash BIOS
Current version
There are several ways to determine the BIOS version:
- before the OS starts loading;
- operating system means;
- using third party software.
In order not to waste time on performing any unnecessary actions, the PC owner can simply look at the software labeling of the device in question before starting Windows.
To do this, you need to follow these steps in strict order:
- turn on PC;
- wait for the corresponding icon to appear (“ American Megatrends", "Energy" and others);
- Click on the button called “Pause Break”.

This key allows you to stop loading your personal computer at any stage. You should wait until a table or list of characteristics appears on the monitor. The user needs to detect the inscription “Bios Revision” or “Bios Version”. Next to one of these phrases there must be a combination of numbers. These numbers indicate the version of Bios used.
You can also find out the software markings of the PC component in question simply by going to its settings.
To do this you need to do the following:
- turn on the computer;
- until the image appears, press the “Delete” key several times;
- in the section called "Main" find item “Information” -> “Version”.

The simplest and in a safe way Finding out the version is to use the item in the “Start” button called “Run”.
The following actions must be taken:
- open “Run”;
- in the field that appears, enter “msinfo32”;
- press “Enter” or simply click on “Ok”.
This will open a standard component of the Windows operating system. It contains all the information about the system, including information about the Bios firmware.

How to update Bios on a computer
There are three ways to update the software for the device in question:
- in MS-DOS mode;
- V Microsoft Windows directly;
- without logging into Windows and MS-DOS.
Each method has both its advantages and disadvantages.
Where can I get the update?
To update Bios, you must first find the right application for this PC component. It is best to download it from the official website of the motherboard manufacturer or Bios. The surest way to find out the model and name of the manufacturer of computer components is a visual inspection of the motherboard itself and the chip of the upgraded device located on it.
You can also use any specialized program to find out the firmware markings and the name of the manufacturer. Everest is best suited for this. The most important advantage this application ahead of its analogues is that it offers the user links to the official websites of the manufacturer, where you can find everything you need.

Another source of new firmware versions can be various unofficial sites on the Internet. But the likelihood of downloading counterfeit software with a virus or simply not working, which can damage your PC, is very high. Therefore, using applications from unreliable sources is highly discouraged.
Making a backup copy
Before you carry out any actions that make changes to the firmware, you must make it backup copy. This will allow you to avoid various kinds of problems if any error occurs that makes the hardware inoperable. The backup copy must be saved to external media (USB disk, flash drive, floppy disk) to avoid the need to retrieve it from the hard drive.
The easiest way to make a copy of the software to be updated is to use an application called EZ Flash (used on ASUS).
The copying process consists of the following main steps:
- production of a bootable flash drive with the MS-DOS operating system;
- After inserting the USB flash drive into the port, you need to restart the PC;
- after pressing the “Delete” key during boot, you should find the “Tool” tab;
- select Asus EZ 2 Utility;
- Press the “F2” key and enter the name of the backup copy.
After completing all of the above operations, all data necessary for recovery will be saved on the selected media. If necessary, they can be easily used.

Installation
Most in a simple way is to install new software on the personal computer component in question directly in the Windows operating system.
To do this you need to do the following:
- download a special update program for specific model motherboard;
- run the executable file.
Most manufacturers have their own update application. That is why it is necessary to use only files downloaded from official resources. For example, ASUS has an application for performing the action in question called ASUSUpdate. It is installed as normal application, the menu is intuitive, even if it is on English language.

Some manufacturers provide updates to their products without logging into the OS. The equipment ROM is already built into special means to perform update. For example, ASRock Instant Flash utility can independently carry out all the necessary actions in a matter of minutes. Just press “F6” - it will scan all available sources of information.
Reset your system settings
There are two ways to reset your system:
- software;
- hardware
To use the first method you must:

To perform a hardware reset, you must use a special jumper or remove the battery from the special connector for at least 30 minutes. After completing the necessary actions, a reboot is performed.
Possible problems
When installing new firmware versions, various types of errors may occur:
- version mismatch;
- data recording error.
The most common problem is the use of inappropriate files to perform update. If this type of problem occurs, you must use a backup to return the system to the initial state. If a data recording error occurs, you should proceed in the same way - reset the settings to standard.
Video: update the BIOS
When carrying out an operation of this type, it is necessary to ensure that the supplied voltage is stable. If electricity will be disabled suddenly, there is a high probability of severe damage to the updated component. Which is unacceptable.
It is important to use firmware only from reliable sources. Since there is always a possibility of foreign data containing bookmarks or viruses. All of this can damage your computer. It is also worth checking the serviceability of the coin-cell battery inside the system unit.
Many users do not understand why update Bios. It is necessary to perform this operation only in extreme cases, when it is simply impossible to resolve a conflict in an alternative way. The procedure should be carried out as carefully as possible to avoid damage.
As is known, any computer equipment and software becomes outdated over time and ceases to meet current requirements. This equally applies to primary BIOS/UEFI systems, the software of which is integrated into a special chip on the motherboard. When installing new equipment (“hardware”), it may sometimes be necessary to flash the BIOS. This procedure will be performed on a laptop or a stationary computer terminal, it doesn’t matter. The technology is almost always the same. Some users, unfamiliar with the basics of such techniques, believe (and not without reason) that this process is unsafe and difficult. If you can agree with the first statement, then you can argue about the second. In fact, flashing the motherboard BIOS is not such a troublesome task. But to carry out this procedure correctly, you should pay special attention to some important details and nuances, which depends on the manufacturer of the motherboard and the programs and techniques used for flashing.
Why do you need to flash the BIOS?
In general, if it is not planned, and the entire system is working stably, there is fundamentally no point in updating the BIOS version.
But when new equipment is installed on a computer, which the primary system may not support only because it is outdated (the device’s BIOS simply does not recognize it), flashing the BIOS becomes a pressing problem. Although many users find this process difficult, anyone who works with a computer can perform these steps on their own. It will take no more than 10 minutes.
Flashing the motherboard BIOS: prerequisites
First, pay attention to several mandatory conditions, failure to comply with which can lead to catastrophic consequences.
Download files and programs to update primary systems only from official resources of motherboard manufacturers. In case of installation unofficial firmware No one can give a guarantee that the process will be successful and the system will work as expected after that.
The second thing to pay attention to is during the update. You need to take care in advance to ensure that there are no power surges or spontaneous disconnection of your computer or laptop from the power supply.
General rules for updating all firmware
Flashing the BIOS for almost all motherboard models involves using the same scheme:
For standard BIOS systems, DOS mode is used in most cases. However, for some BIOS versions, as well as for more modern systems UEFI may apply special program for flashing the BIOS, created by the motherboard manufacturer, which is capable of running even in an operating environment Windows systems without necessarily creating bootable media.
How to find out the modification of the motherboard and the current BIOS version?
The very first thing you need to do is determine which model of motherboard is installed in computer system, and also find out the version of the primary BIOS system (it may be on this moment is current and does not need updating).

You can view information about the board and BIOS version in the section that is called from the Run console using the msinfo32 command.

For the motherboard you can use and specialized utilities like CPU-Z (formerly Everest). For a device identified in this way, you need to find the latest firmware on the manufacturer’s website and save the files on your hard drive.
Preparing bootable media (general procedure)
If you use bootable media, when an update from Windows is not provided, the first step is to create one. Regular recording of downloaded files will not work.

To simplify your work, you can use the Rufus utility, which is very easy to learn and creates bootable USB flash drive within a couple of minutes. There is practically no need to change anything in the parameters. Only in the file system should you specify FAT32, and in the recording method use MS-DOS mode, making sure to check the box next to the line for creating bootable media. If this is not done, then when you reboot the device will not be recognized as bootable. Then, to install the update, in some cases you will need to additionally copy it to media control program and the firmware file.
Next, the process of updating the BIOS will be discussed with examples for motherboards from several well-known manufacturers. Although in general they are very similar to each other, nevertheless, each of them has its own nuances. We assume that the priority is already set in the BIOS settings.
ASUS
Flashing the Asus BIOS can be done in several ways. Among the preferred utilities, two programs worth highlighting are AFUDOS and ASUSTeK EZ Flash 2.
When using the first utility, you should create bootable media and make sure that it contains the afudos.exe program file and the firmware itself (for example, p4c800b.rom).

Flashing the ASUS BIOS looks like this. Booting from a flash drive. Since the media was recorded for DOS mode, the initial line C:\> will appear on a black screen, in which you need to enter the command /i p4c800b.rom and press the enter key. Once the update is complete, a reboot will occur, during which you just need to remove the media from the USB port so that the system starts from the hard drive.
Flashing the BIOS of an ASUS motherboard when using the second utility is somewhat different from the previous option.
Despite the fact that most firmware on the official ASUS website have the .rom extension, CAB files can sometimes be found. There is nothing wrong with this, since they are used for UEFI systems.

To install the firmware you need to log in UEFI settings When rebooting, go to Advanced Mode ( additional settings) and in the service (tools) section of the Tool, select the line ASUSTeK EZ Flash 2. Next, from the list, again select the media with the program (line of the same name), after which the required firmware file will be shown on the right. We select it and agree to the warning twice (first to check the file, then to start the firmware process).
At the end of the process, a reboot notification will appear, and at the beginning of the restart you will be prompted to carry out the initial setup. Press F1 and set the required parameters. IN otherwise- simply exit the settings without saving changes.
Gigabyte
Flashing the BIOS of Gigabyte systems is quite different from other processes. First of all, this is due to the fact that you can use online update to install the firmware. But first, let's look at using the Q-Flash utility, which is believed to be best suited for updating firmware.

First, you should enter the BIOS settings and use the option to reset all Load Optimized default settings. After this, you need to save the changes, restart the computer and enter the BIOS settings again. Next, to launch the Q-Flash utility, press the F8 key, and the start is confirmed by pressing the Y and Enter keys. To begin with, it is recommended to save the current version using the Save Bios option, after which you need to use Update Bios. Next, you will be asked to indicate the source from which you want to update. You should select HDD 2.0 as the media (this is how the flash drive is displayed in the settings). Then everything is as usual: select the firmware file present on the media and agree with all the warnings.
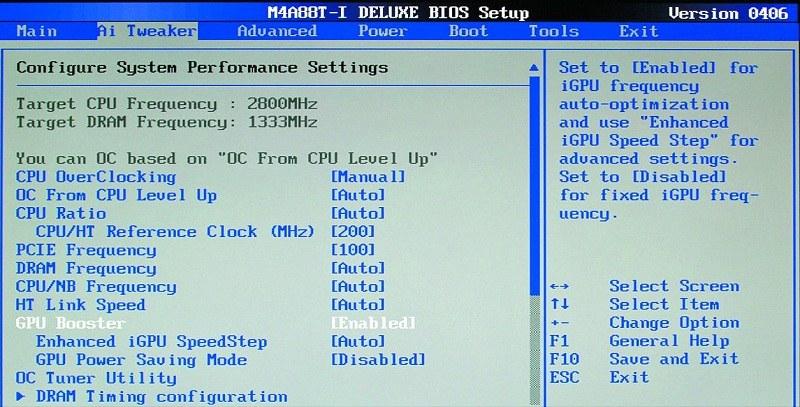
For an Internet update, you can use the @BIOS utility specially developed by Gigabyte specialists, which runs in Windows environment. In this case, it is strongly recommended to disable Hyper-Threading mode in the settings of the primary system, as well as deactivate anti-virus and other resident applications to avoid errors or failures during the update process.
After starting the program, you can immediately save the current BIOS version by clicking on the Save Current BIOS button, and then select the Internet Update online update mode, click Update New BIOS and specify one of the servers present in the list. After this, you will be asked to indicate the model of the installed motherboard, and the program will automatically download all necessary components and activates the update process.
MSI
Flashing the MSI BIOS, as in the case of ASUS, can be done either from Windows or from DOS. For DOS mode, a tool built into the BIOS called BIOS-MFLASH is used. But the MSI Live Update 5 or 6 application can also be used as an initial management utility. It is notable for the fact that with its help you can also update everything installed drivers MSI, as well as reflash the BIOS of the corresponding graphics accelerators. Let's start with it.

In the main window, you just need to check the required elements. Select the MB BIOS component and click the scan button at the bottom (Scan). If a new firmware version is detected, use the Download and Install button, after which the update process will start.

First you will need to select an update environment. To simplify matters, check the In Windows mode, in the next window, click the button to close all programs that appear in the list (Close all listed programs), click the continue button (Next) and in the next window, click the button to start the process.
For DOS mode, select it from the window running process update, after which we indicate the media and agree to the destruction of all data present on it (the process will take no more than a minute, after which a message will be displayed indicating the successful creation of the boot drive). When rebooting, all you have to do is follow the instructions of a kind of “Master”.
In case of updating using the built-in MFLASH mechanism, you will have to download the firmware manually, create bootable media and perform the same actions in the BIOS as described above (select the media and firmware file in the tools menu).
Acer
Flashing the BIOS of Acer systems is surprisingly much easier. You don't even need to create bootable media, although you will still have to format it in FAT32.

To install the update, a special utility called Insyde Flash is used, which is copied to removable media. At the same time, you need to copy the firmware file downloaded from the official website, which has the extension .fd and corresponds not only to the motherboard, but also to the laptop model, to the main directory of the program on the flash drive. Please note that the device must contain only one firmware file, otherwise the application will prompt you to flash only one of several. After running the utility while the power is on, you will be prompted to install the update immediately.
The second method is just as simple. First you need to completely turn off the laptop, unplug the cord from the outlet and wait until the power indicator stops blinking. Next, plug the cord into the outlet, insert the flash drive into the appropriate port, hold down the Fn and Esc keys and press the power button. As soon as the indicator starts flashing, release the pressed keys. After this, reading information from the drive will begin (this can be seen by the blinking LED on the device itself). Once the update process is complete, the laptop will reboot on its own.
Video cards
Since GeForce and Radeon are dominant in the video card market, flashing the BIOS will be considered using their example.

At the initial stage, for your card on the manufacturer’s website you need to download new firmware and management programs. If the system has several video cards, you need to leave only one during the update, inserting it into the PCI-Express slot.
For GeForce cards, the NVFlash program (from two files) is used, for Radeon - the ATIFlash utility (one file). Next, you need to create a bootable USB drive for DOS mode, and then copy program and firmware files to it.
When starting from a flash drive, you should make sure that the card is single-processor, otherwise the proposed method will not work. For NVIDIA use the command nvflash --list, for ATI - atiflash -i. If information is displayed for two cards, then the adapter has two processors, and the proposed firmware method cannot be used (it is better to go to the manufacturer’s website and find instructions there).
At the next stage, flashing the BIOS of a GeForce video card involves disabling protection. This is done with the line nvflash -protectoff.
Next, to start the BIOS update process for GeForce cards, use the command nvflash -4 -5 -6 newbios.rom (the name of the ROM file must match the name of the downloaded firmware), to Radeon cards- atiflash -p -f 0 newbios.rom. After this, we wait for the process to complete and reboot the system in normal mode.
Brief summary
That's all for flashing the primary I/O systems. Based on the foregoing, we can conclude that the best option is to install the update exclusively in DOS mode, although special utilities can be used to simplify the work. But they only work if there are UEFI systems, and are not suitable for standard BIOS versions. You need to be extremely careful with video cards, since incorrect installation of the update or the slightest violation during the flashing process can lead to the graphics adapter failing.
In this instruction, I will assume that you know why you need the update, and I will describe how to update the BIOS in steps that should be followed regardless of what kind of motherboard is installed on the computer.
In the event that you do not pursue any specific goal by updating the BIOS, and the system does not exhibit any problems that could be related to its operation, I would recommend leaving everything as is. When updating, there is always a risk that a failure will occur, the consequences of which are much more difficult to correct than reinstalling Windows.
Depending on the manufacturer and model of motherboard on your computer, the methods for updating the BIOS may differ. Here are the most common options:

For many motherboards you can use either of these methods, such as mine.
How exactly to update the BIOS
Depending on what kind of motherboard you have, updating the BIOS may be performed differently. In all cases, I strongly recommend reading the manufacturer's instructions, although they are often presented only in English: if you are lazy and miss any nuances, there is a chance that glitches will occur during the update that will not be easy to fix. For example, the manufacturer Gigabyte recommends disabling Hyper Threading during the procedure for some of your boards - without reading the instructions, you will not know about it.

Instructions and programs for updating BIOS from manufacturers:

One point that is present in almost any manufacturer's instructions: after updating, it is recommended to reset the BIOS to default settings (Load BIOS Defaults), then reconfigure everything in the right way(If you want to).
The most important thing I want to draw your attention to: be sure to look at the official instructions, I deliberately do not describe the entire process for different boards, because if I miss even one moment, or you will have a special motherboard and everything will go wrong.
BIOS is an abbreviation familiar to everyone, the meaning of which is not familiar even to many sophisticated and experienced users of personal computers. Most of them associate it with a gray-blue interface in the style of MS DOS or Windows 3.1, but many may not tell you about its functionality. Most of the average user's knowledge, at best, is limited to the fact that BIOS is the computer's system settings or something like that, because it is quite difficult to give an exact answer. This complexity is quite justified - a personal computer is not easy for the average person to understand when it comes to fast and productive work in any industry, and understanding the basic mechanisms of its functioning and, moreover, each of its components seems almost impossible - in practice, this knowledge borders on erudition and are not useful in most situations.
So, BIOS is an input/output system that stands between hardware and software (together with the user) and allows you to use computer resources for their intended purpose. It has a permanent memory module, which contains a number of data about the equipment configuration, including time - all owners of old computers have encountered replacing the battery and could hear that it powers this particular component. Important BIOS feature is that the capabilities of other equipment located on the motherboard directly depend on its capabilities.
But for most PC users, all these technical issues are unimportant, but there is a practical need for those actions that they may also encounter. These include, for example, replacing an outdated processor with a newer and more powerful model: support motherboard at the software level directly depends on whether the BIOS is “friendly” with it. Compatibility may not be added immediately: if the processor slot (Socket) can no longer be changed, then it is possible to create the necessary conditions for the functioning of a suitable hardware model, and the majority of motherboard creators take care of ensuring compatibility.
Why flash the BIOS?
As it became clear from the above, the BIOS ensures the joint operation of all components located on the motherboard. We are particularly interested in the processor and RAM: their capabilities are developing at the most rapid pace and require the release of motherboard models at an appropriate speed. But this practice is not very profitable and the creators decided to leave a reserve for the future, leaving the user the opportunity, within certain limits, to improve the compatibility of the motherboard with hardware independently. This was the reason for the emergence of the BIOS firmware procedure on personal computers, which allows you to get rid of many problems with it.
It is worth noting that the procedure is quite dangerous compared to other actions with a PC: if the light is turned off at the time of overwriting (rarely, but it happens), everything will not be restored in any way and the motherboard can be put somewhere far away or simply thrown away. But in frequent cases, such a procedure is still necessary, it brings support not only for new components, but also tools for working with new equipment - older models of motherboards that do not support flashing via USB devices received this opportunity thanks to the compatibility package included in the firmware for such equipment. The computer's flexibility in capabilities is invaluable, and in cases where firmware is still necessary, do not be intimidated by the high complexity of this process - if all procedures are performed correctly, the risk of harming the computer is minimal, and the process can often take only a few minutes, but this is worth talking about in more detail.
Often the manufacturer himself may recommend reflashing - this may be due to a number of shortcomings that were not noticed and/or eliminated during the production phase. For many PC owners who have one of the new series of motherboards, this practice is not something unfamiliar - for objective reasons this happens very often.
Which motherboards require flashing their BIOS?
An important feature of this whole story is the fact that there are still only three companies in the world that produce the software part of any I/O system. It will become intuitively clear to many that this increases the chances of each individual model for flashing, and in fact this is how it turns out: no matter what the manufacturer of your motherboard, with a high degree of probability (which tends to a hundred percent) this procedure is possible for you. But it is worth adding that the same company is engaged in supplying updates and it is not in its commercial interests to invest heavily in improving the performance and capabilities of old models - then there is simply no need to buy new ones.
The theoretical possibility of replacing the firmware is included in any BIOS - at the heart of the device there is a memory module designed for approximately 1000 rewrite cycles. But the release of firmware will now be entirely the responsibility of the motherboard manufacturer.

Checking this possibility is quite simple: you just need to know the manufacturer and model of your device and its model (if not, then welcome to the next section of the article). We go to its official website (both ASUS, MSI, ASRock and others have their Russian-language versions) and follow the page dedicated to your version of the device. There, in one of the tabs, a category with all released firmware for this component will be available, as shown in the example of the official ASUS website below.

On the websites of other companies, the procedure is approximately the same - in the corresponding section all possible options for updating the BIOS will be offered, since in models different manufacturers they differ in process almost completely and the skill of flashing one component cannot guarantee knowledge of the intricacies of another - here it is worth carefully studying the step-by-step guides offered online or, ideally, the documentation of the manufacturer itself. There are also many videos of flashings on the network: there are relatively few motherboard models, but out of those hundreds or thousands of users who encountered the problem, at least one decided to record a video - just search on video hosting sites. Viewing the process from the outside will remove the subconscious fear of “breaking something” and will help you understand the essence of a particular stage.
Determining the motherboard model
Many find it difficult to determine the model of their motherboard - as with other knowledge of a similar nature, there is the same problem: there is no urgent need to memorize or remember an intricate set of letters and numbers and this does not help in everyday tasks. Turning to documentation or looking for a box is also not an option - many people tend to lose such things when moving, take them somewhere for storage, or simply forget about them. This problem may also arise for those who bought a PC secondhand, although in stores when selling an assembled system unit, boxes from some devices also have a habit of not being given, and buyers are reluctant to take them with them.
There are four ways to figure out what model of motherboard you have. Of these, three involve the use of utilities, and one requires direct access to the board. The latter will not work if you have a laptop: it is not recommended for a non-professional to disassemble them, and even pros can’t always cope - they are not repairable modern solutions mediocre. The same applies to All-in-One PC and any other solutions that are not mounted in a standard system unit. You should also not do this if your PC is under warranty: all screws will be covered with seals, which will easily show whether the device has been opened. There is no need to perform any manipulations - the very presence of damage is already a sufficient reason for refusal of warranty service, which is clearly stated in the terms and conditions of any such company.
If nothing prevents you from opening the system unit, unscrew two/three/four, or, more simply, all the existing bolts and remove the cover from the side. We will see a motherboard, on the surface of which a sticker will be waiting for you.

That's all: remember or rewrite the model, perform all the completed manipulations with the lid in reverse order.
In the case of checking programmatically The command line, which is available in any version of the operating system of the Redmond company, can also help. After opening it, you will need to type two commands, activating each by pressing Enter.
wmic baseboard get Manufacturer wmic baseboard get product
The first will provide information on the component manufacturer, and the second - by model. If you don’t want to deal with the command line and disassembling the system unit, then the AIDA64 (formerly Eevrest) and msinfo32 utilities can be a quick alternative. It's worth downloading them free versions from official websites - you most likely will not need the full functionality, but there is always a chance of catching a virus. In AIDA64 you just need to go to the “Motherboard” section from the start window, and in msinfo32 – to the System Information tab and read the data opposite the Motherboard item.


For Linux-based systems (including Ubuntu, Linux Mint and the like), you need to activate the command dmidecode.
There, among all the data, you need to select the Manufacturer and Product Name items.
Is it necessary to perform a BIOS backup?
You need to understand that BIOS firmware is created by people, and the array of information for coordinated interaction must be clearly calculated, and all aspects must be clearly planned. And if in theory this is possible, in practice this does not always happen: there is a high probability that flashing this system along with a number of improvements can introduce a number of problems with your PC into your life, so it’s still worth protecting yourself in case of such a possibility.
Manufacturers themselves do not provide such an opportunity, only allowing more than one firmware version to be recorded onto a medium and their subsequent use. But this does not always happen, since no one expects an unfavorable outcome when undertaking such an operation.
Similar opportunities are provided by third party program called Universal BIOS Backup ToolKit. This product was made by an enthusiastic programmer from China back in 2008 and works excellently on operating systems of the Windows family with versions from XP to 8.1 inclusive. An important feature of this program is its well-coordinated operation: backup copies are correct, the likelihood of damage to the final file is close to zero, and the software works surprisingly efficiently, as if it were made by an enthusiast. You should only launch it by right-clicking and calling up the “Run as Administrator” sub-item - otherwise errors in operation simply cannot be avoided.

The only pitfall that may occur to those unfamiliar with the question: the majority antivirus programs recognizes it as malware, which is not true. Of course, they can infect the source file, but even a utility downloaded from the official website will not pass the test of most programs of this class from the first echelon. The reason for this is a specific driver, thanks to which the software has such unique functionality. In fact, it does not cause any harm, it is only important to download it from a trusted source. The program interface is in English, but very simple. A small window contains only a few buttons, the meaning of which will be clear not only to an experienced user, but even to an inexperienced user. this issue. In addition to the exit button and the key that causes reading the documentation, the program window has buttons to start copying. After completing the process, which takes from one to two to three minutes, an archive in .rom format will be available in the program folder (or any other folder specified by the user), which is a complete copy of your firmware. The memory size, which is indicated on the left, is determined automatically, but it is better to double-check it for your motherboard model - if there is a failure, there will be problems and you will not be able to use an incorrectly made copy due to inevitable errors in the future. The likelihood of its success on BIOS UEFI is doubtful, but further updates to the program should correct all the shortcomings, and may have already been fixed by the time you read this article.
General information about firmware via DOS
Firmware via DOS is one of the safest options for reinstalling software for a given computer node, since all problems associated with the incorrect operation of your operating system are simply eliminated. For different models laptops and computer motherboards, there are slightly different variations of the process, although most of them have many similar features and the guide to flashing this way can be boiled down to a universal series of steps that need to be taken.
Prepare media for flashing. This could be a floppy disk or flash drive.
In direct comparison, they are in no way inferior to each other, if we talk about this process, but it is recommended to take out a floppy disk only if the motherboard (or BIOS) does not support booting from a flash drive. If you still decide to use a more outdated option, then you should check the integrity of the floppy disk by inserting it into the computer, going to “My Computer” and calling the disk check in the properties of the media that appears in the list (in our case, this is a floppy disk). If any errors occur, you should not expect a miracle from a faulty floppy disk - there is a high probability of malfunctions during the process of “uploading” files and incorrect operation of the PC, up to a breakdown and the need to take it for repairs.
Read the official recommendations given by the manufacturer on the official website. Also, similar manuals can be found in the instructions for the motherboard, but the data tends to become outdated and it is quite possible that the same happened in your case.
Also, during the flashing process, you will be asked to download the files necessary for this, which include, at a minimum, a utility for formatting the media and a firmware file from the list.
Make a backup copy of the data on the media.
Everything is simple here: if there is any important data left on a flash drive or floppy disk (which is unlikely), then you need to save it on the computer’s hard drive: in the process of changing the firmware, they will not be lost, but removable drive will need to be formatted.
Formatting the disk.
A special utility that runs as Administrator will help here. Perhaps this is not in the recommendations, but launching any program of a similar plan must be done exactly this way, otherwise you can get a large number of“complex” problems and a stopped firmware process. You can also format it using built-in tools by clicking on the disk icon in “My Computer” and selecting the item of the same name. All values should be left as default, nothing needs to be changed. Is it worth doing a full format? It will take a lot of time, so it’s better not to simply uncheck the “fast” box - the effect will be about the same.
Copying the firmware file.
This stage can be carried out either using a utility or done using a regular Explorer, with the help of which we usually perform all operations with files on our computer. An important feature is that there should be no extraneous files on the media - formatting (point 4) is mandatory; deleting files is not enough.
It is worth pressing the reboot button (no matter on the case or in the system menu) and when loading the initial screen, press the BIOS entry button – Delete. After this we see a menu where you need to select the boot partition: it will be called Boot. In this tab, you need to change the boot priority from media and put the one on which the firmware file is written first. After completing all the preparations, press the F10 key (save all changes and reboot) and follow the instructions given for your specific motherboard model - here the process may differ significantly.
Updating BIOS via Windows
Almost every motherboard manufacturer provides the option of updating the BIOS firmware through the operating system: each of them has its own utility that does everything almost automatically. However, you should carefully study all the instructions so as not to be confused at the most inopportune moment.
As described in the previous paragraphs of this article, you need to go to the manufacturer’s website and select your motherboard model. In the accompanying tabs, the corresponding utilities will be available for download along with the firmware files - in most cases, the process is identical even for products from different companies. Next, you need to run the utility (with Administrator rights, of course) and select the firmware method (the “From file” item or something similar). Next we look in file manager the place where you saved the archive and click the “Run” button - the program does the rest automatically. Advantage this method is simplicity - even a beginner in PC development can cope with it. Another thing is whether a beginner needs to flash the BIOS, because, as mentioned earlier, the procedure can damage components and negatively affect the operation of the computer. It is worth noting that on top of the already small probability of a system failure or power outage there is a considerable chance of a failure in the operating system itself - despite all its stability, the data software products have extremely great complexity: even on slightly different configurations, they can behave completely differently, because the number of factors that can influence this is extremely large. It is also necessary to warn users who nevertheless decide to take such a step: running any programs or leaving a browser, torrent client or office document running is not recommended - any combination can affect the operation of the built-in utility and then a call to the service center cannot be avoided. The problem is in the OS itself, which has a lot of components and thousands of possible bugs, an array of which even companies like Microsoft take years to fix.
In truth, flashing firmware using utilities is far from the best idea, and if such an opportunity exists, it is better to use more reliable options: flashing via DOS or through the built-in BIOS tools. Such solutions may be less simple and time-saving, but they give a much more predictable effect, which cannot be said about the option described above. In cases of firmware using other methods, the number of factors that can negatively affect the process is minimal, and with the inclusion of the operating system with all its shortcomings in the equation, the likelihood of failures increases by an order of magnitude.
MSI
Unlike even larger market players, this company provides the ability to flash the BIOS using any accessible way from those described above. This is convenient, since many people cannot handle the BIOS system menu, and some are worried about safety and are ready to play it safe, not wanting to use a utility launched from under the operating system. There is also the option of flashing firmware via loading into DOS, which is also safe and relatively simple - here the choice must be made by the user based on an objective assessment of their capabilities and willingness to minimize or accept risks.
Whatever the process and whatever method is used, you need to start by determining the model of your motherboard, which can be done in several ways, described above in this article. On the manufacturer's official website, look for your model and download the necessary files, following the instructions. But since there are even three paths here, it is so simple explanation users will clearly not be satisfied and will ask to describe the process in detail.
Live Update
Live Update is a utility produced by the company for flashing the BIOS and some other similar manipulations. It is worth noting that maternal MSI boards laptops, tablets and other devices are also installed - it will not help here and you will have to use other methods. This happens due to the fact that during the firmware process problems may arise. unexpected errors, which will become critical to the performance and functioning of the device.
So, download the utility from the official website and install it (running the installer with Administrator rights). This will solve the problem of unexpected failures that so often occur in work after a conflict between programs and permissions. Next, launch the program and go to the appropriate item (tab). It is also necessary to simultaneously download the archive with the firmware, because the automated option, according to reviews, does not always work correctly and it is better to refrain from using it.

Then, following the menu, we will have to face a warning that calls for closing everything open source software(which was already mentioned here earlier) and wait for the end of all actions that the program performs. Then, of course, the PC will reboot and using the same program you can find out about the overall success of the operation.
There is another option for the program, which offers automated installation of firmware updates via DOS, which was described in earlier sections of the article. It is worth noting that it retains all the advantages of this method and allows for easy and safe installation of a software upgrade. Technically, the program only downloads the archive with the firmware, so the further process is no different from the “manual” installation, you just have to search the required version motherboard and downloading the archive is no longer necessary - the utility is responsible for all this. The negative point is that you may not need the newest version, but the software will download it, and the largest numbers in the version column do not guarantee better performance, as we have had the opportunity to observe repeatedly on many occasions.
MFLASH is a utility from MSI that is built into the BIOS and allows you to install updates directly using the system's tools. In order to operate it, no additional tricks are needed: just an empty (or better yet, formatted) USB flash drive and a file with BIOS software downloaded onto it. Here the sequence of actions is slightly different: the first of them should be downloading the file mentioned above for your model. Then you will need to clear the space - the presence of other files is undesirable, although some users speak positively about the success of such an installation.
After the reboot, you will need to enter the BIOS using the Delete button and find the tab with the same name as the utility. Next, you will need to specify the path to the file (disk) and click on the button to start the process. The length of the entire procedure after entering the BIOS is only a couple of minutes maximum, and after rebooting you will receive a system that is most likely to work correctly - there is no chance that it could be affected by any software failures.

From under DOS
It is also a reliable method that does not involve the system at all and works perfectly when updating software. In order to find it, you will need to look among the files on the official one for exactly the one that is needed for installation under this OS - there will be a corresponding note in the name at the end, as in the screenshot. Next, you need to get a floppy disk, check it for errors using the built-in Windows utilities and format it there. If there are no errors when checking the disk, then you can write a file to it - it will become the installation file.
Next, reboot and enter the BIOS using the Delete button. After this has happened, look for the Boot item Device Priority and put our media (Floppy Drive) in first place. Next, press F10, agree to save all changes and wait for the reboot.

After loading the operating system, we will see a black background with fonts of bright colors (or white) - that means we are logged in. We will be asked to press Y to continue and N to exit this mode. We press the first button, wait a minute and a half and see a message about the successful completion of the firmware upload. We remove the floppy disk and reboot the computer, simultaneously going into the BIOS and changing the boot priority back to the hard drive, although with the floppy disk removed and no boot disk in the drive it will do it like that.
Gigabyte
Gigabyte is the world's third-largest motherboard manufacturer, with its main facilities and headquarters located in China. The company previously did not have similar technologies and was just a contractor for large market “sharks” such as Asus or Intel, but having “spied” some of their developments and opened research departments, it quickly turned from an apprentice into a full-fledged competitor.
Gigabyte specialists working on BIOS software did not reinvent the wheel: all methods of reinstalling software for this system are as similar as possible and are clearly borrowed from other market players. It is not known for certain whether patent wars are taking place between corporations, but one thing is certain: the user remains a winner from such solutions, because all the actions and methods of changing the firmware that Asus and MSI work on also work on the motherboards of the Chinese company - they only differ appearance(purely formally) and names of utilities. The company did not come up with anything fundamentally new, which had a positive effect on the convenience of carrying out such operations.
A positive point is that the company makes every effort to make it easy to find its documentation, which is not hidden in the depths of the official website, but is easily accessible within search results any system on the first page in several copies.
The company, or rather its specialists, strongly do not recommend carrying out such a procedure if you have not identified any malfunctions or malfunctions in the operation of the equipment: processor, RAM and other components. In many cases, according to the company's own research, performance does not improve and worsens, so it is worth carefully considering the feasibility of flashing the BIOS.
Also in the manuals, much attention is paid to accurately determining the motherboard model, taking into account the revision. Since in model range Gigabyte there are models that are designated the same, but one of them is a re-release of the second, then the firmware (and all other manipulations) may differ, the use of the wrong archive can have the most detrimental effect.
It is also worth noting that in the event of a breakdown or any other malfunction that may occur in the event of a flashing, the device is not subject to warranty, since this action is entirely qualified as a repair. This is also worth considering and it’s good that the manufacturer is not silent about it.
Q-Flash is the most reliable way to flash BIOS: this utility is built into the system itself and performs its functions perfectly, having minimal susceptibility to incorrect firmware. Its operation does not depend on the operation of the operating system, which is a definite plus. The only problem is that not all solutions support this technology- in other situations much more simple solution There will be firmware via DOS.

Before using the Q-Flash utility, you must download the most current version of BIOS microcode that matches your motherboard model from the GIGABYTE official website. The BIOS microcode file must be written to a medium (floppy disk, flash drive, or HDD; file system FAT32/16/12).
Since updating the BIOS microcode carries potential risks, it is not recommended to update the BIOS if the current BIOS version does not cause any problems. Updating the BIOS should be done extremely carefully. Incorrect update BIOS may cause the system to not work.
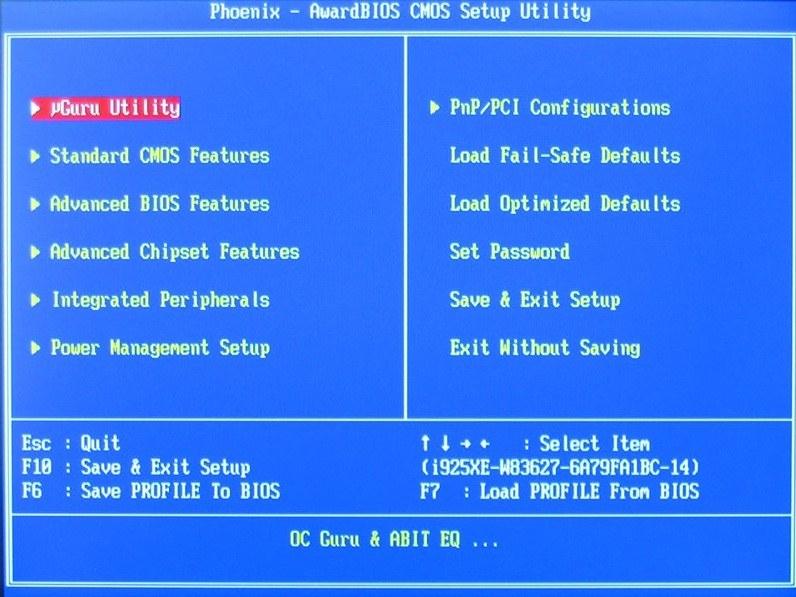
This solution allows you to update the firmware of the input/output system from under the good old operating system such as DOS. It is worth noting that the flashing operation must be performed on a system running in normal mode. Overclocking, lower memory timings, non-standard frequency system bus can lead to the fact that our event will end with a trip to the service center (or calling familiar gurus). The easiest way is to load the default settings into the BIOS SETUP (main menu item Load Fail-Safe Defaults or similar).

The flashing operation must be performed only from DOS. To boot from a floppy disk, it is enough to have only two system files: io.sys and command.com. In any case, neither autoexec.bat nor config.sys should be loaded. In addition, the floppy disk should contain files with the flash driver and the firmware itself.
Run the flashing program with the parameter “/?” and you will receive detailed instructions on working with her.
Please note that updated firmware does not always meet the user's expectations. Be sure to save the file with the old BIOS version on a floppy disk (!) so that you can reverse your actions in the future. For AWARD BIOS, the flasher call can be as follows: “awdflash.exe newflash.bin /py /sy”. Where “newflash.bin” is the real name of the file with the firmware, “py” and “sy” are the flags for reprogramming and saving the old BIOS version, respectively. And lastly: under no circumstances reboot or turn off the computer until the flasher has finished working. This will inevitably damage the BIOS.
Live Update
Live Update is perhaps the simplest solution to problems with the I/O system, because it searches for the necessary microcodes and does almost all the manipulations instead of the user - to use it you do not need to be any kind of specialist in this field. To get started, you need to go to the official website and download the Live Update 5 utility, which will scan your computer and provide a list of necessary updates, with the ability to download them. Click “Click here” and click “Open”.
The archive will open, run in it installation file LiveUpdate.exe and install the Live Update 5 utility in several steps. After the installation is complete, launch it and click on the “Scan” button, wait a few seconds while the utility looks for updates. The program will display a list of results. We are interested in the update called “MB BIOS”. If such an update is in the list (usually it is at the very top), then there is a BIOS update for our motherboard. Download it to your computer by clicking on the “Download” button (arrow). It’s better to click “Browse” and choose a location to save the update file yourself. For example, I saved it to my desktop. That's it, we now have the BIOS update file, now we can move on to the next stage. Run the saved file with the BIOS update and follow the instructions.
There are two options here: the first is probably to write the firmware image to a USB flash drive, and update the BIOS from the flash drive (or for the firmware, if it is impossible to update from Windows). But since I didn’t have a free flash drive, I chose the second option, which, judging by the title, means flashing the BIOS from Windows. Here we need to close running programs and click “Next”.
The further process of updating the BIOS is that we simply press any key on the keyboard, and the computer should reboot. Then everything is over - the device has received new firmware.
ASUS BIOS firmware
ASUS is one of the titans of the computer components industry, which shows itself as a market leader in both quantitative and qualitative terms. An important feature of their products is ease of maintenance: for each class of product there is a utility that searches for drivers or any other useful work - in the case of this company, the implementation of these solutions is at its best. The same thing happened with updating the BIOS: both options are very convenient and easy to learn by unskilled and inexperienced users.
USB BIOS Flashback is the easiest way to update the BIOS on ASUS motherboards. To update, you now only need a USB drive with a BIOS file written to it and a power supply. Neither the processor, nor RAM and other components are now needed.
The list of system requirements for this utility is quite prosaic:
- power unit;
- USB drive FAT16, FAT32 or NTFS (for Intel X79 only FAT16 and FAT32);
- ASUS motherboard based on the Intel X79, Z77, H77, Q77, B75 chipset (the list of ASUS motherboards that support USB BIOS Flashback technology is presented in the table).
First, you need to download and extract the BIOS ROM file from the official ASUS website. It is important to understand that receiving files from somewhere else is fraught with irreversible consequences and unexpected operation of the equipment. Next, you should rename the BIOS file as written in the table, and then save it to the USB drive in the root directory:
| Model | File name |
| P9X79 Deluxe | P9X79D.ROM |
| P9X79 Pro | P9X79PRO.ROM |
| P9X79 | P9X79.ROM |
| Sabertooth X79 | SABERX79.ROM |
| Rampage IV Extreme | R4E.ROM |
| Rampage IV Formula | R4F.ROM |
| Rampage IV Gene | R4G.ROM |
| Р8Z77-V Deluxe | Z77VD.CAP |
| Р8Z77-V Pro | Z77VP.CAP |
| Р8Z77-V | Z77VB.CAP |
| Р8Z77-V LE | P8Z77VLE.CAP |
| Р8Z77-V LX | P8Z77VLX.CAP |
| Р8Z77-V LK | P8Z77VLK.CAP |
| Р8Z77-M Pro | P8Z77MP.CAP |
| Р8Z77-M | P8Z77M.CAP |
| Sabertooth Z77 | Z77ST.CAP |
| Maximus V Gene | M5G.CAP |
| P8H77-V | Р8H77V.CAP |
| Р8H77-V LE | Р8H77VLE.CAP |
| Р8H77-M Pro | Р8H77MP.CAP |
| Р8H77-M | Р8H77M.CAP |
| Р8H77-M LE | Р8H77MLE.CAP |
| Р8B75-V | Р8B75V.CAP |
| Р8B75-M | Р8B75.CAP |
| Р8B75-M LE | Р8B75LE.CAP |
| Р8Q77-M | Р8Q77.CAP |
| Р8H77-I | Р8H77I.CAP |
Then you should connect the USB drive to the USB BIOS Flashback/ROG Connect connector (for boards based on Intel X79, this is a USB 2.0 connector white, for boards on other chipsets - this is the USB 2.0 connector, marked with color and the inscription USB BIOS Flasback/ROG Connect on the Q-Shield panel) and hold for three to four seconds until the light indication starts. Next, we wait for the USB BIOS Flashback/ROG Connect button to light up, which means that the update has been completed successfully.

It is important not to remove the USB drive, turn off the power to the motherboard, or press the CLR_CMOS reset button while updating the BIOS. It is also worth remembering that if the USB BIOS Flashback/ROG Connect button blinks for five seconds, then the USB BIOS Flashback is not working correctly. This may be caused incorrect installation device, an error in the file name or an incompatible file format - you should check it yourself after rebooting. It is worth noting the company’s rather loyal policy regarding problems after a firmware update: if you encounter any problems with booting after updating the BIOS, you can contact your local ASUS service representative, who, according to the authors of the documentation, is committed to helping.
AFUDOS utility
This solution is a little outdated - on motherboards released in the 2000s and 2010s, the most popular utility is EZ Flash, although the old solution is also applicable to many devices. To start flashing the firmware using this method, open the bootable USB flash drive, write the afudos program (downloaded from the website afudos.exe file) and the firmware itself (a file named p5c800b.rom) onto it. Then we reboot and when the first picture appears on the monitor, press F2 for laptops or Del for desktop PCs, go to the Boot tab and put the flash drive in first place, usually for this in the 1st Boot Device item you need to set Removable Device, then press F10 and confirm that We want to save the changes in the settings. After this, the computer will boot from the flash drive and will display an invitation to work A:\> on a black screen. To start the firmware process, write afudos /ip4c800b.rom and press the Enter key. It is worth noting that you do not need to turn off the power or reboot the system while updating the BIOS. This can cause serious damage to your system. After the BIOS update is completed, the utility will return to DOS; you should remove the floppy disk and reboot the system to enter the BIOS menu.

Intel
This method is one of the simplest, as it uses a self-extracting archive and does not require special skills from the user. After selecting the section dedicated to the motherboard, you need to download the firmware, in our case it is Express BIOS Update and launch it by double-clicking the mouse. Next, click “Next” in the invitation window, and then click “Yes” to accept the license rules. Afterwards, click “Finish”. Windows will restart to begin the BIOS update. During the update process, do not turn off the computer's power for 3 minutes. During the reboot process, you will see the BIOS update process. When the BIOS is updated, the computer will boot into Windows. When Windows restarts, a window will appear indicating that the BIOS was updated successfully.

The essence of this method is to create bootable ones (disks, flash drives, floppy disks) containing a BIOS update. In our case, download this file LF94510J.86A.0278.BI.ZIP
To work, we will need firmware files (write its name on a piece of paper, it will come in handy later) with the XXX.BIO extension and the iFlash.EXE firmware utility. These files are located in the archive with the downloaded firmware. Use the iFlash utility that comes with the firmware in the archive. The HP USB Disk Storage FormatTool 2.2.3 utility is also useful (other versions are possible), but this one is one of the most stable at the time of writing. Of course, you can't do without MS-DOS files to create a DOS boot disk. After downloading, all files will be unzipped.
Run the utility as administrator HP USB Disk Storage FormatTool 2.2.3. Check the boxes as shown in the picture. The path to the MS-DOS boot device folder is set to the place where the MS-DOS files were downloaded. (For example, this is drive C, folder Downloads\win98boot. And the Start button. When asked about deleting files, click “Yes”.

Upon completion of the process, copy 2 files from the archive with the firmware to the flash drive (example of what they look like: IFLASH2.EXE and LF0278P.BIO). And without removing the flash drive from the USB port, we reboot the computer. We go into the BIOS (F2 button at boot) and set the boot priority from a USB drive (on the Boot tab, enable boot from USB (Enable USB Boot) and exit the BIOS saving the settings - F10.
DOS will boot. IN command line enter IFLASH /PF XXX.BIO (or IFLASH2 /PF XXX.BIO) to start the BIOS update process. Next, follow all instructions. In our example it will look like this: IFLASH2 /PF LF0278P.BIO
Creating a boot floppy is a viable method if the utility and firmware are small enough to fit on the floppy, as the floppy is 1.44Mb in size.
For our example, there is no way to clearly show the process of creating a boot disk. So, as an example, I’ll take another firmware file from another motherboard. Insert the floppy disk into the drive and double-click the downloaded firmware file XXX.EXE. Press "y" to extract the necessary files. The files will be extracted to a temporary directory ( temp folder; Path C:\temp). You can also extract files using the usual WinRAR archiver. Double-click the RUN.BAT file and follow the instructions to create a bootable floppy disk.
After creation, restart the computer, set the BIOS to boot from a Floppy disk and exit saving the settings - F10. After booting from the floppy disk, a welcome window will appear, press any key. You will see the BIOS update status. When the process is complete, remove the floppy disk from the drive and press Enter to restart the computer.
ASRock Firmware
For motherboards from a Chinese manufacturer, the sequence of actions will also not be much different when installing the firmware: here you also need to format the media and go to the official website for the files. The following list of actions is also standard and is no different from updating from DOS from other manufacturers...
You need to download the BIOS update file (WinZip file with .zip extension) from the ASRock website, unzip it and save the ASRFLASH.EXE utility and BIOS file to a floppy disk. Next, boot the system from the floppy disk. At the A:\ prompt, type ASRFLASH, press Spacebar once and type the BIOS file name, then press Enter. For example: A:\ASRFLASH K7S41GX2.00 "Enter". After this, you will see the message "Please wait for BIOS loading ROM".
After 30 seconds, you will see the message "Flash ROM Update Completed - Pass", which means that the BIOS update is complete. After updating the BIOS, remove the floppy disk. Reboot the system and during boot press F2 to enter the BIOS setup program.
From the Exit menu, select "Load Default Settings" and press "Enter" to continue. Select "Exit Saving Changes" and press "Enter" to exit the BIOS setup utility.
Actions after flashing
There is no need to undertake any special “rituals” after flashing, unless the instructions provide for it: just remove the media that was used after flashing and test the operation of the PC with the new software. If any glitches are noticed, it makes sense to roll back to the previous version or find another one so that both support for new components and the stability of the machine are not affected.