Where is the webcam on the laptop. How to set up a camera on a laptop
Read the instructions that should come with the kit.
You can also try to get information through standard parameters operating system. As a rule, everything installed equipment displayed in a special "device manager" connected to personal computer or laptop. Click on the "My Computer" shortcut. Next, a window will open in front of you with all local drives and connected external portable devices. If at the bottom there is such an item as "Video device" or something similar, click on it with the mouse button.
If it is a webcam, then you will see your image on the monitor. Also, the built-in webcam may not work due to lack of drivers. You can find them on the official website of the manufacturer. If you have an external webcam, then the connection will not take even 10 minutes. Connect the camera to the computer via the USB port. Wait a couple of minutes for the computer to find new hardware. Next, go to "My Computer" and see if there is a "USB video device" column.
Click on it. If the drivers were installed automatically, the camera will work. AT otherwise you will need to install a special software for this webcam. As a rule, these devices are always sold with an installation disk, so look in the webcam box. Insert the disc into your computer's drive. Next, find the .exe file and run it. Wait for the installation to finish and restart your computer.
Now visual communication via the Internet through a webcam is gaining more and more popularity. There are already quite a few laptop models that have a built-in camera. But when setting up this device, some users have problems. In order to enable the built-in camera on a laptop, follow these steps.
Instruction
Through the "Start" menu, enter the program designed to manage. It is usually included with any software package that has it built in.
If there is no such program, then use the CD that came with the laptop.
If it works fine in this one, then it, and there should be no problems with it.
Often there is a key on the laptop keyboard with which you can turn on camera so take a close look at the keyboard. Usually, the purpose of the function keys is indicated by their icon.
If you can't find the key, check the documentation that came with your laptop. This documentation is available on CD in in electronic format. You can also read necessary information on the manufacturer's website.
Update the camera drivers that are also on the CD. If you need more a new version, then you can use the manufacturer's website.
Perhaps the camera is simply disabled in the BIOS. Start the system and enter the BIOS, find the camera setting (usually there is the word Cam) and change its value from Disabled to Enabled. Now start the system again, the camera should turn on. If, after carrying out the above steps, the camera still managed to turn on, then most likely the problem is in the camera itself, it is faulty. In this case, you should contact service center, it is likely that the camera just needs to be replaced.
Sources:
- how to turn on laptop camera
Most laptops come with a built-in webcam. It is difficult to overestimate the usefulness of such a solution: through the web camera you can arrange conferences for several people and be in the center of events, geographically being many kilometers away from them. The laptop itself is an attribute of a mobile business person. The built-in webcam is another tool that helps you get the most out of your laptop and stay connected.

Instruction
In the start menu in installed programs look for the names of which contain the model of your webcam or the English words camera and the abbreviation cam. If you managed to find such programs, most likely they will help you turn on the built-in webcam. Try them. Depending on the configuration and design, a diode near the camera may light up indicating that the camera is on and working. When you turn off the webcam, the diode will turn off simultaneously with it.

If your built-in webcam is turned on, this program will help you capture and save any streaming video, which is played on the screen or enters the camera lens, as well as to carry out their own video broadcasts.

Sources:
- asus built-in camera in 2018
In recent years Skype program became very popular. Needless to say, this is a very convenient and financially beneficial program that allows people to call all over the world. One of its indisputable advantages is that it allows not only to hear, but also to see the interlocutor. In the event that you are just setting up your webcam and want to connect a video call to Skype, a few tips will be useful to you.

You will need
- To do this, you will need Internet access and the simplest webcam.
Instruction
Buy a webcam, connect it to your computer. Drivers are always included with the web, install them on your PC. If suddenly there are no drivers in the kit, download them from the network. Just make sure these drivers are compatible with your webcam first.
After you have installed the webcam, make sure that Skype "saw" it. To do this, go to the “Tools” menu, click on “Settings”, and then go to the “Settings” submenu. Be sure to check that the line “Enable Skype video” is ticked.
If Skype saw a webcam and it is, then your image will look at you in the upper right corner of your monitor. If there is no such image, reinstall the drivers again. If everything is fine, then your interlocutor will see the same video image.
Adjust the video image to your taste. Click on the "Webcam Settings" option and set the brightness, contrast, and color gamut. All these settings will take place directly on the monitor - so choosing the most suitable option for you will not be difficult.
So, the settings are made, the image is there - click on the "Save" button. Your webcam is set up.
Related videos
note
If you are not visible in any case, it means that you have an insufficient channel for Skype, change tariff plan.
If during the conversation there is sound, but no image, click the "Start video broadcast" button.
Sources:
- skype mania
The webcam is nothing more than regular camera low resolution, built into the laptop panel above the screen or in a special holder device. Classic webcam resolutions are 0.3, 1.3, 2.0 and 3.2 megapixels.

Instruction
The Web allows computer users through special software not only in text mode, but also through "videophony". Thanks to high-speed channels, users will see each other on their computer screens in . The most popular program for videophony, and at the same time absolutely free, is called Skype. Sometimes she does not signal with, voicing an error that the device is disabled. Turn on the webcam as follows.
Go to "Start" or "My Computer" and select "Control Panel". In the icon display in the control panel, select "Small Icons" (for owners of Windows Vista/ 7). All sorts of shortcuts for managing the computer will be displayed on the screen. Locate the "Device Manager" shortcut and launch it by double-clicking the left mouse button.
Will open before you system application"Device Manager". It displays in a tree format all devices installed in the computer, including boards and peripherals. All devices are grouped according to purpose and performance of certain functions. Find "Imaging Devices" in this list. This item is usually located at the very end.
If no camera equipment is connected to the computer or mobile phone, in imaging devices, double-clicking will display the webcam with a down arrow icon on the label. Double click on the webcam shortcut to access the properties and device management. In the main "Properties" tab of the window that appears, select the "Enable" button. In the pop-up window asking you to confirm turning on the webcam, click "Next", then "OK". After a few seconds, the webcam will turn on.
Tip 6: How to connect the built-in webcam on a laptop
Connecting the built-in webcam on a laptop is as easy as connecting a regular webcam to a regular one. desktop computer. So, we connect a webcam on a laptop.

Instruction
Get it installation disk that came with your laptop, install the web driver from this disk. In some cases, it can be installed separately, and in some cases it can be installed in a general package. required drivers for the corresponding model. If you do not have such a disk, then look for and download the driver on the Internet. To do this, enter in address bar browser address any search engine and enter in the input field a request containing the phrase: (and indicate the full model of your laptop).
Open the "Start" menu and click on the item "Control Panel" - the control panel window will open. Switch the way the tools are displayed to the classic view, find the line "Hardware installation" in the list and double-click on it with the left mouse button.
Here is the welcome screen of the Add Hardware Wizard, click on "Next" at the bottom of this window. The system will search for new equipment connected to your , and also ask you if it is connected in this moment device to a computer or not. Answer "Yes, the device is already connected" and then click on "Next".
So, you see a list of devices (drivers and controllers) available in your . Scroll this list down to the end, the last line will be: "Adding a new device". Select this item and click on "Next".
The wizard will ask you whether to install the driver automatically or manually. Since you do not have the original driver disk, and the driver itself is located in one of the directories on the local disk, select manual installation.
In the list that appears, select "Sound, video and game controllers", then click on "Next". Now, on the left side of the window, select the item "Standard system devices", and then on the right side - "Video recording devices (without PnP)" and click on "Install from disk ...". In the subsequent dialog box, click on "Browse" and point the system to the location of the driver. Then click on "OK" and on "Next". After the system completes the driver installation, close the wizard window by clicking "Finish".
Related videos
The built-in webcam is the best solution for video communication using a laptop. Its location above the screen is great for negotiations. You can enable the built-in camera in the following way.

Instruction
If the built-in webcam is not equipped with signals that it is working, then first you need to find out if it is working. To do this, log in to the panel Windows controls(via the desktop icon or from the Start menu) and double-click the System icon. The operating system properties window will open, in which you will need to open the "Hardware" tab. In this tab, click the "Device Manager" button. In the drop-down list of the "Device Manager", select "Imaging Devices", and click on the "+" symbol. A list of all devices will open, among which find the webcam and make sure it is enabled.
To use the built-in webcam, you need to run an application designed specifically for it. Usually, this software is pre-installed (if it is purchased with the operating system). For example, in order to enable the built-in camera on Acer, you need to enter the "Start" menu, click the "All Programs" button and from the list "Acer Crystal Eye Webcam". With this program, you can take photos and record videos, while changing the shooting resolution and saving the results to your computer.
You can also enable the built-in webcam using third party programs, For example free application ManyCam, which can be downloaded from the link http://download.manycam.com/. This program supports a wide range of functions for working with the built-in webcam.
The built-in webcam is automatically enabled in applications such as Skype, MailRu Agent Oovoo and the like. Moreover, if the computer is installed and running in background Manycam, then other applications will detect it as a separate webcam with advanced settings.
Today, when face-to-face communication fades into the background and more and more people begin to communicate “blindly” - in messages through social media or mail, webcams are gaining popularity, allowing you to broadcast your actions to any corner of the planet. Of course, anyone with a laptop and a camera should know how to run this USB video device.
We often need a camera to communicate on Skype or another messenger, but, unfortunately, it does not turn on. It may not be configured or even enabled. We offer you several effective methods connection checks and settings, which should help out at such an important moment.
Connectivity Check
If you are using a USB camera, you should first check all the connectors and cables. Sometimes you need to additionally press the power button on the gadget itself. The built-in camera in a laptop will require certain programs.
Most easy way– check the camera online. You just need to go to the site that provides such a service, click "Allow" in the drop-down window, and you will be on the screen.
Check Device Manager
You can check the operation of the camera using the "Device Manager".

A question mark or an exclamation mark next to the name indicates the need to install drivers. They are located on the disk with the operating system. If there is none, they can be found on the official website of the gadget manufacturer.
Choose drivers exclusively for the model of your laptop or USB camera.
With an arrow drawn down opposite the name, you need to press the right mouse button and select the "Enable" item in the context menu.
Turning on the camera
You can turn on the camera with standard programs and special utilities.
Take advantage of special programs
You can turn on the camera with Windows programs Movie Maker (film studio) or Skype. If they are not on your laptop, install them.
Everything is clear with the film studio - you just need to open it to start the camera.
Skype is a little more complicated:

You can also turn on the device using any utility or special program to create photos and videos on your computer. There are a lot of them on the Internet, just download wisely - do not bring viruses. To do this, check the files through the checked .
The most difficult situations
In the most difficult cases, you can restart the laptop, move the portable camera to another slot, update or reinstall the official drivers.
When all else fails, you should contact the master or take the gadget (USB camera or the entire laptop) to a service center.
Instruction
Start with the most simple steps. Press and hold the Fn and F2 keys on your keyboard. After that, open "My Computer" and look for the webcam icon.
If unsuccessful, restart your computer. During system boot, press the F9 key and see if the webcam is enabled in the BIOS. If not, then you need to correct the situation so that the built-in camera boots with the system.
If rebooting and initializing the camera in the BIOS did not help, open the manager Windows devices. To do this, click right click click on the "My Computer" icon, then "Management" and "Device Manager". Click on the "+" sign next to the line called Imaging Devices. In the list that opens, find the USB video device. A cross opposite this item indicates that the webcam is not connected. Right-click on the line and in the context menu that opens, click "Enable".
Find the camera icon on your desktop or in the My Computer window. If the shortcuts are still missing, install the "native" drivers specially designed by the manufacturer for the webcam for specific model Hewlett-Packard laptop. It may happen that the drivers that the operating system has installed Windows system in automatic mode, do not fit or work incorrectly.
Test the camera using the Hewlett-Packard laptop manufacturer's preinstalled HP MediaSmart software. The camera may not initialize immediately, and you may need to restart your computer.
Related videos
Helpful advice
In most cases, the problem of turning on the built-in webcam is due to incorrectly installed drivers. It happens that the original software for the camera does not get up even after removing the "general" drivers that Windows installed by default. In this case, you will need to edit Windows registry, and in critical cases, reinstall the system.
Sources:
- hp laptop camera not working
Buying computer equipment, users tend to use all its features. It's no secret that laptops, just like computers, are compatible with digital video devices such as cameras, camcorders, etc.
Instruction
Turn on your laptop and click on the "My Computer" icon. You will see a window with local drives and external connected devices. If you find the item “Video Devices” or just “Video” at the bottom, click on it with the mouse and you will see yourself on the screen. Your laptop has an integrated, built-in video camera. Sometimes it may not work due to lack of installed drivers, which must be downloaded via a USB cable from the Internet from the manufacturer's website.
If your laptop does not have a built-in video camera, you should connect an external video device to it. This is easy enough to do. Webcams are sold in stores computer technology with software, necessary USB cords. Check out the instructions. Take USB cable and laptop to the camcorder via USB port. After a few minutes, the laptop's operating system will detect the external connected device. Go to the "My Computer" folder and find the item "USB video device" there. Click on it with the mouse. If the drivers for the camera are downloaded automatically, then the hardware is installed and the camera will work. But sometimes you need to install the software yourself. Insert the disc that came with your webcam into the receiver, open it, find setup file with the extension "exe", run by following the commands on the screen. After a while, the installation will finish. Restart your computer, the camcorder is ready to use.
To connect a regular camcorder (one that can) to a laptop, a special port 1394 is used. This gives the best quality images of digital material downloaded from the camcorder, and also increases the download speed. A connecting cable with plugs for the FireWire 1394 port is also used for connection. If there is no such port, buy an IEEE 1394 controller, insert it into the side port to connect controllers with its thin part. Then insert the plug of the above-mentioned cable connecting the laptop to the camcorder into the controller. Connecting and disconnecting the controller occurs on the principle of a flash drive. Check the connection of the video camera through the operating system as described above in paragraph 2.
Sources:
- how to connect camcorder to laptop
Manufacturer ASUS supplies most of its laptop models with webcams for video communication on the Internet. Inclusion installed device is performed by pressing the corresponding key combination on the keyboard. Image adjustment can be performed both in the program in which you are broadcasting video, and using specialized utility.

Instruction
Turn on the laptop and wait for the operating system installed on the device to start. Hold down the Fn key, which is located in the bottom row of keyboard buttons to the left of windows keys. This button is responsible for using the functions
Question from user
Good afternoon.
Tell me how to make the webcam work. It seems that the driver has already downloaded, reinstalled it 10 times - but it still does not work (shows only a black screen). What else could be wrong?
Good day!
Yes, today's Internet surprises no one with streaming video, webcams, etc. In general, in general, there are not so many problems with webcams, and by following a simple series of steps, you can eliminate the cause of its inoperability (unless, of course, it is related to the hardware component - after all, your webcam could simply break down).
Why the webcam may not work
1) The camera is simply not active...
By default, the webcam in a laptop is always on and powered (it's just not active in real time - you don't always need a camera, but only while talking on the Internet, or when recording video).
And for it to start capturing an image, you just need to launch some application that uses it.
For example, in Windows 10 - such a program is "Camera". It's in the start menu.

If you have Windows 7/8, then some problem may arise - because. they do not have a basic webcam program built in. In this case, you can use Skype or Media Player Classic(which is present in every set of codecs).
Addition! About where to download the normal Media Player Classic -
I'll show you example Media Player Classic, how to open a picture from a webcam in it (relevant for all versions of Windows).
After installing the program, go to its settings: "View/Settings" . In the "Capture" section, specify your camera in the "Video" column, a microphone in the audio, and "Russia" in the country (it should turn out approximately like in my screenshot below).


If everything is in order with the camera, an image should appear in the player window.

2) Drivers not installed
If the picture from the webcam is not transmitted, then very often drivers are the reason for this (more precisely, their absence). To see if the driver is installed on the system, open device Manager (press the combination Win + Pause and in the menu on the left you will see a link to launch it).
In device manager, look at the tabs "Cameras" and "Other devices" .
If the driver is installed, then in the "Cameras" tab - the model of your device should be displayed, if there is no driver - then in "Other devices" you will see a mark with a yellow exclamation mark on some "Integrated webcam"(see visual screenshot below).

Device Manager - check if there is a driver for the webcam
To update the driver, you can try using Windows function: Right-click on "Camera" and select from the menu that appears.

3) It is disabled in Device Manager or Windows Control Panel
It is also worth noting that in addition to the lack of a driver, the camera can simply be disabled in the device manager. Pay attention to the icon: is there an arrow on it?

If you have Windows 10, then open the START menu and go to the settings section.
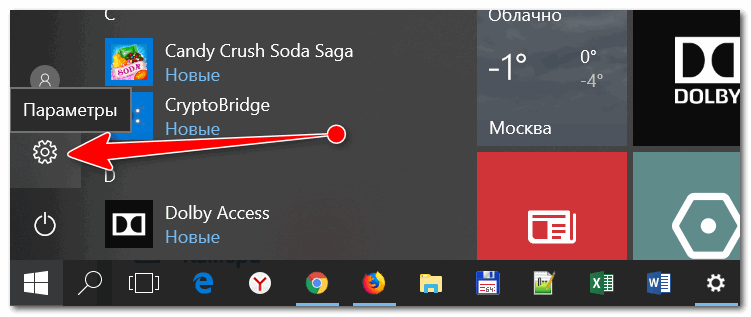
In chapter "Confidentiality" open tab "Camera" and allow applications to use the hardware.
By the way, please note that at the bottom of the window you can set applications for each individually, which can use the camera, and which can not.

4) Check the spec. laptop control centers, antivirus.
And there is one more thing that may affect the operation of the webcam ...
Some laptops have control centers (comes with drivers). They allow you to adjust the laptop's power supply, adjust its monitor (brightness, contrast, etc.), fine-tune the keyboard, touchpad in detail.
Often in such centers there are also privacy (security) settings in which there may be a restriction on the use of a microphone and a camera. I recommend checking this one out.

By the way, some antiviruses can also block the transfer of images from the camera, fearing that the attacker's application will be able to gain control over it (and thus receive confidential information about you). Try temporarily disabling your antivirus.

PS
Alternative non-obvious reasons
1) Check Is the camera sealed with tape? or some kind of sticker. For some laptop users, I have noticed such a "trick" for several times - people are afraid that hackers (or tracking software) will be able to take pictures of their personal lives and, just in case, seal the camera. Naturally, in this case, apart from the black screen, the camera will show nothing...
2) Is the webcam busy? another application? It's just that if you run two applications at the same time that "want" to use the camera, then perhaps nothing will be shown in one of them. Try restarting your PC (after previewing and turning off all unnecessary), and use only the only software to view video from the camera.
3) It may take 10-15 seconds between the time you launch the program to display video from the webcam and the time you see the picture on the computer screen. ! Those. there is a certain pause. It's just that many users, having launched the program and not seeing the image after 2-3 seconds. - consider that it does not work and look for the "cause" of the problem (which does not exist!).
4) If all of the above did not help, maybe your camera is just broken(hardware reason). I would recommend that you buy an inexpensive external webcam (connected to USB port) in some Chinese store(For example). If you catch a promotion (+ use cashback) - you can spend mere trifles...
Suggestions on the subject are welcome...
For now, that's all.
A webcam (“webcam”) is digital device to record video information that can be transmitted over a network. “Webcam” is an attribute of any laptop: their manufacturers equip their products with webcams “by default”. Many of these are also sold separately.
The difference between “webcam” and full-fledged video cameras is the focus on the capabilities of network programs with multimedia functions, that is, the emphasis is not on the quality of shooting, but on the ability to quickly transfer images to the network. Therefore, the majority of models have a low resolution, not the best color reproduction and a minimum of settings. The most expensive web cameras are capable of shooting at the level of an “average” camera.
How to install and configure a webcam on Windows 7
Installing and configuring the built-in camera
Built-in laptop webcams are usually ready to go right away, just launch a network application, such as Skype, and set the desired video settings in it.

If the program says that you do not have a camera, but you are definitely sure otherwise, then it is disabled or not installed. On some laptop models, first of all, you need to turn on the webcam physically - simultaneously press the Fn key + one of the keys in the F1-F12 row. A miniature in the form of a camera drawn on the button will help determine the desired combination.

Find “Imaging devices” in the list of equipment and expand the tab. If a web camera is installed but not active, you will see an icon next to it in the form of a circle with an arrow .
To enable a device, open its context menu and click Enable. When prompted by Windows, restart your computer and the camera will start working.

If there is no web camera in the device manager, but there is unidentified hardware, as in the picture, then you need to install the driver.

You can try to install the webcam driver using the system tools - most likely, Windows will find something suitable in its databases, and the device will work. To do this, select from context menu unknown hardware command “Update drivers”

and specify the search method - automatically or manually. If the web camera was not previously installed, then there are probably no suitable drivers on the computer. Automatic search allows you to find them online.

You can also find out the webcam model from the laptop documentation, go to its manufacturer's website and download drivers from there.
Along with the driver, not always, but often a program is installed to configure the built-in webcam. For example, Cyberlink YouCam on HP laptops:

With its help, you can not only adjust the shooting parameters, but also edit the image.
Installing and configuring an external camera
By external, we mean a “webcam” as a separate device that connects externally to the computer's peripheral port. Most of these cameras are USB interface, that is, it is universal, able to work on any PC and not only under Windows.

External “webcams” come in completely different designs and shapes, many are equipped with a built-in microphone, and some have a separate switch on the case. To connect them, it is best to use active extension cables that can additionally feed the device, thereby improving the signal quality. The active cable allows you to move the camera away from the computer at a distance of 10 meters or more, and the passive (normal) cable allows you to move it up to a maximum of 5 meters.

An external webcam always comes with a CD/DVD with drivers and software from the manufacturer. To set up the camera, just connect it to a PC port, turn it on if there is a button for this, insert a disk into the drive and install the software. The included software allows you to adjust shooting settings, as well as turn on or off options such as microphone volume, password protection, and more.

However, thanks to the plug&play technology, most webcams can work without manual installation drivers. After physical Windows connections recognizes and adjusts them automatically.
Programs for working with webcams
If the webcam control program is not included in the package, you can install it separately. There are many applications for Windows 7 that allow you to adjust the camera thinner than the standard ones. And their additional functions make video chat more fun.
manycam

This program will not only improve the quality of the picture transmitted to the interlocutor, but also add a special charm to your appearance - cartoon eyes or mouth, glasses, mustaches, beard, horns, etc. Or change the background of the room, for example, to a seascape. The program is able to recognize movement, so all visual overlays will move with your face. In addition, ManyCam allows you to draw on the image directly online.
If you communicate in a video chat with several interlocutors, you can enable a separate window with different special effects for each.
ManyCam is fully compatible with Windows 7.
iSpy

iSpy is a video surveillance program with the function of transferring footage over the Internet. It allows you to partially replace the more expensive technology of IP video surveillance and can be used to protect premises and outdoor areas.
To work with iSpy, you can configure an unlimited number of webcams, including those connected to different computers one local network. The recorded material is saved in Flash format and transferred to the server for storage. The user can view both archives and real-time images at any time, as well as turn the cameras on or off remotely.


