The procedure for assembling a computer system unit from components. Self-assembly of a computer
More and more people are wondering every day how to assemble a computer from components from scratch. Assembling a computer on your own and with your own hands is a rather fascinating and informative process. Self-assembly and configuration of a computer costs an average of 30% cheaper than buying an already assembled, ready-to-use machine.
Some people mean a system unit by a computer, but I hasten to remind you that a system unit without a monitor, keyboard and mouse is useless. Only with these peripherals does it become a full-fledged functioning personal computer.
What do you need to assemble a computer?
To start the assembly, you need to pick up a new set of parts. Parts that were in use are undesirable to buy, since in the absence of experience in setting up a PC, difficulties may arise.
So what do you need to build a computer? The points:
- computer case,
- power unit,
- motherboard,
- CPU,
- RAM,
- graphics card,
- sound card,
- DVD drive,
- HDD,
- monitor,
- keyboard,
- computer mouse.
Which computer case to choose?
Choose a good computer case. It is necessary to pay attention to the fact that in stores there are cases made in China, which are made of very thin tin and are easily deformed under mechanical stress.
The computer case includes a power supply and network cable. Sometimes the case and power supply are sold separately.
How to choose a motherboard?
Motherboards come with integrated cards for processing video information and sound. These motherboards are easier to assemble and have average technical parameters.
If you need to equip your computer with more powerful means of playing sound and video information, then you need to use a motherboard that is equipped with slots for a video card and a sound card.
When choosing a motherboard, you need to determine the area of \u200b\u200bthe main use of the computer.
How to choose a video card?
It makes no sense to use an expensive video card to view news and video information on the Internet. But if you are a fan of computer games with cool video effects or plan to work in powerful programs video editors, then you cannot do without a good video card.
When choosing, always start from the purpose for which you purchase a video card. The power and price of the video card will depend on this.
Tell the seller in the store why you need a video card. He can help you choose the right model.
How to choose a sound card?
The question of how to choose the right sound card is quite extensive, so I will limit myself to basic theses.
Sound cards integrated into the motherboard basically have two channels. If you plan to listen to music through an amplifier or receiver, then buy a multi-channel sound card. There are those that support 5.1 and 7.1 sound systems when there are several speakers and a subwoofer in the system.
Sound cards can be internal, which plug into a slot on the motherboard, and external, which can be connected to a computer via a USB or Firewire connector. Although the latter are already more of a professional level of sound cards that are used by sound engineers, DJs and electronic musicians.
First of all, to answer the question of how to choose a sound card, ask yourself why you need a sound card in general, and then look for a model that meets your criteria.
How to choose RAM?
To buy the right RAM, you first need to decide on its volume. For a typical modern computer, 4 GB is enough. A gaming computer requires at least 8 GB.
It is also important to know the type of connectors random access memory on your motherboard. Recently, you can find, basically, only DDR3, but in general you can find the following types of connectors:
The type of RAM connector is usually indicated in the description motherboard. In any case, check with the store if they can exchange the memory you buy for another type of memory of the same capacity if you make a mistake with the choice of memory type.
RAM boards are sensitive to static charges, so it is not recommended to unpack them and keep them open until installation. Before installation, it is recommended to touch the metal case in order to remove a possible accumulated static charge on you.
HDD
The information that is on the hard drive also requires a certain amount of space. Depending on your goals, you may need additional memory.
A 500 GB hard drive is the best option for work. If you are going to play games or download Blu-ray movies to your hard drive, and there will be a lot of them, then you can safely take a hard drive from 1 terabyte. I prefer to take hard drives Seagate Barracuda.
DVD drives
DVD drives differ by manufacturer and price, otherwise they are standard. They are mainly needed to install programs and drivers for equipment on initial stage computer settings. Further, if you connect high-speed Internet, most likely you will rarely use the DVD drive.
How to choose a processor?
Processor power used to depend only on clock frequency. The higher the frequency, the more powerful the processor. But now such a factor as the number of processor cores has been added. The more powerful the processor, the faster the computer will run. The motherboard must support the platform or socket of the processor you have chosen. Therefore, it is better to choose them together and in advance.
The answer to the question of how to choose a processor depends, again, on what you are going to use the computer for.
Monitor, keyboard, mouse
I've had a Phillips widescreen monitor for a long time and it's been working successfully, wireless mouse Logitech MX Performance Mouse and the most common USB keyboard.
But the choice of these peripherals I leave it to your personal taste. The number of opinions and options here is huge. I recommend taking simple but reliable ones.
Assembling a computer with your own hands: How to assemble a computer yourself?
Important Tip:
It is not recommended to wear synthetic clothing, which condenses electrostatic charge, while assembling the computer yourself. Electrostatic voltage is detrimental to microcircuits. Therefore, cotton clothing should be used.
So, how to build a computer yourself? Assembling a PC begins with installing the processor and heatsink with a fan on the motherboard. The processor is installed in the socket and fixed with a lever. Thermal paste is evenly applied to the surface of the processor and the heat sink is fixed, as shown in the figure in the instructions. The cable connector from the fan must be connected to the power socket, which is located next to the processor panel.
You can immediately install a RAM card on the motherboard. It is necessary to be extremely careful and not to make great mechanical efforts so as not to damage neighboring elements fees. I already wrote detailed with pictures. Detailed description The processor installation guide is supplied with the motherboard.
The next stage of assembly is installation in a PC case hard drive and DVD drive. Then the motherboard is installed and fixed. Wires with connectors that come from the power supply must be connected to the corresponding sockets on the motherboard, DVD drive and hard drive. Then connect all the wires that come from the front panel of the computer case to the corresponding motherboard connectors, following the connection instructions.
Now you can proceed to install the operating system. After full customization software computer, you can close the case cover.
In general, assembling a computer with your own hands takes place in this order. The nuances of how to assemble a computer yourself are not intentionally described, since in each case they are different. Leave questions about assembling a computer in the comments.
Many people ask: how to assemble a computer? Most do not want assemble the system unit yourself. It is believed that this is a rather complicated procedure and it is not so easy to cope with the assembly yourself. Without assembly experience, this is of course not easy, but still possible.
What is the advantage self-assembly computer? Firstly, such a computer will cost less than bought in a store. Secondly, the system unit will be assembled according to your requirements, and during the assembly you will find out what the computer consists of, etc.
The first step is to determine the configuration of the future system block- home or office, gaming or just a multimedia center, or even some highly specialized computer. The choice of components for assembling a computer will also depend on the class of the computer.
Worker office computer does not need a gaming graphics card and huge amounts of RAM, but for gaming computer without a powerful video card and a large number RAM is indispensable. multimedia center needs a good hard drive with a large capacity, or even better if there are several of them, as well as a high-quality sound card and an average video card with connectivity HDMI TV cable.
In any case, it begins with the definition of tasks and goals that this computer will perform. After you have decided on the type of system unit, it's time to make a list of components for the system unit:
- CPU and cooler with heatsink
- Motherboard
- RAM
- video card
- HDD hard drive
- Frame
- Power Supply
- DVD drive
You probably already noticed that the list is not sound card, the fact is that modern motherboards are equipped with a built-in sound, network card and other modules. Which 10-15 years ago were separate devices. In the event that you need high quality sound, then you cannot do without a high-quality sound card. Especially if you need support for multi-channel audio.
Choose accessories, we recommend with processor, because for different types processors are only suitable for certain motherboards. The socket on the motherboard where the processor is installed is called a socket, so the choice of processor affects the choice of motherboard. In addition, be sure to check whether the selected motherboard supports this processor core.
Cooler with radiator is also selected according to the type of processor socket, taking into account the power consumption and the need for subsequent overclocking. If you do not plan to overclock, then the box-version will suffice. V otherwise, we recommend not to save on the cooler and choose with a copper core in the radiator and a fan with speed control.
planks random access memory you need to buy those that are supported by the motherboard and its maximum frequency. Those. if motherboard supports DDR3 memory with a maximum frequency of 2000 MHz, then it makes no sense to buy DDR3 memory sticks with a frequency of 2400 MHz, since they will still work at a maximum frequency of 2000 MHz.
Choosing video card, pay attention to the bit width of the video memory bus, the amount of built-in memory, and then to the frequencies of the video core and video memory. V modern computers. The video card is installed in a PCI-Express (PCIe) slot. On the this moment bus width is as follows:
- 32 and 64 bit - a video card for an office computer, similar to a built-in video card.
- 128 bit - a video card for a home system unit, but for modern games it is rather weak.
- 192 and 256 bit - a video card for a gaming computer.
- 384 and 512 bits - gaming graphics cards level GeForce GTX760 and ATI Radeon R9 290X, will allow you to play modern games without brakes.
Select frame computer needs to take into account the form factor of the motherboard and the size of its other components, such as a video card. There may well be such a situation that the video card will not corny fit inside, since modern gaming video cards are quite large. In addition, it is worth considering the number of installed in the future hard drives and DVD drives.
HDD or a hard drive should be chosen first of all in terms of reliability, durable operation and speed. If finances allow, buy SSD drive small volume for installing the operating system and the usual magnetic storage HDD for storing personal data: photos, videos, music, etc. Through the use of SSD drives, You will not only increase the speed of your computer several times and reduce the noise emitted during operation.
Select DVD drive it is better based on reliability, and purchase trusted manufacturers: LG, NEC, Samsung, etc.
Before the purchase power supply it is necessary to determine what maximum power the system unit will consume. The main consumers are the processor and video card of the computer. We recommend that after an approximate calculation of power, increase the obtained value by 20-30% so that the power supply does not work at peak loads. So you will significantly increase its service life.
That, perhaps, is all that you need to buy for self-assembly of a computer.
For the correct computer assembly You can use our service center ITcom in Kharkov. Our experts will not only help you choose compatible and reliable components, but also tell you where to buy them.
Many people want to build a gaming computer in 2017, while keeping within a small budget. But this is a very difficult matter, because the cost of computer components is increasing every year, as well as the requirements of games regarding PC performance. At the same time, I want to assemble such a computer, the filling of which will remain relevant for at least a few more years, because it is unprofitable to invest in its modernization every year, and not everyone can afford it. In our material, you will learn what details are most important in games and how to build an inexpensive gaming computer.
Assembling a gaming computer in 2019 do it yourself
CPU
The first step is to decide on the choice of processor - the most important element of the computer, which is responsible for everything computing processes. You have to choose between the products of two world famous brands Intel and AMD. It is recommended to find performance tests on the Internet and compare the results with each other. Best Choice in our opinion is the processor intel core i5 - its power is enough for any games and fast operation of the operating system.

The higher the generation of the processor, the better performance Please take this into account when choosing. To assemble a powerful budget gaming computer, you can use the i5 7500 - almost the top solution in the line, which does an excellent job with resource-intensive tasks. Of course, Intel core i7 processors will be better, but the performance gain in them is not as big as an overpayment. AMD Athlon II X4 640 will be an excellent solution for assembling a budget computer, although in terms of its capabilities it is inferior to solutions from Intel.
Choosing a motherboard
You need to find a motherboard that will support the format of the selected processor. When choosing it, you need to pay attention to the processor socket (for example, an LGA 1151 socket is required to connect an Intel i5). Also important is the standard of slots for RAM, their number and frequency. Additional connectors may also be present, which you should pay attention to in order to choose a motherboard with suitable functionality.

RAM
When assembling a gaming computer in 2017, the best solution would be DD4 RAM with a capacity of 8 or 16 GB. There is simply no need for a larger volume, and so everything will fly. But 4 GB will not be enough for modern games, especially since part of the memory is eaten up by the system. The amount of RAM you need to choose based on your budget - the more you put it in, the faster the games will load and the interface will work smoothly. But keep in mind that if in the future you have a desire to expand the volume, then you need to install a bar with a similar frequency and preferably from the same manufacturer, otherwise it may turn out to be incompatible. It is better to choose a memory with a maximum frequency, its performance largely depends on this. When deciding how to assemble an inexpensive gaming computer in 2017, you need to make sure that the selected RAM standard is supported motherboard.

Please note that if you set the RAM bar to more than 3 GB, then operating system must have a 64-bit architecture. Otherwise, no matter how much memory you install, no more than three will be available.
The video card is the most important part when assembling a gaming computer.
The question of how to assemble a good gaming computer is impossible to imagine without choosing a video card that is responsible for processing graphics in games. The graphics card and processor are the most expensive parts that affect gaming performance the most. When choosing, it is better to read reviews, as manufacturers offer a huge variety of models that vary greatly in their capabilities. For a budget PC, an Nvidia Geforce 1050 Ti with 4 GB of memory will suffice. But lately, everything is not so simple with video cards - miners are buying them up, and if they manage to be found on sale, then it costs much more than it should. This applies to the entire video card market. If you have a large budget, then you should pay attention to Nvidia Geforce 1060, 1070 and 1080 cards - the top solutions for today, by purchasing which you will get maximum performance.

When deciding how to assemble a gaming computer yourself, you can also pay attention to cheaper solutions from ATI or Nvidia. When choosing, consider the connector to which the video card is connected. DDR5 is in the lead - this is the latest format, which is equipped with almost all motherboards. Therefore, it is better to opt for it, DDR3 will become less and less popular over time, until it completely dies out. And remember that a bigger model number doesn't always mean it's better. You need to look at reviews and comparison of performance tests on special sites.
Drive selection
The best option today is to use an SSD drive paired with a standard one. The system is installed on the first one, which gives a noticeable performance boost. But due to the high cost, it will not be profitable to buy a large SSD, which means that over time you will no longer be able to store all the files on it.

This is where a standard hard drive saves, which is much cheaper. So, for 3000-4000 rubles you can buy a 1 TB hard drive, while for the same amount you can find a maximum 128 GB SSD. Again, when deciding how to assemble a good gaming computer inexpensively in 2017, you should read reviews and pay attention to such a characteristic as rotation speed. It must be at least 7200 rpm. The speed of writing and reading data depends on this parameter. Fast storage speeds games up and reduces installation time.
Power Supply
Thinking about how to assemble a 2017 gaming computer yourself, you need to calculate the required power of the power supply. To do this, you need to look in the characteristics of how much energy each part of the computer consumes, add up the amount and add about 20% just in case. Most PSUs come with 20 or 24 pin connectors, make sure they are compatible with your motherboard. Do not take the power supply bundled with the case. As a rule, it is not of high quality. A gaming PC will require a variant with at least 500W of power.
Frame
The case should not only be beautiful, but also contain all the connectors you need to use. Particular attention should be paid to cooling, because even on the most powerful hardware, games will slow down if it overheats. Some cases have 80mm fans, others 120mm. The top solution is a liquid cooling system, but it is unreasonably expensive, so it is better to opt for a case with 3-4 powerful coolers. The more powerful the filling, the more efficient the cooling system should be.
It is worth noting the following point. Budget motherboards are equipped with a 4-pin CPU power connector. So with our hands we divide the existing 8-pin cable into two 4-pin ones and connect to the board. Expensive motherboards, on the contrary, in addition to the 8-pin connector, are equipped with an additional connector. The trick is that in this case everything will work from one 8-pin wire. An additional port is needed if, for example, you will overclock very seriously CPU. But then you will also need an accompanying power supply, or an adapter.
Step #5: Install Drives and Optical Drive
For a desktop PC, there are two most common drive form factors: 2.5-inch and 3.5-inch. Plus, M.2 SSDs are gaining popularity. As for the latter, everything is simple with this form factor: the device is installed directly into the port soldered on the motherboard. But 2.5- and 3.5-inch drives must first be fixed in the case.
In 99% of cases, the case is equipped with a special basket with skids. The manufacturer also indicates in the characteristics the number of slots for 2.5- and 3.5-inch drives, as well as 5.25-inch devices. In the case of the Fractal Design Define R5, two metal baskets are used. The first (top) can accommodate five 3.5-inch or as many 2.5-inch drives. The second (lower) - three. In some cases, these baskets may be removable. Plus, this case specifically has two seats for 2.5-inch drives behind the chassis.
Not all computer cases optionally support the installation of 2.5-inch drives. True, many SSD manufacturers complete their products with special adapters for 3.5-inch sleds. Usually they are packed in cardboard boxes, but not sealed in a blister.
Before we start building the computer ourselves, let's take a look at the figure below. It presents all the main components from which the computer will be assembled with your own hands (our hands) :)
Clicking on an image will open it in modal window in improved quality.
Let's briefly go through the individual components of our "experimental" so that assembling a computer with our own hands seems to us more holistically. From the link below, open a new window with the top image that will have numbers (from 1 to 10) on it, and on this page below we will give short description each of the components.
- At number "1" we have -
- number "2" - standard PCI Express
- "3" - cooling system (aluminum radiator and cooler for heat dissipation)
- "4" - itself under the socket (connector) LGA 775
- "5" - two DDR2 modules
- "6" - IDE cable (for connecting or old standard CD-DVD)
- "7" - DVD-ROM
- "8" - computer
- "9" - hard drive (hard drive) SATA standard
- "10" - cable (for connecting a hard drive or CD-DVD SATA standard)
- "11" - floppy disk (disk drive) and its data cable
Naturally, all this "economy" must be packed somewhere. For this we need a good one.
Assembling a computer with our own hands takes place in the following sequence: first we install (actually screw) the motherboard into our case, install the processor and its cooling system into it, and then we connect and fix the rest of the necessary elements to this "foundation".
Another link, which in a separate window schematically shows in what sequence the computer should be assembled.
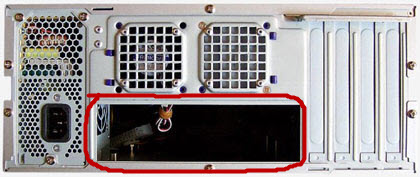
So, at the initial stage of self-assembly of the computer, we need to install the motherboard in the case. With regards to it, there may be such recommendations: the case must be spacious enough so that we can easily install all the components we need into it.
The board is attached to it with screws, which are screwed into special mounting sleeves (metal hexagons). They come with the body.

The bushings are screwed into special holes on the rear wall of the computer (on the inside of its right side wall), the motherboard is placed on top of them and attracted with screws.
Hexagons are needed in order to form a gap between the board itself and the metal surface of the system unit (to exclude the possibility of electrical contact between the soldering of elements from the rear surface of the board and the case). Such a contact may well cause a short circuit () and disable its electronics. The more bushings you manage to use, the more secure the fixation will be (look at the number of mounting holes on the case and the board itself).

Tip 1: remember, mounting sleeves for the motherboard must go complete with computer case . If you buy a case, then only with them. This is important because these fasteners are different in height and differ in the width of the thread at the base. With others, you simply won't be able to set the fee!
Tip 2: If you plan to change the motherboard (buy it from your hands or in a store), then be sure to make sure it comes with a panel with holes for connectors? When assembling a computer with your own hands, the socket will need to be installed on the back wall of the system unit. Pay attention to the photo below:
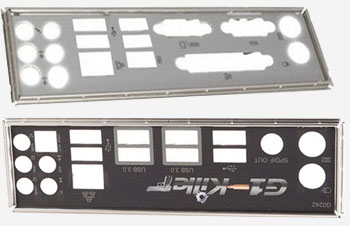
Note that the location of the holes for the connectors for each batch of boards is different, and if you are not sold a panel that matches the motherboard right away, then later it will be very difficult to get it separately.
The panel is installed in a specially designated place for it. It needs to be done before placing the motherboard in the case.
Correctly orient it in relation to the main connectors and install it with a noticeable pressure with your fingers. The plug should "sit down" tightly and lock with a characteristic click.
Below you can watch a video that clearly demonstrates the whole process:
We continue to assemble the computer with our own hands. After we have fixed the motherboard in the case, we need to install the central processor in the slot (socket) of the board. Let's look at the figure below and comment on some points.

The installation procedure in the slot is as follows: press down and bend the clamping latch to the side (indicated in the photo above at number 2). To do this: we click it out from under a special hook (number 1 in the photo), raise the metal frame (number 3), which fixes the processor in the socket. After that, we just have to install the CPU itself (indicated by the number 4).
Attention! Take a good look at the processor and determine on which side it has a "key" (a corner specially cut off on one side or two small indentations on the sides). The socket has the same corner or protrusions in the appropriate places. When installing the processor in the socket, they must be combined with each other.
When the installation is completed, we repeat all the steps in the reverse order: put the fixing cover (No. 3) on the processor, lower (already with a certain force) the clamping metal rod (No. 2), slightly move it to the side at the bottom point and thread it under a special hook on the side No. 1.
To learn how to install an old PGA processor (believe me, you need to know this), see the video below:
In the process of self-assembling a computer, we need to be able to install a cooling system (radiator with a fan). It should be noted that now we are installing a cooling system for a product from Intel, in the case of AMD it looks a little different.
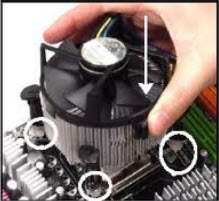
In theory, it looks like this: at the four corners of the processor slot there are special holes in the motherboard, it is through them that the entire air cooling system is attached.
Accordingly, there are four special plastic clips on the heatsink, which, when pressed, press the heatsink against the processor and, along the way, fix the entire structure on the motherboard.
Here is a close-up of the cooling system for our processor we just installed:

And this is one of his latches on the board close-up and we snap it.
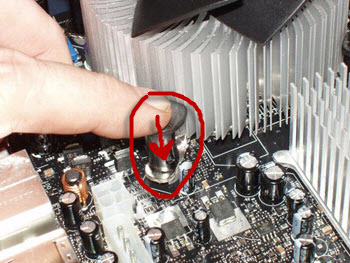
Pay attention to the photo below:

See the slits (grooves) on each of the four plastic tabs? The position when the recesses are perpendicular to the radiator fins correspond to closed state latches-latch (in the photo above, all latches are closed). It is in this position that all of them should be before installation on the board! Remember this!
The arrows indicate the direction in which you need to turn (you can do this with a screwdriver) the latch in order to move it to the open position.
Advice: After placing the radiator clamps strictly above the holes around the mounting slot (you need to make sure that the plastic tips of the fasteners "fall through" a little in them), you need to simultaneously smoothly but strongly press on two clamps located diagonally from each other (until they click and securely fix them in the board ). Then we carry out the same procedure for the two remaining clamps. Everything! The cooling system is installed!
It is much easier to show the whole process once in a short video than to describe it in words, so watch the video below:
If it becomes necessary to remove the cooling system, then simply move all four latches to the "open" position and pull the structure towards you (it can be removed quite easily).
Advice: some people find it more convenient to install a computer cooling system before that how the motherboard will be fixed in the case. So it is possible to clearly see what and where it snaps into place, and to measure the force of the applied force for reliable fixation of the elements.
The design for attaching the cooling system to AMD processors is somewhat different from what we can observe in products from Intel. It consists of two constituent parts: a plastic base frame, securely fixed around the processor socket, and a heatsink with a fan, which are attached (snapped) to this frame. Here, for example, how it looks for an AM3 processor socket:

As you can see, with this approach, the down pressure force from the radiator is first transferred directly to the plastic base (frame) and only then is evenly distributed over the textolite of the motherboard itself.
By the way, when removing cooling systems from motherboards under the control of Intel processors, quite often one has to observe how the base of the motherboard itself (textolite) has a visually noticeable curvature (due to constant pressure on it from the radiator of the cooling system), which is attached directly to the board itself . This is bad and can potentially lead to micro-cracks in the very core of the motherboard.
Do-it-yourself computer assembly, in particular, installing a processor and motherboard is often associated with installing third-party cooling systems on the processor, which can weigh half a kilogram or even more! In this regard, in order to prevent deflection of the motherboard at the attachment point, they come with a special metal cross, which is located on the back side of the board (under the processor).
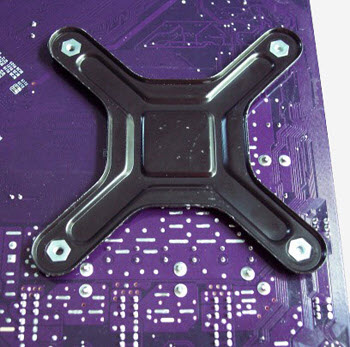
This additional mount is called the word "backplate" (Backplate) and it serves, as we have already said, to remove unnecessary physical stress from the motherboard. The only caveat of this design is that it must be installed before fixing the board in the computer case.
Don't forget it's right installed system cooling avoids in the future!
When assembling a computer on our own, we need to remember to do one more thing: a small (3 or 4-pin) wiring comes from the cooling fan, which supplies power from the motherboard to the fan so that it spins and dissipates heat. We need to find the appropriate connector on the board (usually 3-4 pins next to the processor socket) next to which there is an inscription “CPU_FAN” and connect our power cord to it.
Most important components and cooling system installed. Now we need to install all the remaining devices. And since assembling a computer with your own hands is a rather responsible and painstaking task, then, for the general readability of the text, let's continue our description on the next page.
In conclusion (for better consolidation of the material), you can watch a video on how to install a processor and a cooling system on products from Intel: