Installing a clean version of Windows 10. What is the “Start over” function
New "OS" under named Windows 10, as you know, is available on the official Microsoft resource as an updater existing system up to the tenth version. But the so-called “clean” installation with initial formatting of the partitions is not provided at all. In other words, you can’t just install “ten” on a computer or laptop. Let's see what it is clean install Windows 10 after updating, since upgrading the system is the main condition from scratch.
Windows 10 installation options
Before proceeding with the technical issue of installing this OS, you should consider installation options. In this case, it is believed that the “ten” can be set after Windows updates versions 7 and 8 (this refers to update packages for the systems themselves), you can install the “ten” again after the old system has been updated to version 10 directly on a running system, or you can re-install from scratch if for some reason For some reason, Windows 10 does not load due to an incorrect installation process.
Now we will consider the second two options, since the installation of the “tens” does not present any particular difficulties. It is important to remember that in any case you will need a flash drive or disk with the recorded distribution!
Why you may need to reinstall Windows 10
Many users may have a logical question: why reinstall Ten if it already works? The fact is that with a regular update, Windows 10 inherits all the shortcomings of the previous system and does not correct errors system registry, does not remove computer junk, many programs. For example, programs or device drivers installed for the G8 simply refuse to work, etc.

There are a lot of reasons why the user is not satisfied with installing Windows 10 after updating (update) the “seven” and “eight”. In the sense of installing a clean system from scratch, Windows 10 itself looks more preferable, however, like any newly installed system. It is clear that immediately after installation, complete order reigns in the system, and it, as they say, “flies”. Freezing and braking begin much later, after the OS gets dirty unnecessary programs, often working in background, incorrect removal of them, when a lot of garbage remains, when a huge number of duplicate files appear on the hard drive, etc.
Clean installation of Windows 10 after update: return to original state
So, first, let’s consider the option when the “ten” has already replaced the old system, borrowing all the parameters and settings from it. First we need to use the computer reset tool.
This can be done in the simplest way in a directly functioning OS. To do this, use the settings section located in the Start menu, where in the update and security section, select the recovery option (on the left in the panel). On the left of the screen there is a line for the terminal to return to the initial state, and below it is the “Start” button, which you need to use.

Next, if we are wondering how to perform a clean installation of Windows 10, note that it is clean, in the next window you need to select complete removal everything that is on the hard drive, but if desired, some important information can be saved (selecting the first row). However, in this case we will assume that we do not need either files or programs.
A list of programs to be cleaned now appears. Click the “Next” button, and in the new window - the “Reset” button. This is followed by a reboot of the computer terminal or laptop, and then the so-called clean installation of Windows 10 after the update is automatically activated. But it’s too early to rejoice. It also happens that problems may arise with the return (more on this a little later), and the question of how to activate Windows 10 after a clean installation deserves special attention. This stage must be approached with particular responsibility.
Activation after update
Once the installation process is complete, you will need to log in to your account (this is natural). Next, call up the computer properties menu (icon on the “Desktop”) and look at the description. As you can see, the product is not activated. So a logical question arises: how to activate Windows 10 after a clean installation? But after the update, the system wrote that everything was in order with activation.

That is why, before re-installing the system, you should first download a small utility called ProduKey (before you have returned to its original state yet). When launched, it will show all Microsoft keys, including the Windows activator. It needs to be written down.
Using the old key
Now in a clean system, in the details window, look for the activation line, and then click the button to change the product key.

Enter your key and confirm activation. But not everything is so simple when you need to solve the problem 10 after the update, if the above method did not work and errors occurred.
If Windows 10 won't boot
As is already clear, in some cases the system may issue a warning that some problems have arisen. How to perform a clean installation of Windows 10 in this case?
First, we boot from a disk or flash drive containing the distribution recorded from the image. At the first stage, as usual, a window for setting up primary parameters appears (language, date format, money, keyboard layout), after which we proceed directly to the installation, but only here we select system recovery.

Next, select diagnostics from the suggested actions. Then - returning the computer to its original state, and then - deleting everything that is there. Ultimately, the OS selection window will appear, where Windows 10 will be listed.
In the next step, it is best to select the line to clean only the disk on which the system is installed, and then use simple deletion of files. Now we confirm the start of the return process.

After rebooting (possibly several times), when the recovery process is complete, you will be shown a welcome message and then prompted to enter your product key. There is one point here. The fact is that the product key, according to Microsoft, is sent to the user who has an “account” who downloaded the system image from the official website. You can also enter it (if available). In this case, the request to enter the key will appear twice. But, in principle, this action can be skipped (postponed) and the method described above can be used to completely installed system. Next, you should agree to the legal issues and use standard settings for installation and configuration. If necessary, to log into the system you need to enter your username and password that were registered with Microsoft.
Instead of an afterword
We can only hope that now it will become clear to many what a clean installation of Windows 10 is like after the update. If you look at it, there is nothing particularly complicated here. True, problems may arise with activation keys, but you can either obtain them officially from Microsoft, as the developers themselves state, or use many keys from World Wide Web, but no one can guarantee the functionality of such a password. So it’s better to use the official code, especially since it is “linked” not only to the user account, but also to the ID of the computer or laptop. And in the world, if anyone doesn’t know, two identical identifiers (ID) do not exist at all.
Function " Start again" - one of the significant features of the standard application "Windows Defender Security Center", which appeared on board Windows 10 Creators Update.
This application contains functions that directly or indirectly relate to Windows security, as well as decisive issues with its performance. The latter includes the “Start over” function. This feature offers effective method decisions of all possible problems as a simplified procedure Windows reinstallation while saving some parameters and data.
The "Start over" function is a better alternative to the computer reset mechanism present on board Windows yet from version 8.
While the latter suggests reinstalling the system using the original distribution, the “Start Again” function will both reinstall and update Windows to the latest build. This function, in fact, is a built-in system mechanism for reinstalling Windows using the Refresh Windows utility.
Let us recall that this mechanism appeared along with the Windows 10 Anniversary Update as a solution to the issue of automatic activation of the system when it is reinstalled on OEM devices.
Since the release of the Anniversary Update, this mechanism has evolved: as part of the Creators Update, it can already be transferred to a reinstalled Windows settings region, time zone, security settings, privacy, and even user accounts with their themes.
But some nuances have remained unchanged: during the simplified reinstallation of Windows, you will have to say goodbye to installed universal applications and desktop programs.
The key features of this simplified method of reinstalling the system are:
No need to create installation media;
There is no need to enter the BIOS to change the boot priority, moreover, to even know how to do it;
Automatic Windows activation;
Saving the computer name, user accounts, their data in user profile folders, and individual system parameters;
Installing the system from the latest distribution with all integrated updates.
How do I use the Start Over feature?
Open the Windows Defender Security Center application using the Start menu or system search engine.

Go to the “Device Performance” section of the application and in the “Start over” column, click “Additional information”.

Click the “Get Started” button (administrator rights are required).


Those who have updated the previous build or version of the system to the current Windows 10 should stop at this stage and do not exclude the possibility of rolling back to them in the future. After reinstalling the system, rolling back to the previous build or version of Windows will not be possible, and if you decide to retain the rollback option, before clicking “Next” again, you need to create backup copy system using a third-party program, such as AOMEI Backupper.

We start the reinstallation.

Preparatory work will be carried out, the computer will reboot, and the system reinstallation process will be complete blue screen showing progress as a percentage.

There is no need to set up the system or create an account. As mentioned, the region, time zone, security and privacy settings that you need to pay attention to during a normal Windows installation will be carried over during a simplified reinstallation with Start Again. old system. How will user accounts be transferred? The reinstallation process will be interrupted unless you enter the password for password-protected accounts.

As a result, we will see the desktop of the reinstalled system and an HTML file located on it with a list of deleted desktop programs.
To download and install November 12, 2019. If you want to avoid potential problems, then it is best to perform a clean installation of the system.
Although updating using Windows Update is the most in a simple way to install version 1909, there is a possibility that you will encounter problems and errors that are a consequence of software and driver incompatibility, configuration problems, etc. A clean installation of the system minimizes the risk of encountering problems, because in this case all data on the hard drive is deleted and a new copy of Windows 10 November 2019 Update is installed.
Additionally, if you've been using the same installation for a long time, then a clean install of Windows 10 can improve performance, boot times, memory consumption, and fix many existing issues.

How to clean install Windows 10 (version 1909)
Once you've created a bootable USB drive, you can proceed with a clean install of Windows 10:
- Insert your Windows 10 boot drive and start your PC.
- Press any key to begin the installation process.
- Click "Next".

- Click the “Install” button.

- On the Windows Activation screen, click the “I don't have a product key” link if you're reinstalling (Windows 10 will automatically reactivate after installation).

- Select the operating system you want to install and click “Next”.

- Check the “I accept the license terms” checkbox after reading the license agreement. and click the “Next” button.

- Select the installation type “Custom: Windows installation only (advanced users)”.

- On the "Where do you want to install Windows?" screen. Select the partition on your hard drive or SSD where you want to install Windows 10 and click the “Remove” button. Typically installation is performed on “Disk 0”.

- Select "Unallocated space on disk 0" to install Windows 10 and click the "Next" button.

- Wait until Windows 10 installation finishes. The computer will restart several times.

- Select your region on the first page of the wizard preset after completing the installation procedure and click “Yes”.

- Select your keyboard layout and click “Yes”.

- If you do not need to configure the second layout, click the “Skip” button.

- If your device uses a wired Ethernet connection, then your computer will connect to the network automatically. If you are using wireless connection, then you will have to configure it manually by specifying the Wi-Fi network details.
- On the “Select a setup method” screen, select the “Set up for personal use” option and click the “Next” button.

- Enter email/ account phone Microsoft records or Skype account. You can also select "Offline account" if you don't want to create a Microsoft account.

Many experienced computer users believe that for better performance and better performance, the operating system needs to be cleaned up periodically. It is clear that such users would prefer to install “zero” ten rather than install it on top of the old operating system. Let us leave aside discussions about how correct this opinion is and to what extent it is justified to spend time on clean installation of Windows 10 from the official Microsoft website instead of simply setting the “ten” on top of the “seven” or “eight” - after all, as they say, there are so many people, so many opinions. There is no single correct answer, so everyone does what they think is right. And if someone foams at the mouth to prove that it is right or wrong, then, in my opinion, this does not mean that this person is right. If it seems to you that a blank image installed on a formatted HDD works faster and more stable, then why look for other ways. Let me add that I myself think so. I don’t have logical evidence of the benefits of a clean installation of Windows 10, like many other Windows OS users - only many years of experience, intuition and subjective feeling.
So, what should you do if you don’t want to upgrade your Windows 7 or 8.1 to Windows 10, but want to clean and format your hard drive and then install a clean Windows 10 on it?
To ensure that all users can safely install Windows 10 completely, Microsoft has created a tool that allows you to burn an image operating system on DVD disc or USB drive. Download this free program may with official website companies.
But be careful! If on this page you select the blue “Update now” button at the top, then a program for updating Windows 7 or 8.1 to Windows 10 will be downloaded to your computer. download a program for recording a clean image of “tens” you will have to go down and select the blue button “ Download the tool now ».
The MediaCreatorTool.exe file will load. After downloading is complete, you need to launch it like any other program and select “ Create installation media for another computer." We choose it even if we need to completely install Windows 10 on the same computer. IN otherwise, if you select “Update this computer now,” the new OS will be written over the old one, and not completely. (In general, it would be more logical to name these items “Update the operating system” and “Create an image of Windows 10”, but here, apparently, as often happens with software, incorrect literal translation from English into Russian).

At one time, when launching the MediaCreationTool utility, it was observed error 80072f76 0x20017. It was associated with “jambs” exclusively on the Microsoft side and arose everywhere around the world from September to December 2017. On this moment the problem is solved, but in such cases for downloading Windows image 10 from the official website you can use the “crutch”. You can download the top ten directly by replacing the user agent in your browser with Apple Safari. Everything is simple there: press F12 in the Edge browser - then go to the “Emulation” tab - change the user agent line to “Apple Safari (iPad)” - download necessary images With Microsoft official website(described in more detail here in English). If access to Edge browser you don’t have it due to the lack of Windows 10 anywhere and you decide to trust me (by the way, completely in vain - because you can’t trust anyone on the Internet), then here I have links to ISO files V cloud storage Mega with the latest versions of Windows 10 as of December 2017: 32 bit and 64 bit. I will say right away that downloading from there will most likely be slow. It’s faster to use the method with the official website and changing the agent in the browser. After downloading ISO image with Windows 10, using any of the described methods, you need to create a bootable USB flash drive from this installation image. This can be done using the utility Rufus.
The Windows 10 clean image burning program provides the ability to create it both on a USB drive and on a DVD.
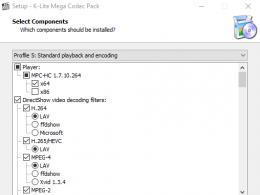
But first, you need to select some parameters for the image of the Windows 10 operating system to be created (this must be done if the default settings do not suit you, since you are going to install a clean image of Windows 10 on another computer).

The first is the edition (Windows 10 Home or Windows 10 Professional) and then the architecture (32-bit, 64-bit, or both). Regarding the release, I’ll say this: choose Windows 10 Home if you don’t understand what the difference is.
As for the 32- or 64-bit version, then you need to know the bit capacity of the computer you want to use. install a clean image of Windows 10. How to determine this, read the article "". If you need a disk from which you can install different versions of Windows 10 on several computers at once, then feel free to select the “Both” option. If there is no need for both images, then you should not choose the double option, since the weight installation disk will increase exactly twice and will be about 8 GB instead of 4 GB.

After all the necessary parameters are set, you need to select which media you want burn a clean image of Windows 10. If it is a USB drive (flash drive), then the image will be written directly to it.

If you select a DVD disc, the program will first ask you to select a location to save the program on your computer or laptop - for convenience, you can place it directly on your desktop. Only then can you burn the created image of clean Windows 10 to a DVD. One of the ways to do this is discussed in detail in my article “ How to burn an image to a DVD in Windows 10».

Installing a clean image of Windows 10
I don’t see any point in considering how exactly you can install clean Windows 10 on your computer. If you are at all wondering about a clean installation of Windows 10, then you obviously know how this process occurs when installing Windows 7 or 8. With version 10 of Windows, nothing new has appeared in this process. As for choosing individual parameters, I personally prefer to install “top ten” with the default settings, and only then, if necessary, change something on a running operating system.
Based on comments and personal messages, I realized that many people still have questions about installing Windows 10. Wrote a very detailed article "".
I foresee a question about Windows activation 10. Advertise pirate methods I won’t - if you want, you can easily find a great variety of them. I assume that you are planning to install a clean Windows 10, already having a license for it. If the licensed “ten” was installed on the computer at least once, then the key is already linked to it and after a clean installation of the operating system it will be activated automatically. If you do not have a license and you (quite rightly) do not want to use pirated activation methods, then I advise you to read my article “ How to get a licensed version of Windows 10 for free and legally after July 2016».

P.S.: Just in case, I’ll add that to find the item activation in the parameters you can use the search (magnifying glass on the control panel). When you start typing the words “Activation...” in the search bar, you will see the item “Activation. System parameters". This is what you need to launch by simply pressing Enter.
Over time, the computer's operating system becomes clogged, no matter how you protect it. Critical errors and decreased performance cannot be avoided, but there is a way to quickly return to a fresh Windows. This is the so-called clean installation.
What is a clean installation of Windows 10 and why is it needed?
There are two methods for installing an operating system: over the old one or on an empty disk. A clean install is an install latest version systems on a completely or partially empty hard or SSD drive.
Disk wipe ensures that problems existing in the current operating system are not carried over into the new build. During a clean installation, programs, games, services and files on the PC are deleted, providing the user with an uncluttered Windows with factory settings and standard applications Microsoft. If you install new Windows
over the old one when updating, your files will be saved, but there is a chance that some of them will break or slow down the system. This is why a clean installation is preferable. With clean Windows installationit is indeed possible to “start all over again”: the parameters and settings of the old system will no longer be taken into account, which will help resolve problems that previously arose in it Please note that licensed programs will lose their license because after installation new system
there will be no connection with the old one. Therefore, applications will not be able to determine that they were purchased for that specific computer. Only perform a clean install if you are sure there is a way to restore your license. For example, many programs are not tied to a specific system via a key, but to an account, so to confirm their license it is enough to log into your account.
A clean install can be useful in two cases:
How to clean install Windows 10 There are three methods to perform a clean installation: by creating an image on third-party media, using Windows features and through official program
Microsoft. The first method is suitable for those who want to switch from an old operating system to Windows 10 or want to redistribute hard or SSD disk space between its partitions. The other two methods are relevant for those who are already using Windows 10 and want to perform a quick reinstallation with or without saving some data.
Whichever method you choose to cleanly install Windows 10, make sure to back up all your important data in advance: copy it to a third-party storage device or place it on cloud servers.
Creating an image
- Since all versions of Windows except version 10 do not have a built-in format tool, download and open the free HP USB Disk Storage Format Tool. Select your flash drive in it, set the format to FAT32 and start the formatting procedure. Please note that this will delete all data from the media.
 Set the format to FAT32 and run formatting in the HP USB Disk Storage Format Tool to completely erase the media
 - If you are using Windows 10, you can click on the flash drive icon in File Explorer right click mouse and select the “Format” function. Then specify the FAT32 format and run the procedure.
 For Windows user 10 formatting of a flash drive is done through it context menu in Explorer
 - After completing the formatting process of the flash drive, go to the official Windows download site. Download installation file and expand it. The program itself will weigh a little, but it will boot a system of approximately 3 GB in size.
 Download from the official website Windows installer 10 to continue the clean install process
 - After launching the installer, specify the flash drive on which the image will be written, as well as the bit depth and language of the system. If your flash drive meets all the parameters and has been correctly formatted, the system image will begin loading. The duration of the procedure can exceed several hours, its speed depends on the quality of the Internet connection.
 Select "USB Device" in Windows 10 Setup to start the image burning process
 - When the image is recorded, the program will notify you about it. Without removing the flash drive, turn off the computer and start it again. As soon as the first commands appear on the screen, press the Delete or F12 key several times to get into the BIOS. Please note that sometimes other buttons may be used for this: when you launch, a footnote should appear at the bottom of the screen explaining what you need to press in your case.
 To get into the BIOS, look closely at the startup screen to see which button you need to press
 - Once in the main BIOS menu, go to “Download” ( Boot Menu). Remember: the names of the items are different in different versions, so your main task is to find the section responsible for the loading order. In the first place, you need to install a flash drive, replacing the hard or SSD drive with it. If you have a newer BIOS version- UEFI, you need to set the version of the flash drive name that begins with the abbreviation UEFI.
 On the list BIOS boot you need to install the flash drive in the first place
 - After completing the settings, save your changes and exit the BIOS. If all the above steps are completed correctly, the system installation window will open. Give consent to begin the procedure, accept license agreement, specify the system parameters that suit you.
 Confirm Windows Setup to start the process
 - When choosing an installation method, select the option that allows you to work with the disk. Do not select the update method as it will not allow a clean installation.
 Proceed to custom installation to continue
 - Proceed to working with disks: select the partition assigned to the system and format it using the corresponding button. Repeat the same step for all other partitions to free the disk from debris. When you finish the cleanup procedure, select the partition to install the system and start the process.
 Format all partitions to complete system installation
Further steps practically do not require your intervention: it will happen automatic download everyone Windows components 10, you will be asked to install initial settings and create account. By setting the necessary parameters, you will get a clean system.
Video: how to clean install Windows 10 using a bootable USB flash drive
Installation using Windows system function
Windows 10 has a built-in feature that allows you to automatic mode Erase the existing system and install a clean Windows 10 instead. As a result of this process, your folders, files and settings will not be deleted. To use this feature, follow these steps:
- Go to system settings and open the “Update and Security” section.
 Open the Update & Security section in Windows Settings to perform a clean installation of the system
 - In the "Recovery" section, click on the blue link asking you to learn about a clean installation of Windows.
 Click the "Learn how to start over with a clean installation of Windows" button to proceed with the installation
 - Click "Get Started" to start the process.
 By clicking on the “Get Started” line, you will start the clean installation process
 - Next, agree to the terms, and also confirm the removal of all third-party programs and the start of the operation.
 After reviewing the list of programs to be removed, confirm the action using the “Next” button
 - A gradual recovery will begin, which can last more than an hour. Do not interrupt it under any circumstances, as this will lead to serious problems.
 Be sure to wait for the clean installation to complete
After the procedure is completed, you will receive a partially clean Windows: settings and files will be saved, but programs will be useless system elements will be deleted. A file with a list will appear on the desktop remote applications. Some drivers may stop working or be removed, so you will have to download and install them yourself.
For a month after a clean installation, an image of the erased system will be stored in the computer’s memory, which means you will have a chance to use it and return to the deleted version of Windows.
 If you are sure that you will not do this, manually delete the file, as it takes up a decent amount of memory. It will be saved in the computer memory remote Windows
 , so you can return to it if you want
Installation via the official Microsoft utility
- This method is similar to the previous one, since the same clean installation is performed. However there are two differences: used additional program
- from Microsoft; you have a choice whether to keep personal files or not (but all third party applications
will still be deleted).

Follow these steps:
What is a clean boot on Windows 10 and how to do it Clean boot - view Windows startup , in which not all drivers and third-party applications are loaded with the system. The list of downloaded elements includes only those services that belong to the system itself and are personally selected by the user. This method download is used for analysis, launching only some programs and drivers.
This way you can find out which service is causing the error when starting. Let's say the system is not working correctly, but you don't know exactly what program or driver is causing it. In this case, you perform a clean boot several times, starting different services one by one, until you find the right combination running programs
, at which the system begins to fail. Once you figure this out, you can eliminate the cause of the problem by removing the conflicting item. The system also has a method secure boot
, similar to a clean boot, but with a distinctive feature: it does not start all system services, but only those that are vital to Windows. It is worth using if you do not know what the problem is: in system or third-party applications.
How to Clean Boot Windows 10
- To perform a clean boot, follow these steps: Press the Win+R key combination to open the Run window. Write it down msconfig command
 Run the msconfig command which will open the system configuration
 - On the "General" tab, check the box next to the "Diagnostic run" option. It ensures that only system services are running.
 Check the diagnostic startup type, which will start basic services and drivers
 - On the Services tab, enable hiding system services and click Disable All. This will shut down all services running by third-party programs.
- Open the task manager through the startup list for further actions
 Remove all programs from startup, otherwise they will automatically start with all their processes the next time the system starts.
On the Startup tab, disable programs that start automatically After restarting the computer, the system will boot “clean”; there should be no conflicts. If they exist, then the reason must be sought in system processes
, and not in third-party programs. If performing a clean boot gave the expected result, conflicts disappeared, and the system began to work stably, then you need to take the next step: run all programs one by one, repeating this until you find a conflicting application. When it is found, it will have to be removed or replaced more stable version
, if it exists.
Video: How to clean boot Windows 10
How to disable Clean Boot Mode Once the problem is successfully resolved, you can return to the normal boot method. To do this, follow all the steps described in paragraph “How to perform a clean loading Windows
 10”, while setting the parameters that were originally: specify the startup type “Normal startup” and return all the programs you need to autorun.
 To return to normal boot mode, set the startup type to "Normal" in the system configuration
AnVir Task Manager - Addition to Clean Boot Windows The above method may not meet all your needs due to the lack of more fine tuning . Therefore, it is worth using the program AnVir Task Manager, which helps manage system processes. By installing it, you will have access to more
customizable parameters. If you want to perform a clean boot using this program, follow the steps:AnVir Task Manager is an excellent addition to the clean boot process and allows you to disable all unnecessary system processes
There is a fundamental difference between a clean install and a clean boot. As a result of the first method, you will get an unclogged Windows 10, since everything third party programs and the drivers will be removed. In the second case Windows system will be “naked”, and you will not have to delete all applications, because it will be possible to find the conflicting program and erase only that one.